
chandra.romel@LIGO.ORG - posted 06:47, Friday 16 November 2018 (45331)
EY pressure
End-Y is pumping down nicely.
Images attached to this report
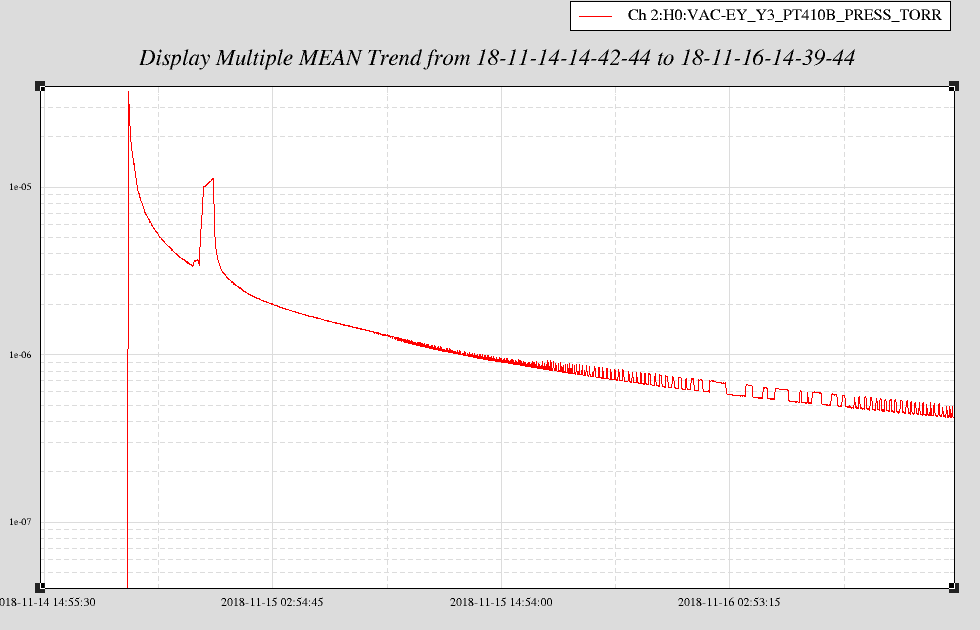
End-Y is pumping down nicely.
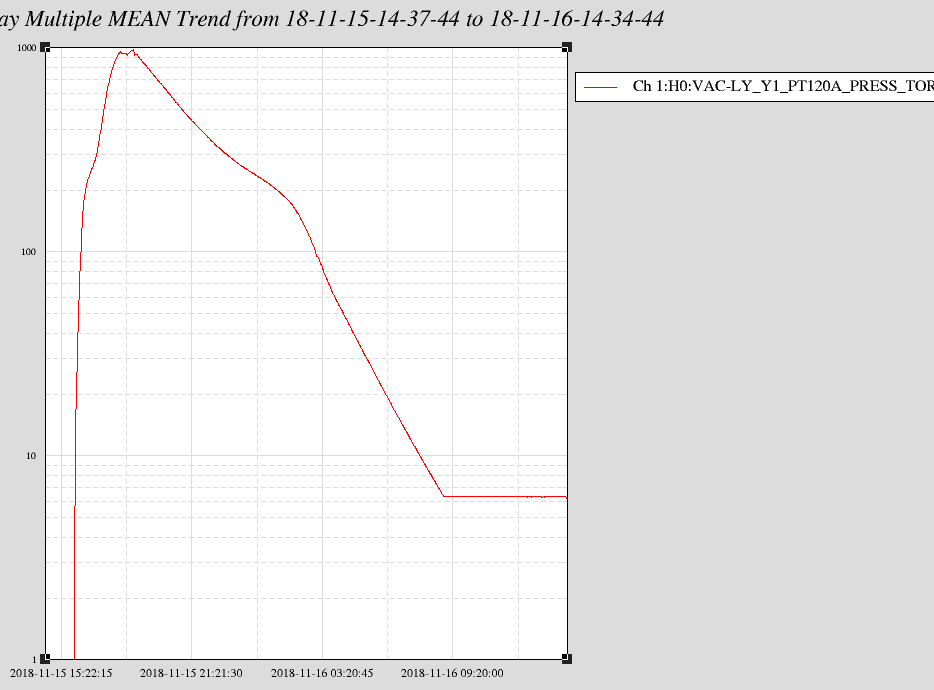
Valved roughing pump back into vertex at 6:30 am. Thanks to Gerardo for staying late last night and getting us down to 6 Torr!
Found the laser tripped this morning with a front end flow error.
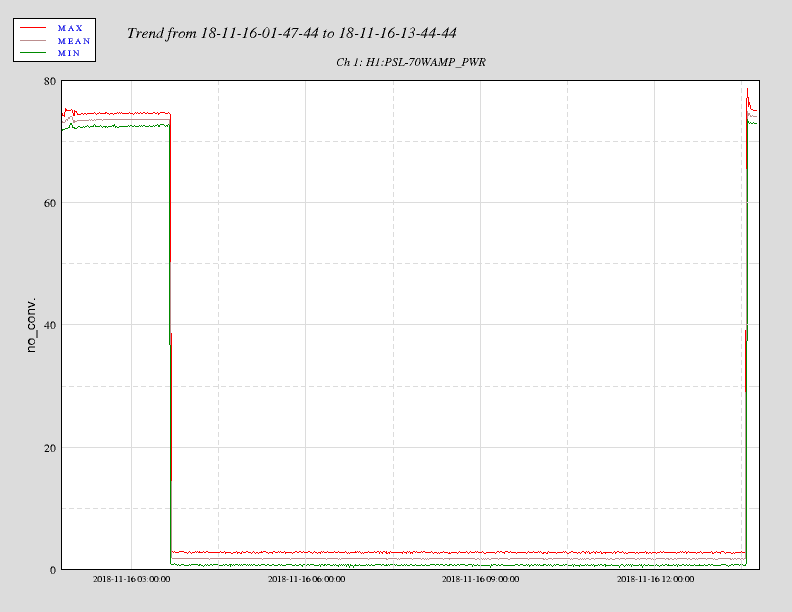
The laser has been shutting down several times per day after restoring the interlock functionality following the cooling line work earlier in the week.
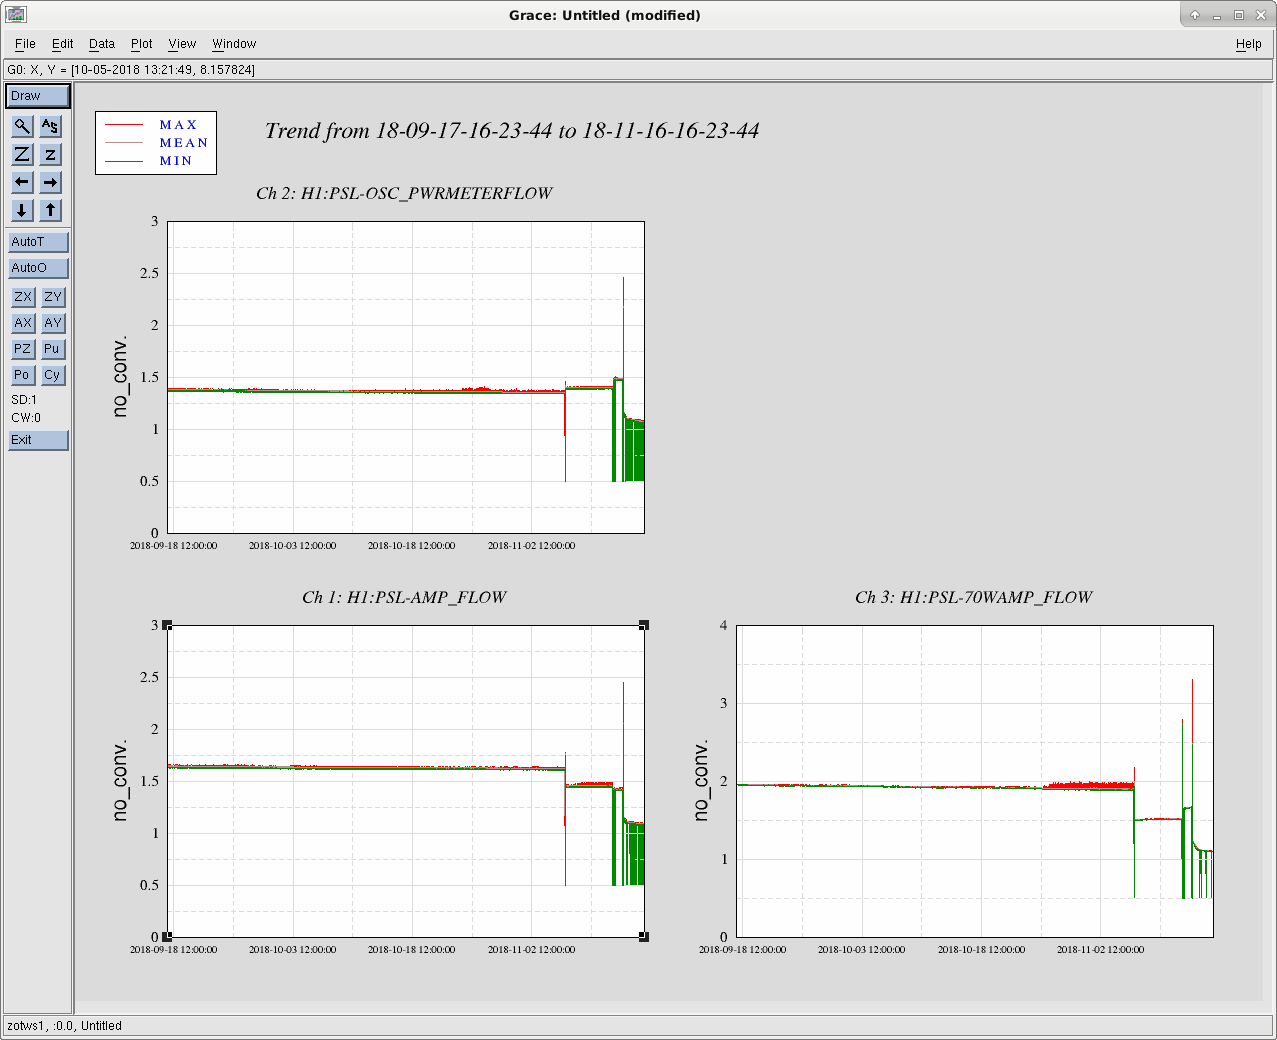
This is due to short flow dropouts reported by the flow meters either due to bubbles working their way out of the system, or due to running the flow sensors too close to the minimum flow they can reliably report.
We are in the process of comparing performance with LLO and investigating workarounds in both chiller line hardware and Beckhoff software.
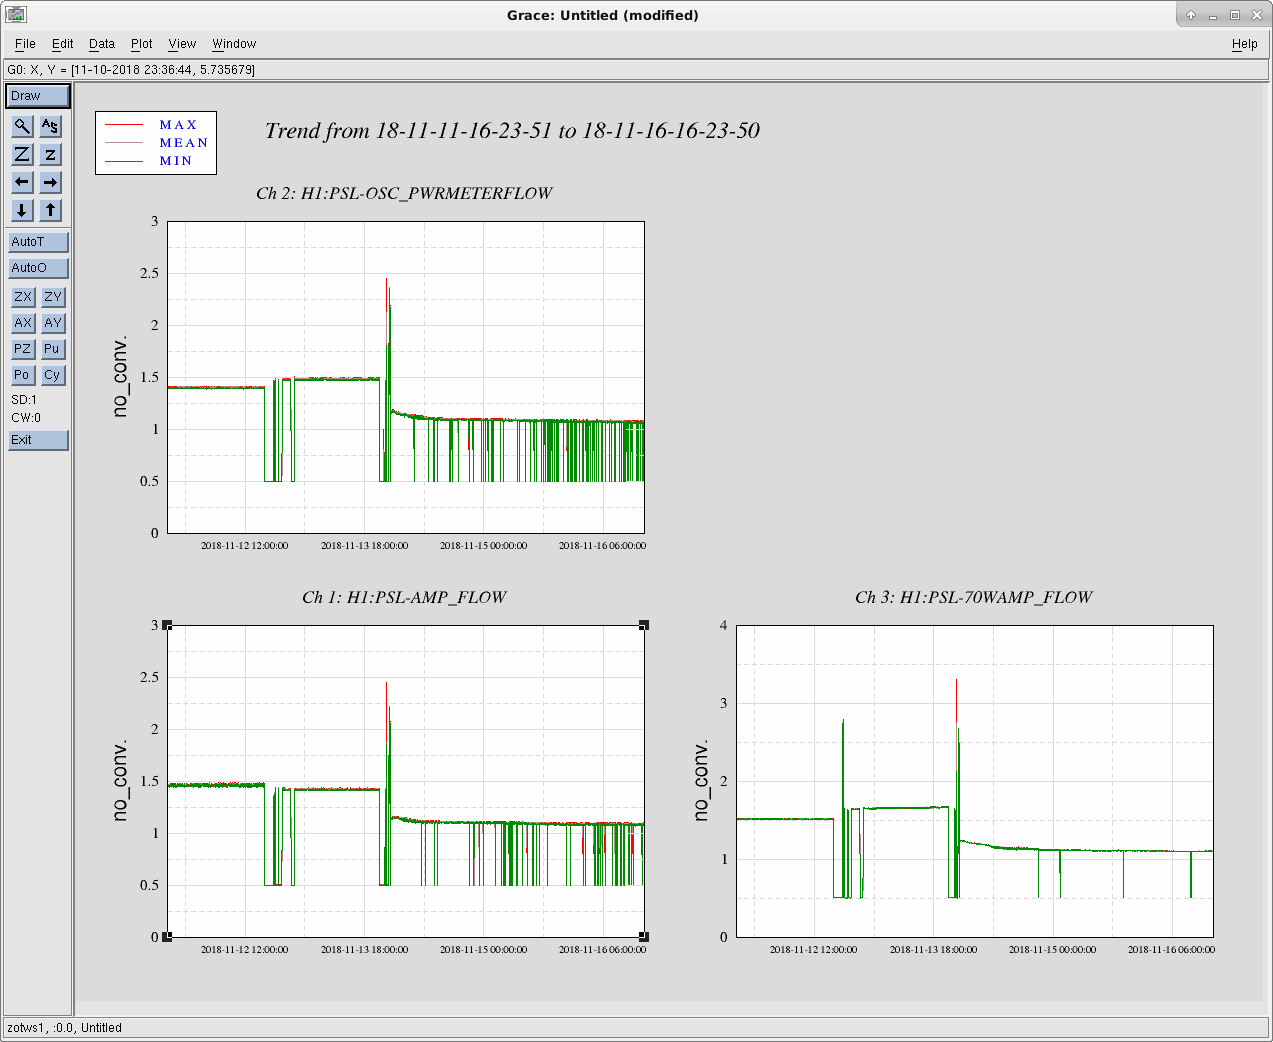
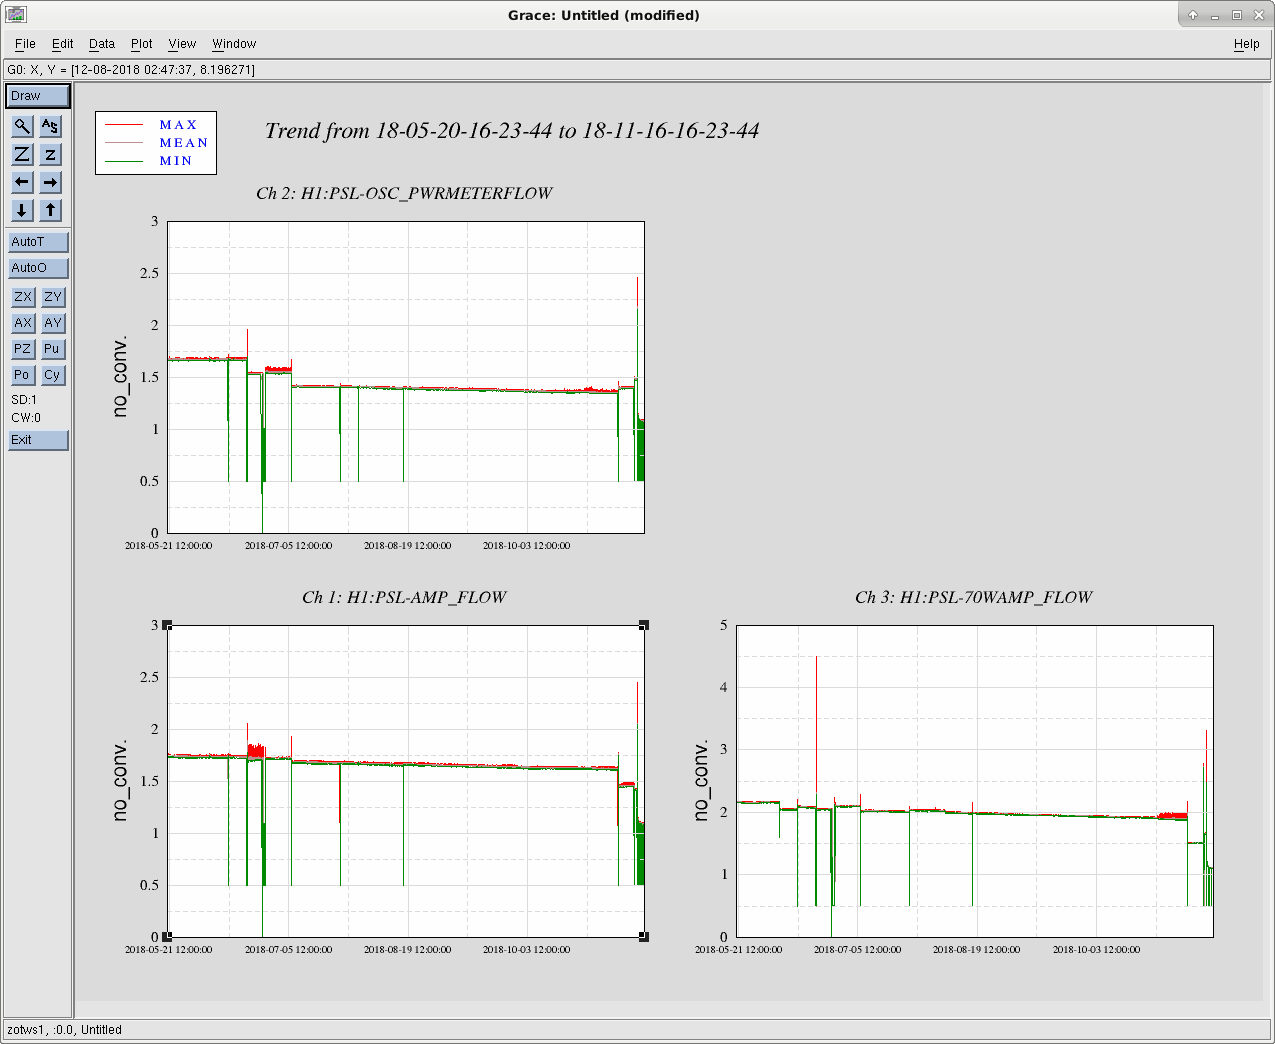
Attached are a few trends of the flow rates, with the first being over the last 5 days. As can be seen the flow meter drop outs became much worse after Tuesday's reduction in flow.
The 2nd attachment is a 60 day trend and the 3rd attachment is a 180 day trend. Both show that flow meter drop outs have been rather uncommon over the last 6 months. At this point this seems consistent with air bubbles working their way out of the system due to the recent plumbing work. If the drop outs don't reduce in frequency then we may have to increase the flows slightly to move them further away from the flow meter's minimum measurable flow.
Will resume pumping tomorrow morning. Current pressure at 6.29 Torr.
PeterK, RickS
We cleaned an number of optics in the main beam path.
We replaced some optics that seemed to be scattering more light than they should, even after cleaning - the two steering mirrors in the pico-motor-actuated mounts just upstream of the PMC, and the two modematching lenses between the 70-W amplifier and the PMC.
We spent quite a bit of time adjusting the positions of the two modematching lenses between the 70-W amplifier and the PMC. There seemed to be a broad maximum (fairly weak dependence on lens position), but the modematching was not very good. Using the power meter in reflection and the PD monitoring the transmitted light, we had about 52 W in transmission and a little over 15 W reflected - about 78% visibility.
We then looked at the beam transmitted through the turning mirror just downstream of the 70-W amplifier. The shape looked pretty good, but there was a definite pedestal. We decided to try apertures installed just upstream of the PMC to see if scraping off the pedestal (halo) would improve visibility. It did.
Here are the numbers:
3 mm diameter aperture, 53.7 W transmitted, 9.4 W reflected. 85% visibility
2.5 mm diameter aperture, 54.4 transmitted, 8.4 W reflected 87% visibility
2 mm diameter aperture, 49.9 W transmited, 6.9 W reflected 88% visibility
These numbers are significantly better than what we had without the apertures. So we will likely go back to working on the beam quality out of the 70 W amplifier. Maybe we will spend some time to get the Diagnostic Breadboard working. It was deigned just for this kind of work.
(Hugh, Niko, Corey)
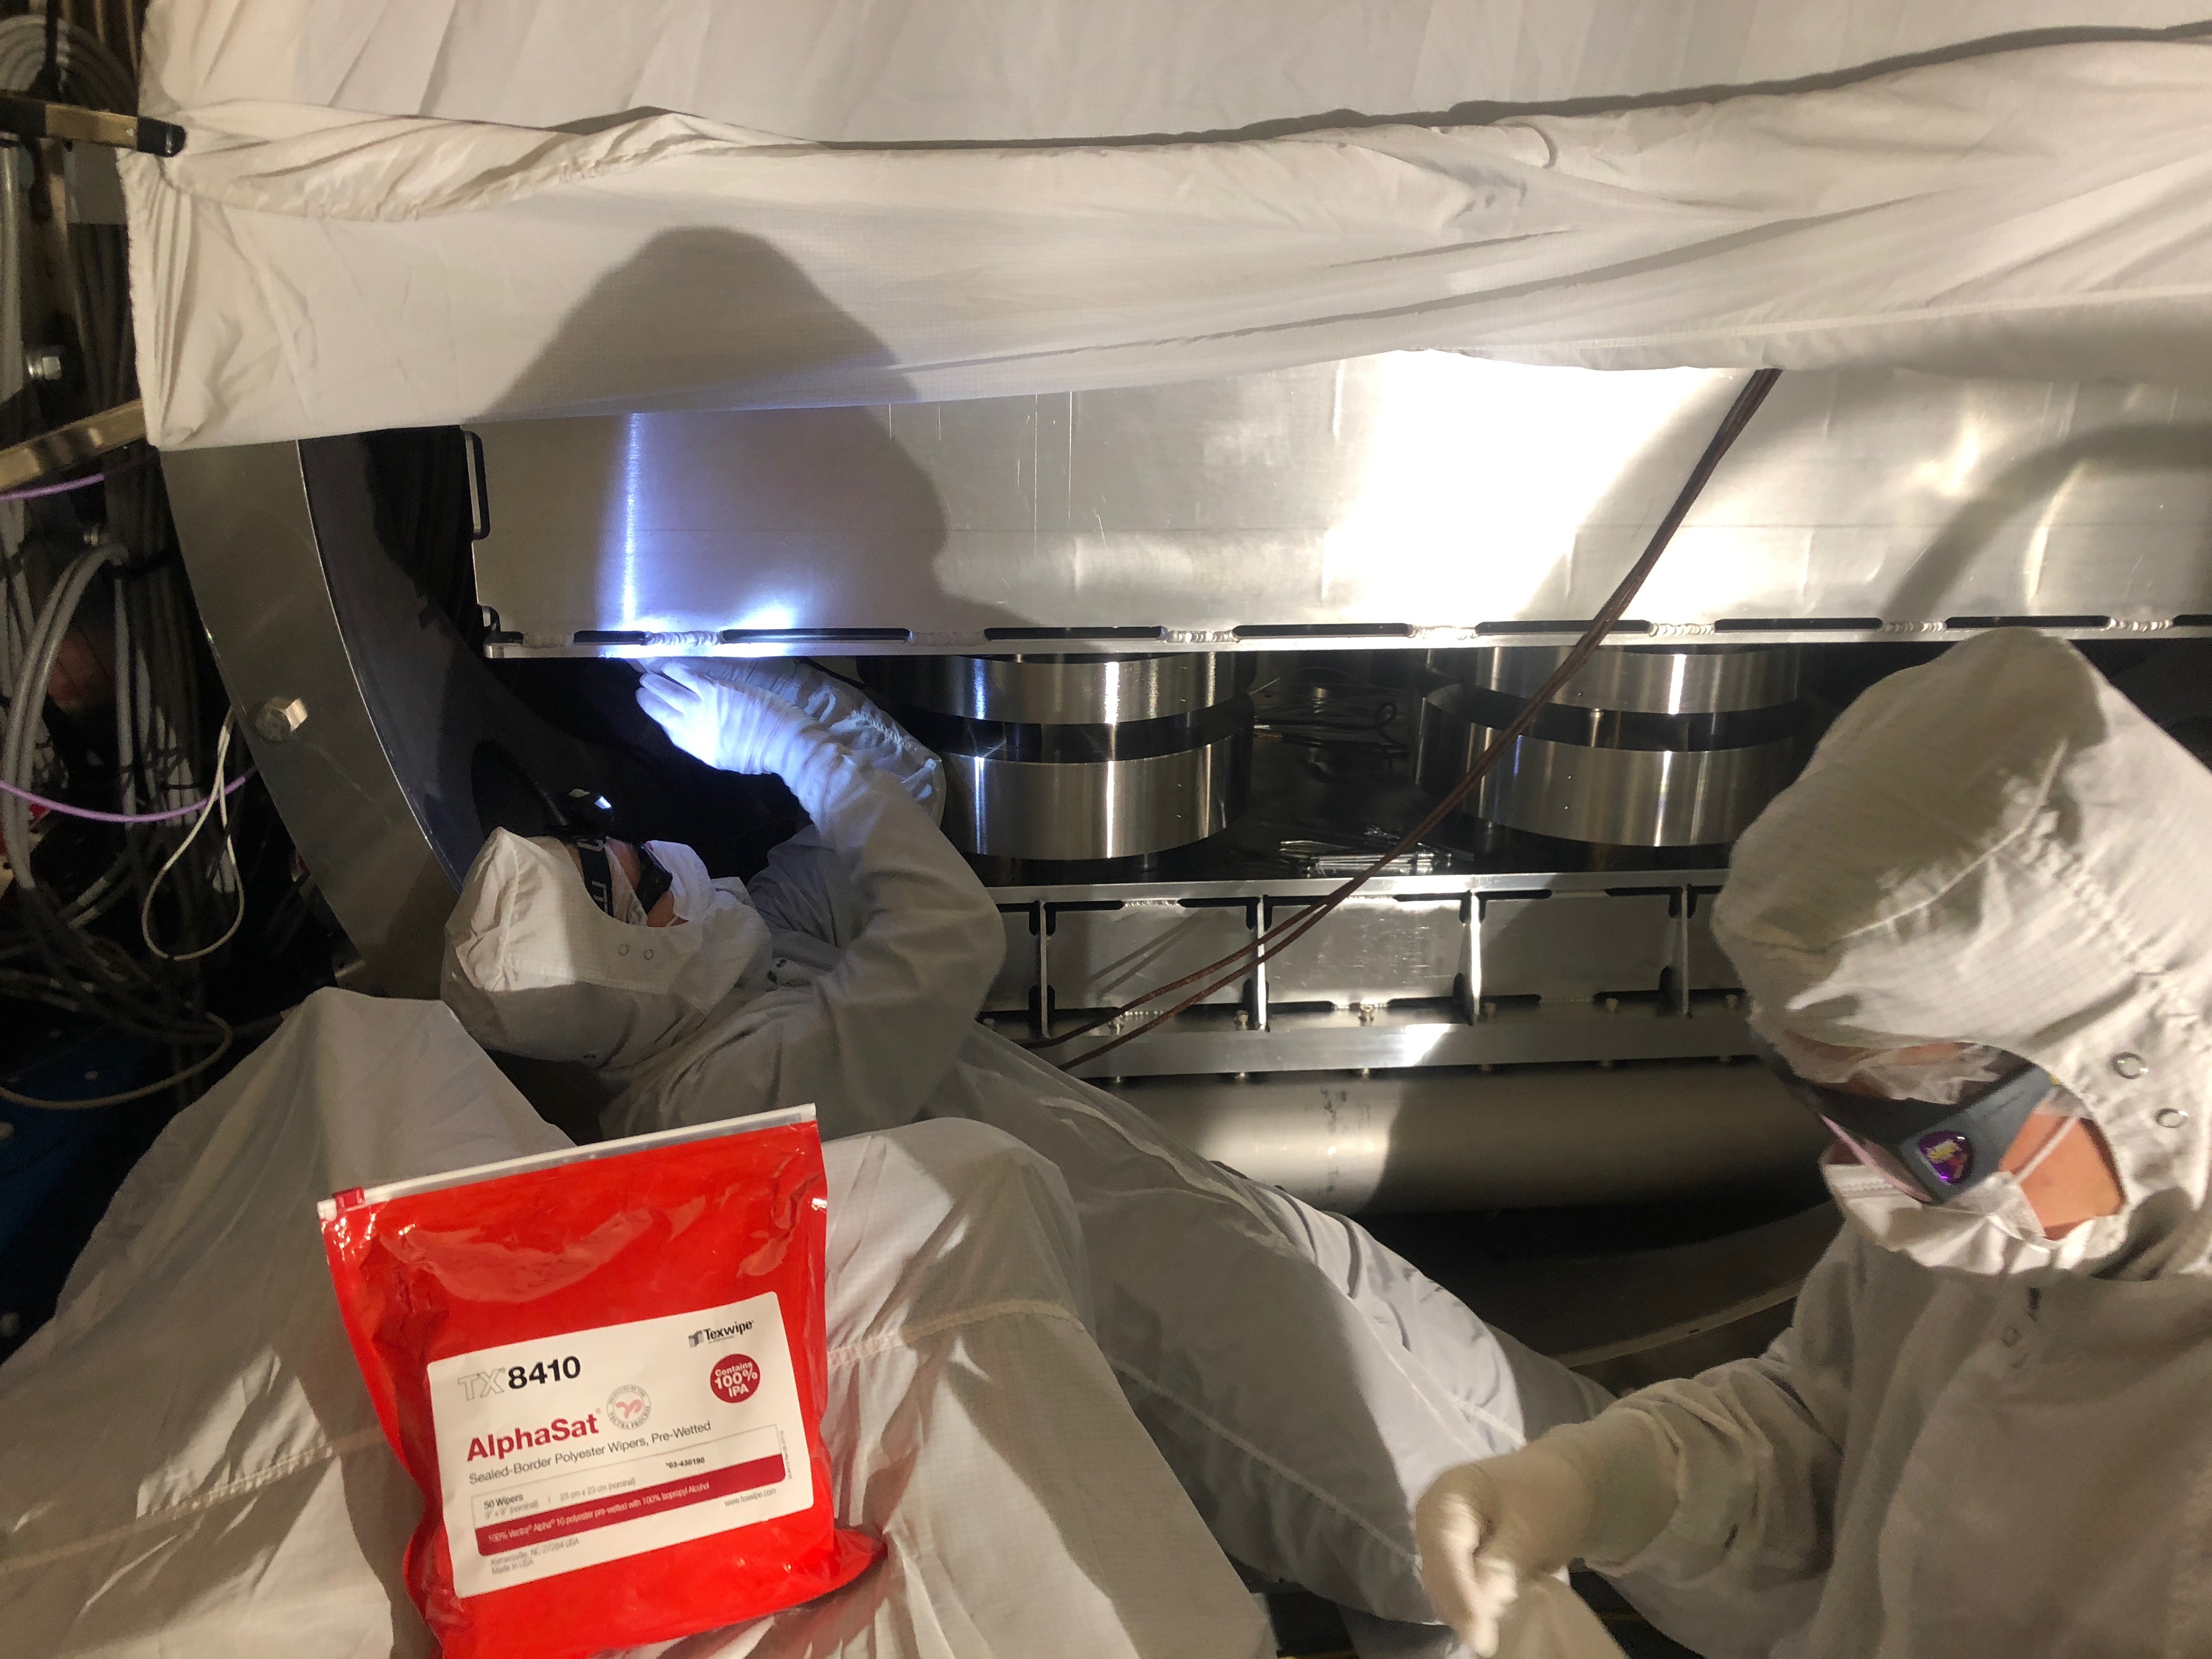
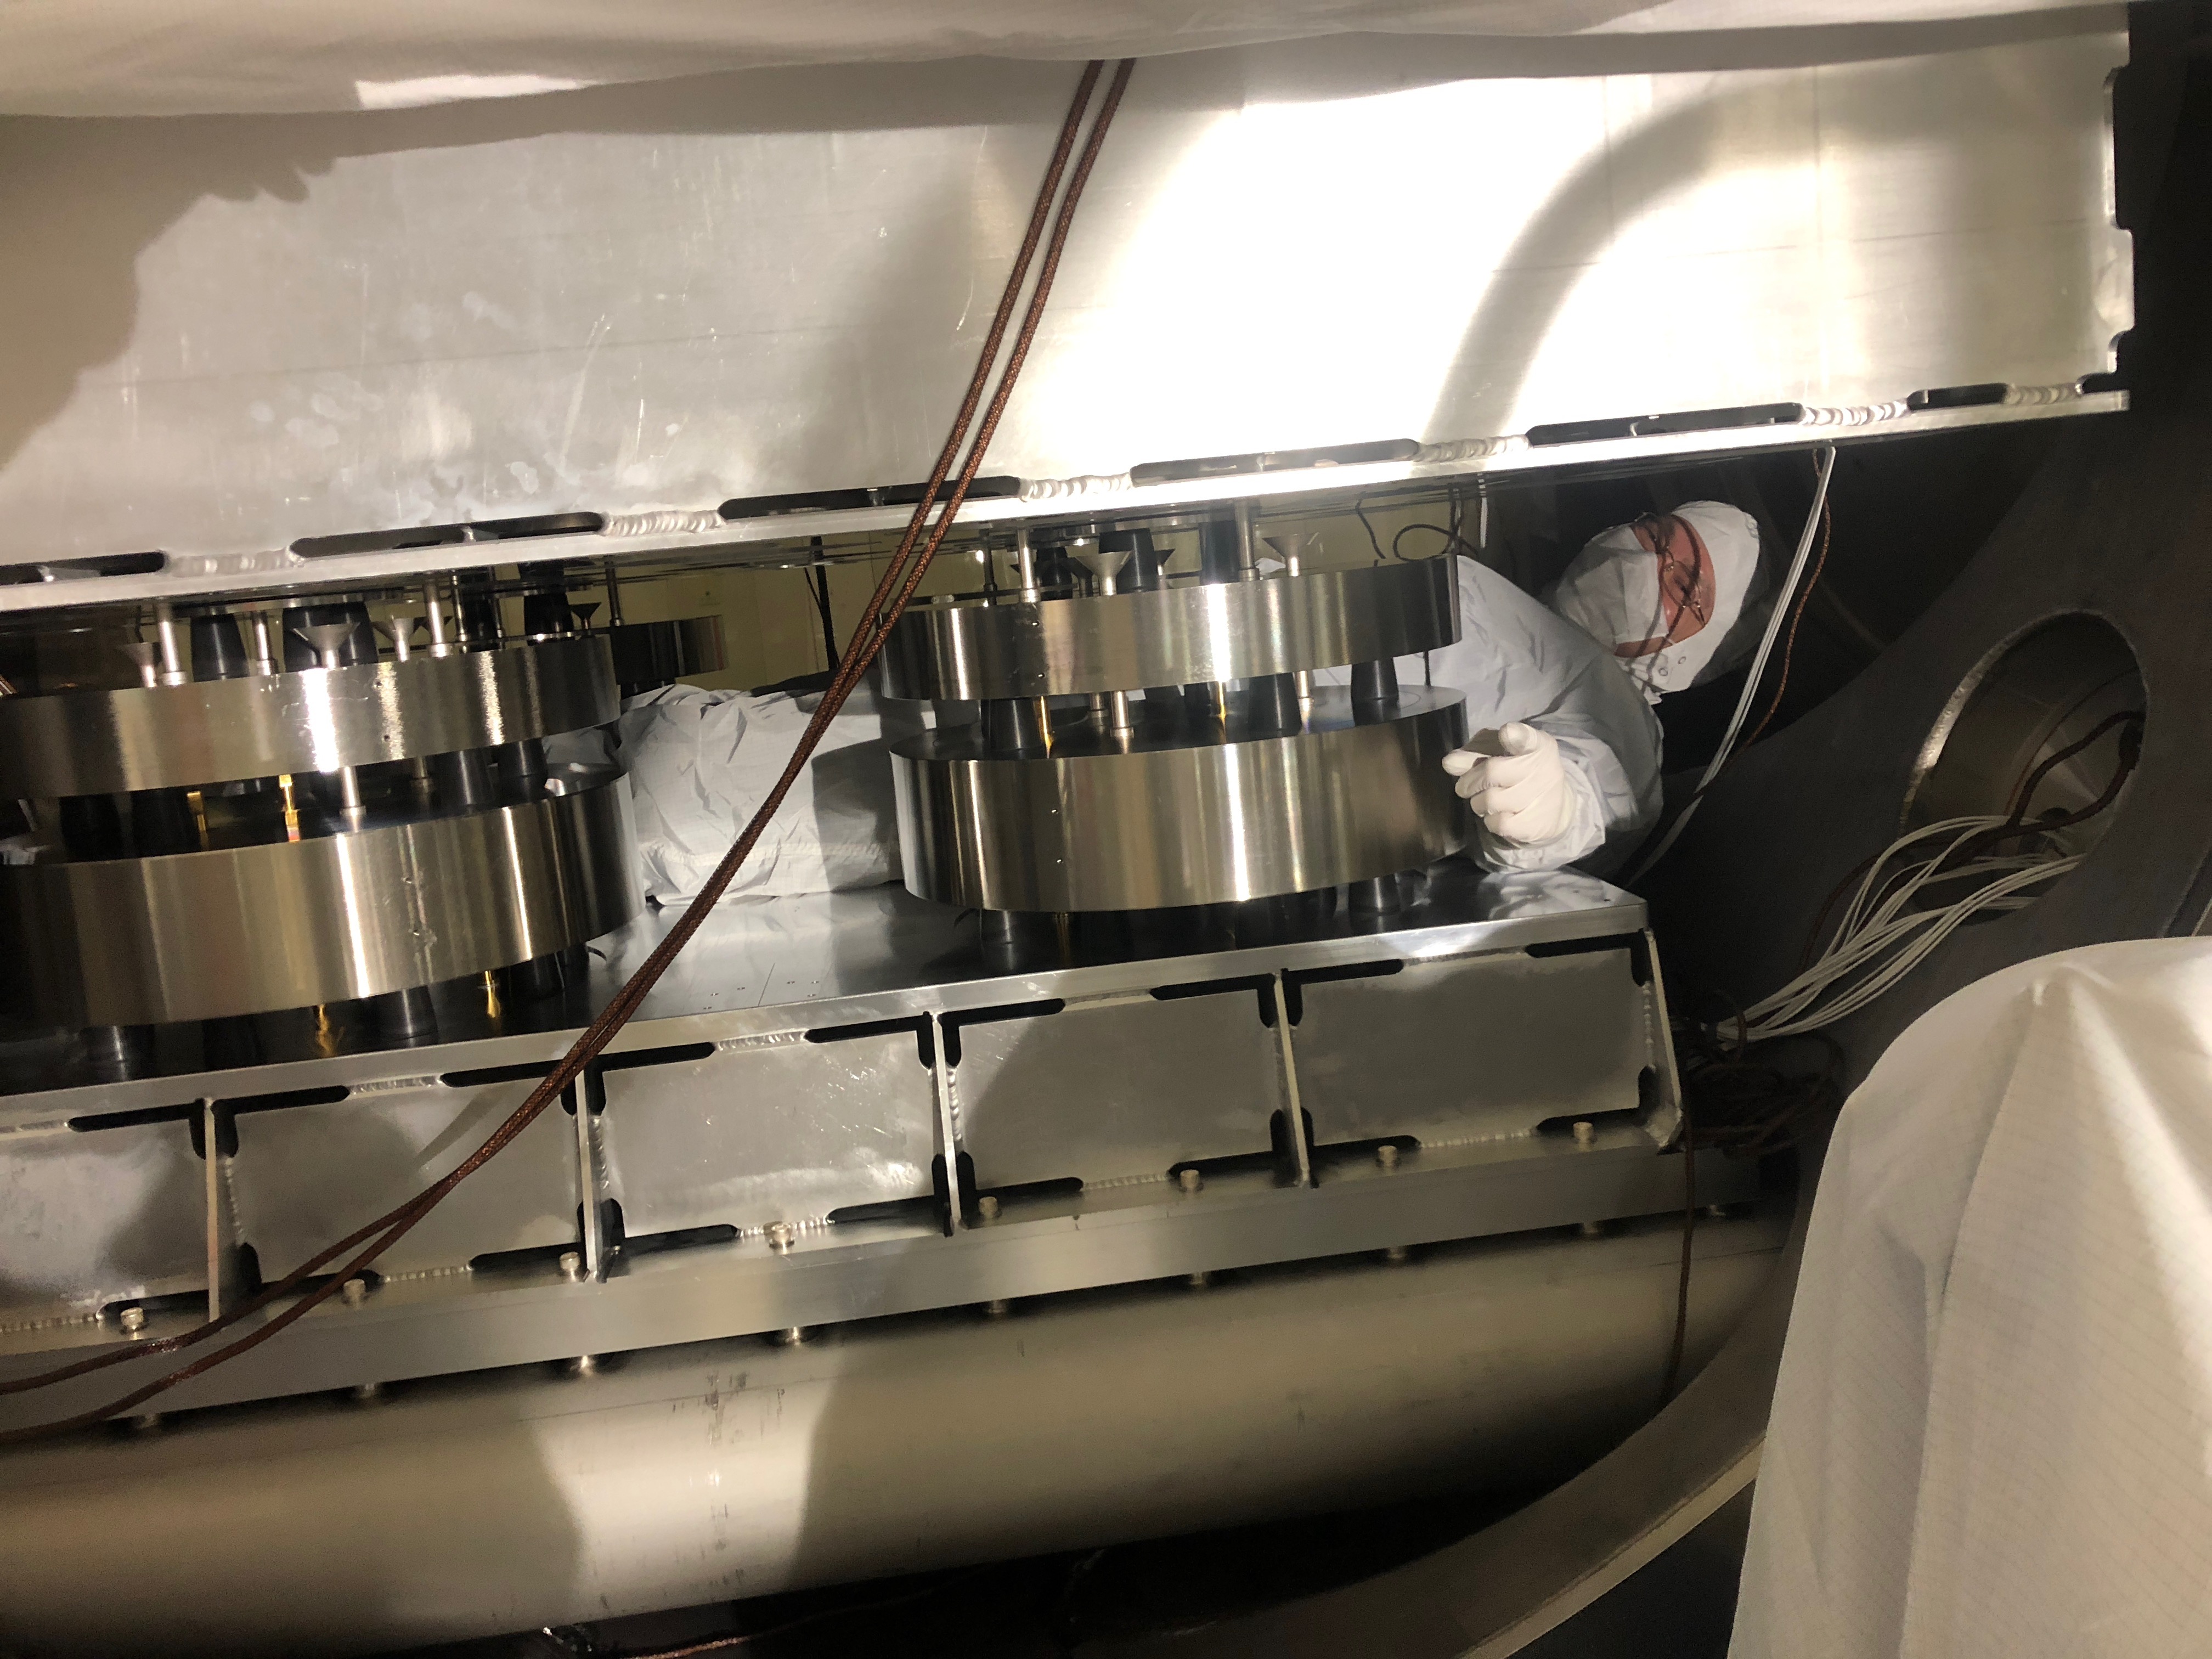
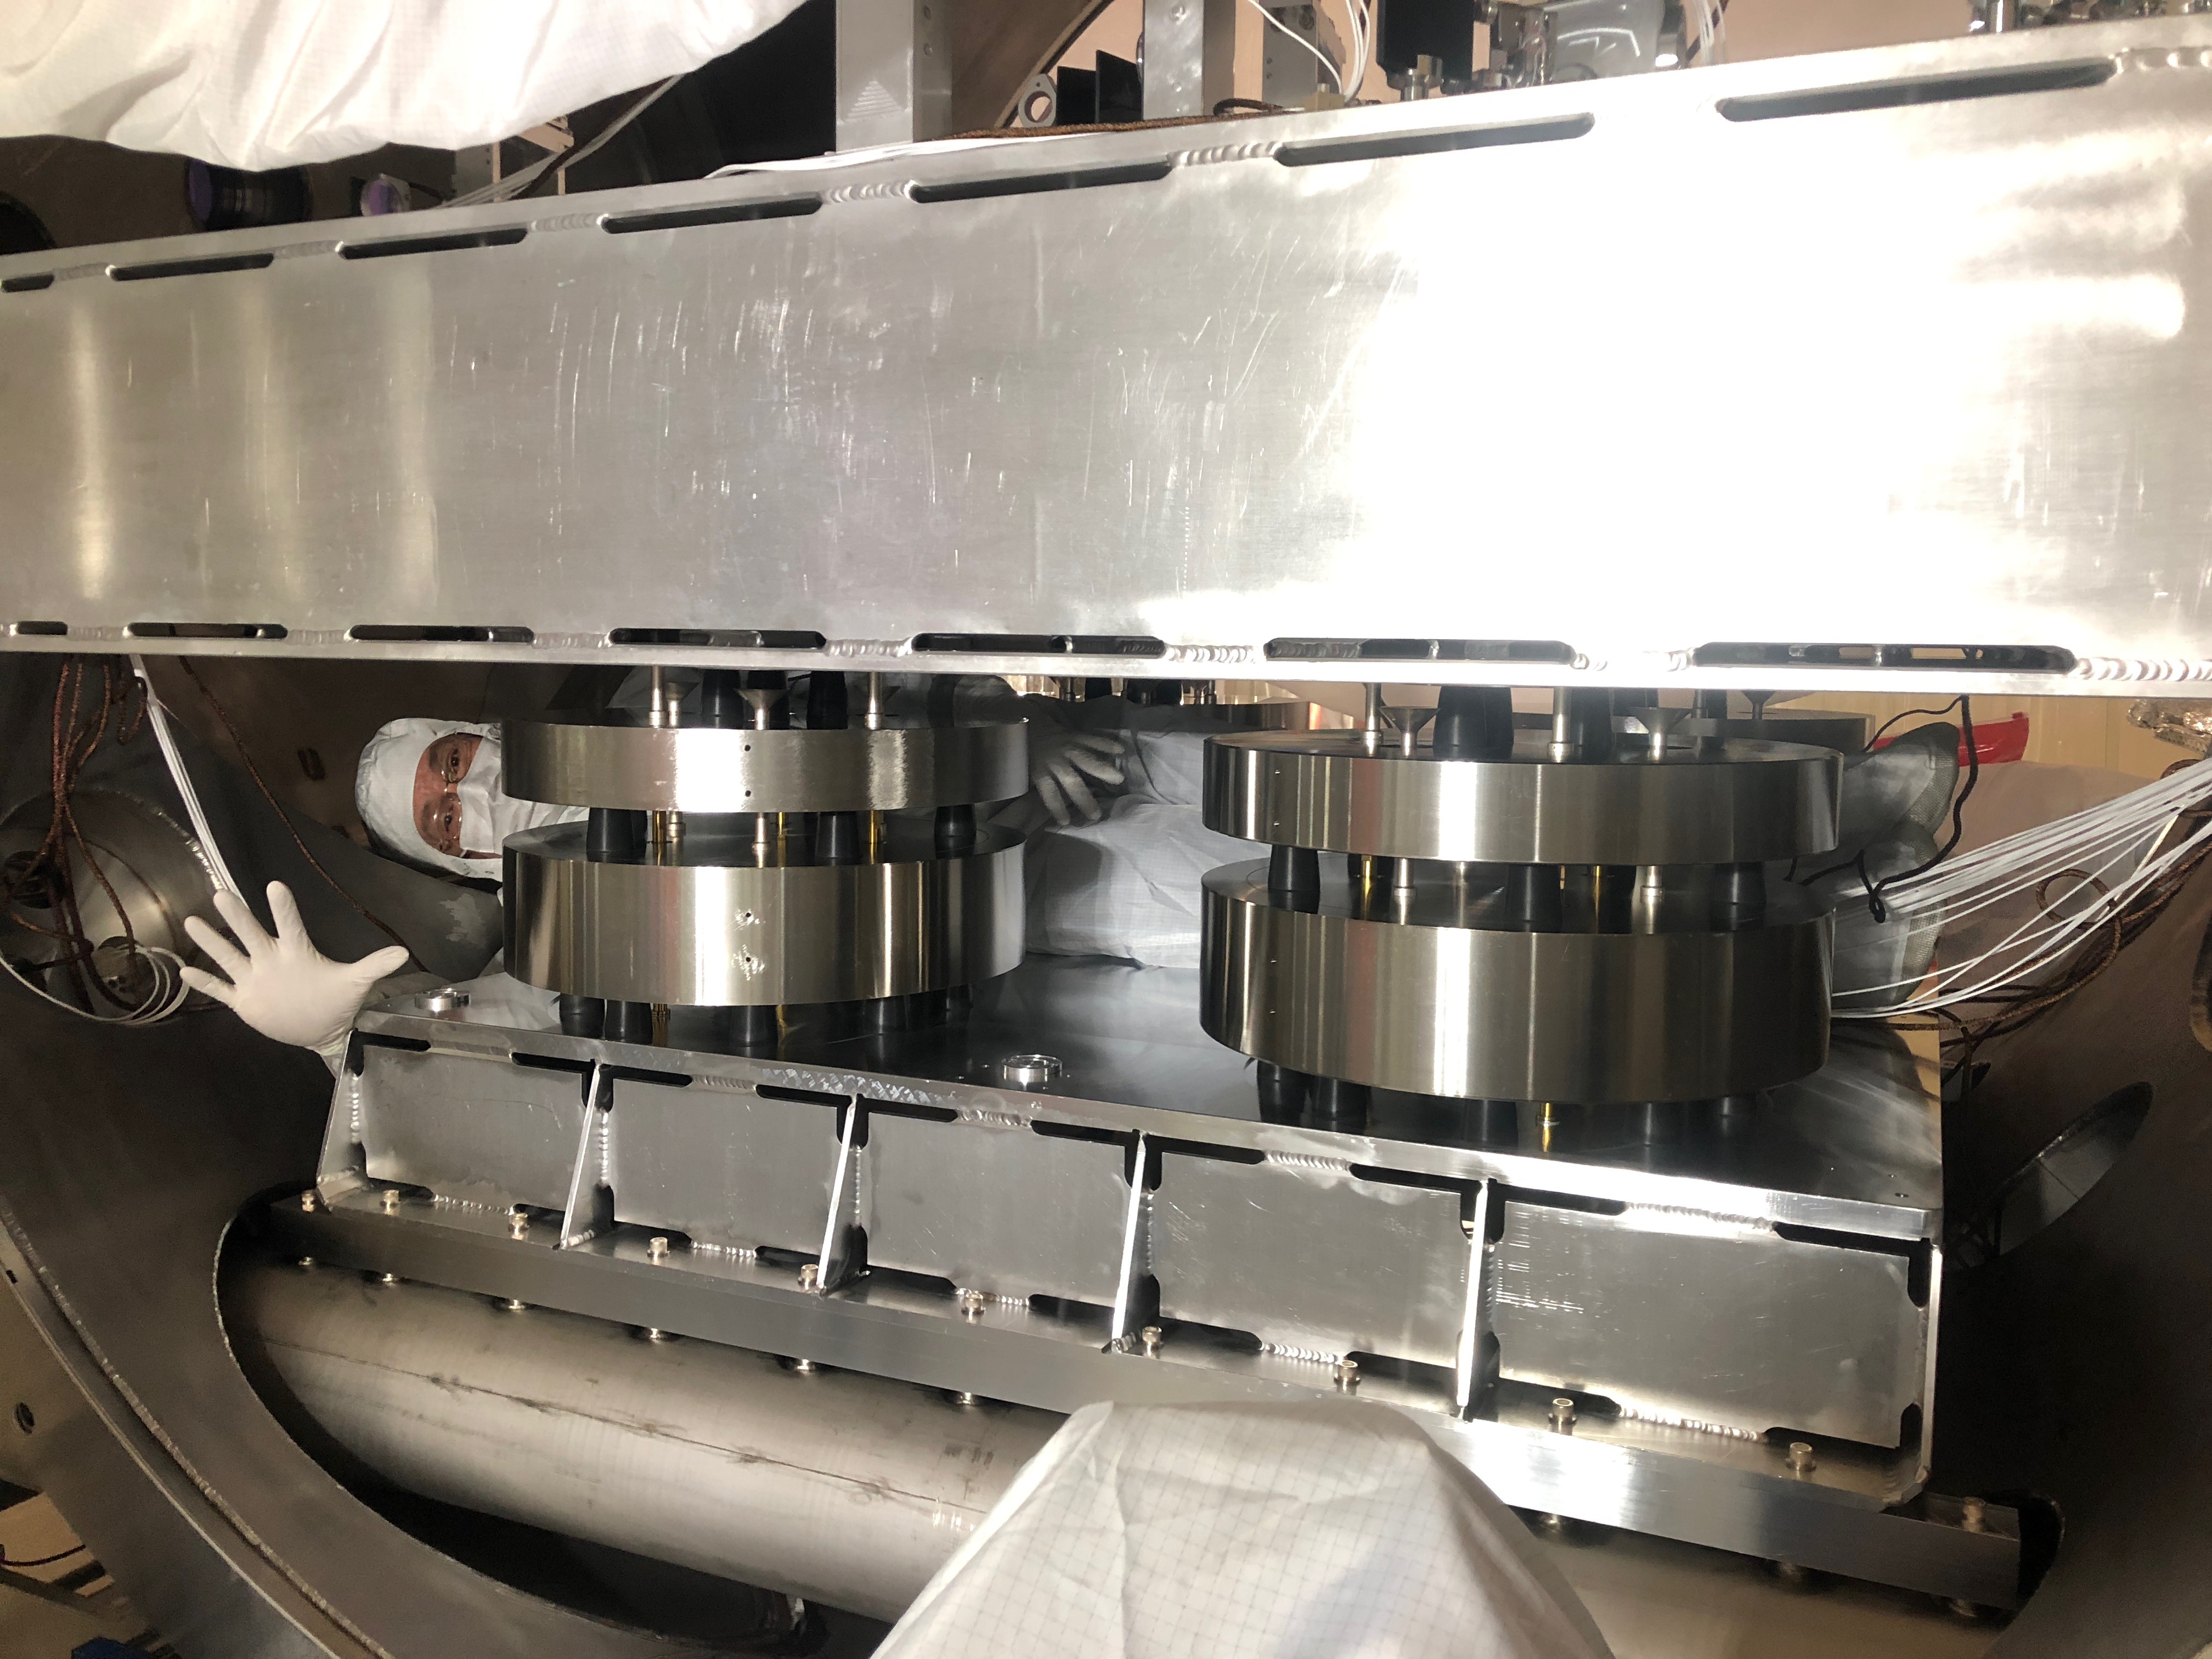
Attached are a few photos of Hugh, Niko, and myself getting an arm workout yesterday (as we attached L4C pods to the innards of an Initial LIGO Optics Table):
Installation of these sensors was not trivial, and as Hugh mentions, for the pair which were inboard (toward the center) inside the Optics Table, someone needed to go in-chamber. Here are some Unlisted videos:
Gerardo M., Kyle R.
GV1 has a known inner O-ring leak on the Vertex-side flange. As such, its AIP can't handle the added gas when the Vertex volume gets vented and it will go off scale as a result. Today's venting of the Vertex volume was no exception. However, unlike previous precedence, we are now routinely combining the gate annulus volume with the adjacent annulus volume whenever we close large gate valves (a.k.a. "GVs" - in this case, GV1). We have adopted this change so that the gate volume will get pumped by the GV's AIP during those periods when the GV is closed. The benefit of doing this is that we, now, don't need to connect pump carts to GV's to pump out the gate volumes after the GV's have remained closed for long periods (days) and this is a significant time/effort savings. The downside is that we now have to remember to re-isolate the gate annulus volume before the GV gets opened. We keep the gate annulus volume isolated from the adjacent AIP-side annulus volume when a GV is open as a layer of protection of the BT should we need to vent the AIP-side of a given GV as part of replacing its ion pump (not an uncommon service). If we didn't remember to isolate the gate annulus volume before venting the AIP-side we would then vent the Beam Tube by accident. Its all very stressful and confusing. Just be happy that you aren't in the Vacuum group! ;)
Following today's brief venting of the Vertex, we now have an unknown amount of gas in GV1's annulus volume which includes the gate annulus. As such, Gerardo and I connected a pump cart and evacuated the entire annulus volume so as to eliminate the possibility of dumping ??? torr*L of air into the BT when we next open GV1.
Good catch, Kyle! Let's put a note on GV1 to not open its gate annulus valve when venting vertex.
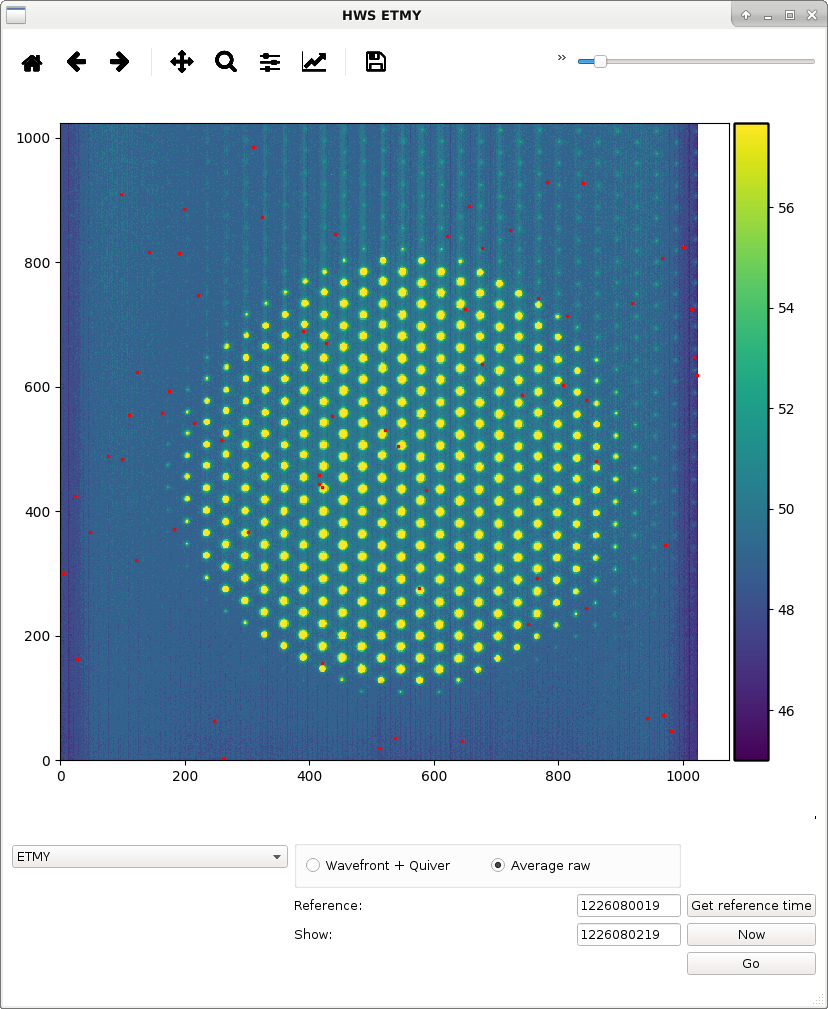
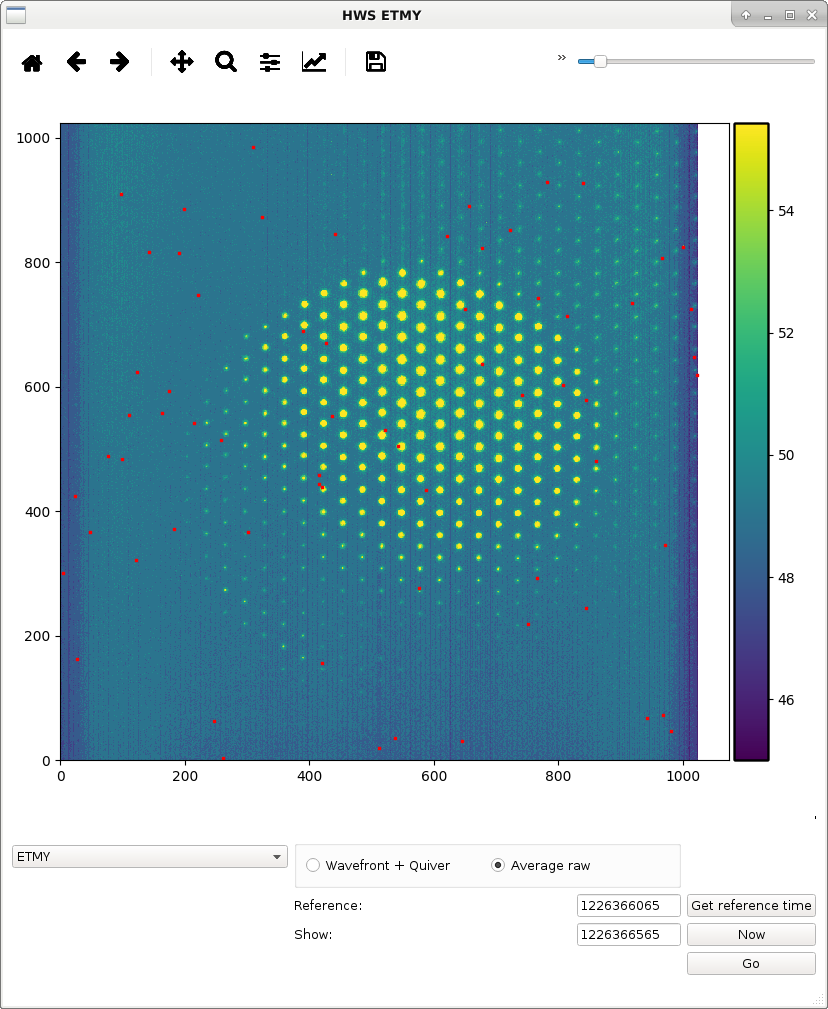
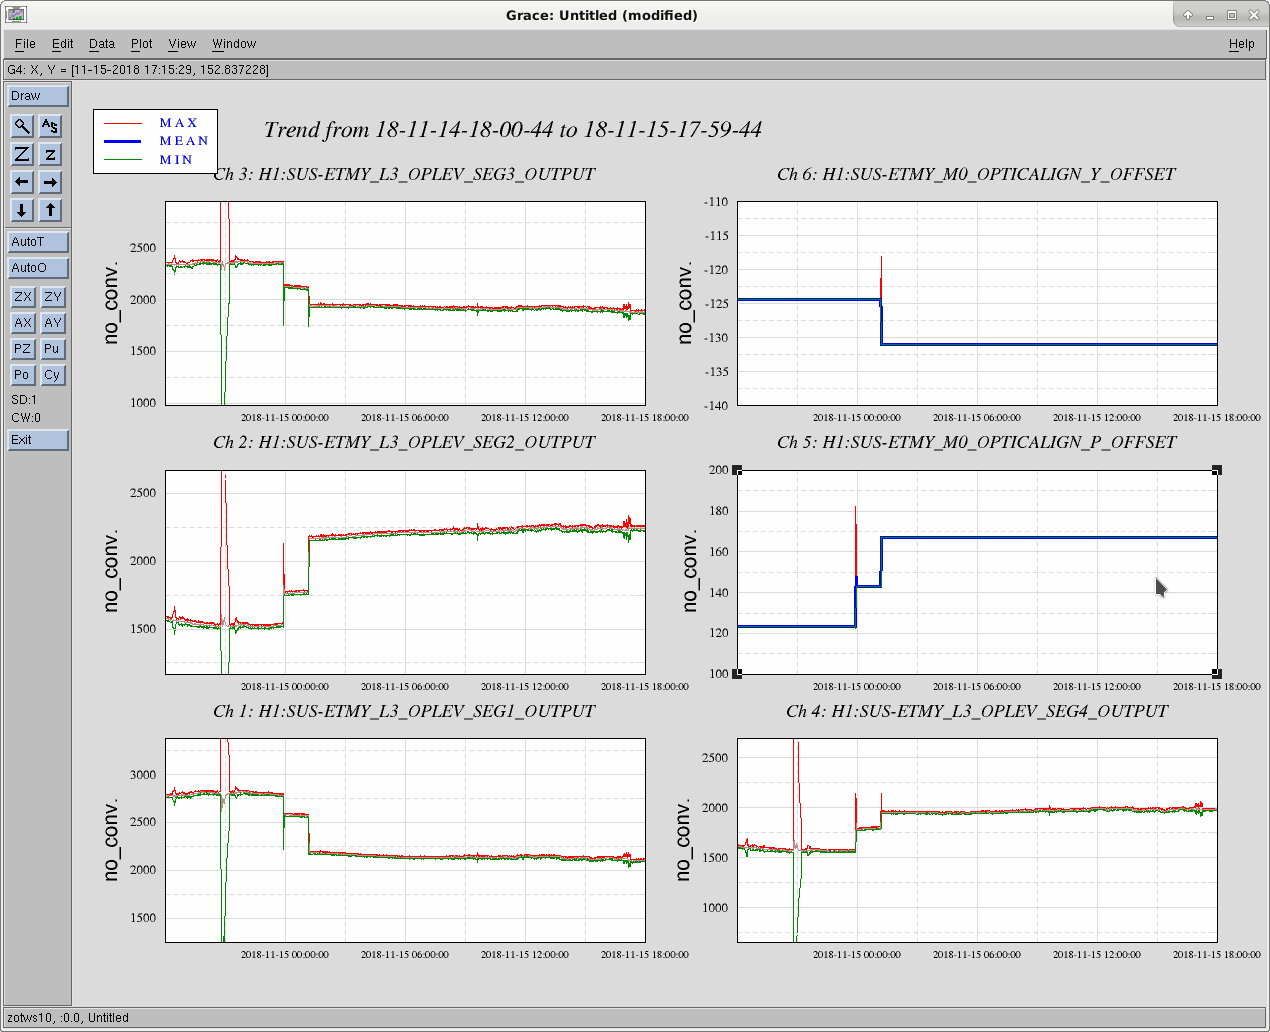
It seems ETMY HWS has become misaligned, pictures attached, and we're not sure why. TVo adjusted the ETMY M0 alignment to center the oplev but that didn't fix the ETMY HWS positioning to what it was like previously.
ISI_ETMY_ST2_SC has a notification, not sure if that has something to do with it?
Thanks to Corey and Niko for the late night effort and even later night report here. See the first attachment showing the locations of the installed sensors. I'm sure Corey will post some informative and entertaining images of the ordeal.
2pm: waiting for ISC to complete. 2:30: All the cables emulated fine so we felt ready to cable up the actual sensors. But like usual we had a few snags. 330pm: The first sensor went in and out three times as we struggled to orient it as we had foreseen in our fit checks. But we had no cables then and some fasteners were different and that made the difference. We thought we'd be stuck with just three of the four fasteners in the two corner verticals but then shifted our thinking and disassembled the long hex driver. The thinner key alone fit into place and then was reassembled with the driver parts and the fastener was driven home. 450: On the V2, we could not get one bolt to start and then realized the hole was already occupied by the beam dump mount screw Corey reported on and moved for us. Then V2 was complete. 5:30: For V3 and H1 we needed 'inside' help and Corey stepped up with no fear. After a couple attempts upside down and sideways in the south door nozzle he volunteered to go deeper and shimmied feet first between the isolation stacks putting himself in position where he could hold the assembly in place to fasten up. After struggles to get the first bolt started, the others went with out trouble; V3 complete. 6pm: Finally H1, one cable fastener is not going into the feedthru. After a couple attempts, a closer look reveals the one horizontal sensor pulled from storage has a broken bolt in the feedthru. Corey waits patiently while another senor is retrieved from the staging building. No broken bolts and a quick and painless mount up in the table---if only we had more horizontals to do. 7p--cold ale time...
I'll report on SNs etc separately.
To Do: * Dress cables down isolation stacks. * Wait for ISC to finish adding/moving elements on Optical Table. * Address other needed cable dressing. * Rebalance table with aux payload.
Edit--In the sensor location depiction attached I got the location of V3 & H1 crossed so I've redlined and reattached the depiction below.
For all front end computers:
monit configuration was changed to allow workstations access to the web interface
ntp configuration was changed to write the drift file to /var/log/ (default was trying to write to a read-only file system)
To install it did the following:
1. restart monit to new configuration (/etc/init.d/monit restart)
2. Using firefox, go to the monit web page (http://name), go into ntp control page and press RESTART
Roughly an hour later, the /var/log/ntp.drift file was created, and the error message that it couldn't be created is no longer seen.
Have been topping off the water level in the crystal chiller as the bubbles come out of the system post plumbing upgrade. No water added to the diode chiller. Will be replacing both the crystal chiller filters at the next opportunity. Closing FAMIS #10438
I turned the PCal laser at EY back on today. It was turned off earlier in the week for the vent work.
{Kyle, Chandra}
Kyle vented the vertex at 8am (~ 2 hr vent) and then we both climbed on beam tube, each wearing a safety harness tied off to one single crane hook, to remove the 12" conflat flange blank and replace the leaky copper gasket on port located just before NEG #1. Chandra inspected the knife edges on blank and mating flange - all looked good. We noticed a discolored spot on both flanges about the size of a nickel outside of the knife edge on flat flange surface. We wiped it with iso-wipe. It is a cloudy gray color with hints of red/orange outlining - could be rust/corrosion. No photos taken because all four hands were needed and we didn't want to risk dropping anything inside the beam tube! Purge air was flowing strong while the blank was off (off for less than one minute). Old gasket came off with my gloved fingers. New gasket was torqued with flanges metal-to-metal, and we starting pumping down vertex at 10:50 am local.
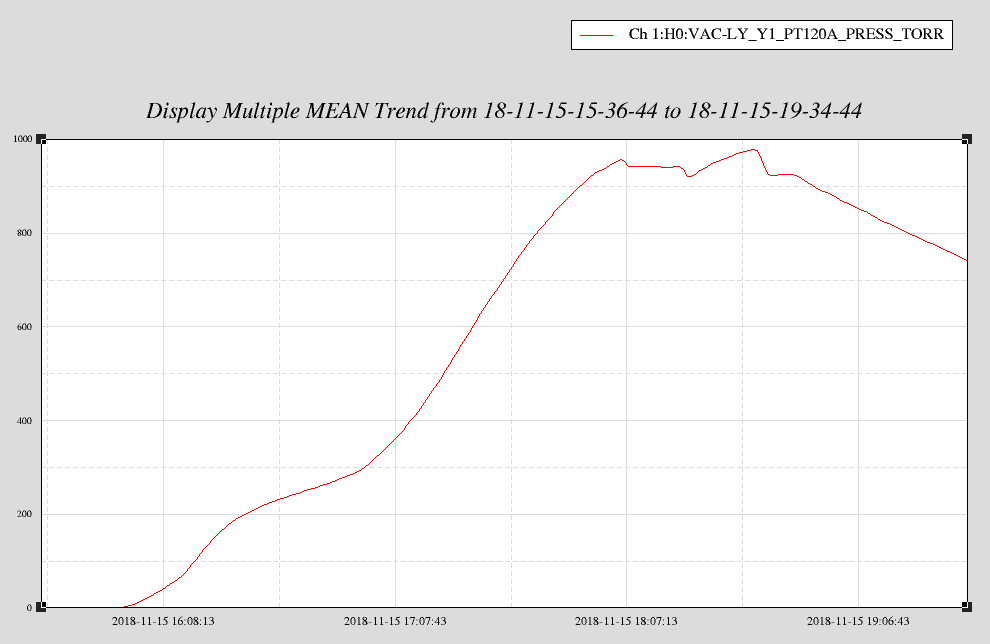

Rough down pressure curve comparisons of EY and vertex. No surprise that vertex takes longer to pump given pump speed for given volume. We expect to be on turbo pump sometime tomorrow and will leak check either later in the day or Monday.
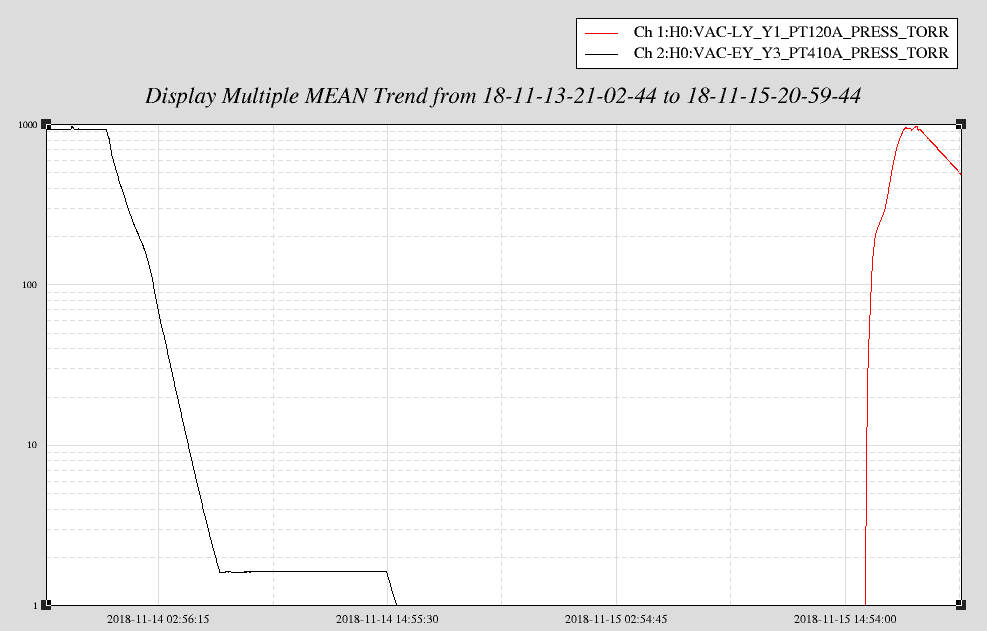
Measured dew point of vent air was -41C. I forgot to measure the dew point of the pressure equalization "blow down" air just prior to the start of the pump down.
Following on from the EY ESD repair work: Once the pressure at End Y was low enough, Patrick T and I went out to turn on the high voltage and check that the ESD is operational.
We turned the HV supplies (outside the VEA) back on at 5:03pm local time, we then turned on the switches on the back of the low voltage ESD chassis (inside the VEA).
We did the same test that Fil and I ran in May - alog 41772 - driving the ESD quadrants at the OUTF stage (4.3 Hz, 30000 Cnts drive at the excitation point), and looking at the response on the optical lever. We didn't see a response to the LR quadrant drive, compare red trace to other traces in the attached screenshot, very perplexing. Could the problem be at the feedthrough?
We did no further tests this evening.

This is disheartening.  It is possible to tell pretty much exactly where the break is.  Look at T1800199 for a note I wrote detailing the method for finding the open circuit in a cable run.  You will certainly know where in the chain the flaw exists.  Richard and Fil are familiar with the technique.

All things are obvious in retrospect, but we should have done this analysis method prior to going into the chamber.  I was so taken by the possibility of the failure at the end of the cable nearest the optic, that I didn't think about alternative possibilities.
The feed through is tested when the continuity test is done. The pigtail that is in place is not removed so it is not the feed through.
The ETMY Oplev segments seem to be responding when I repoint the optic, so doesn't look like the Oplev readback signals are a problem.
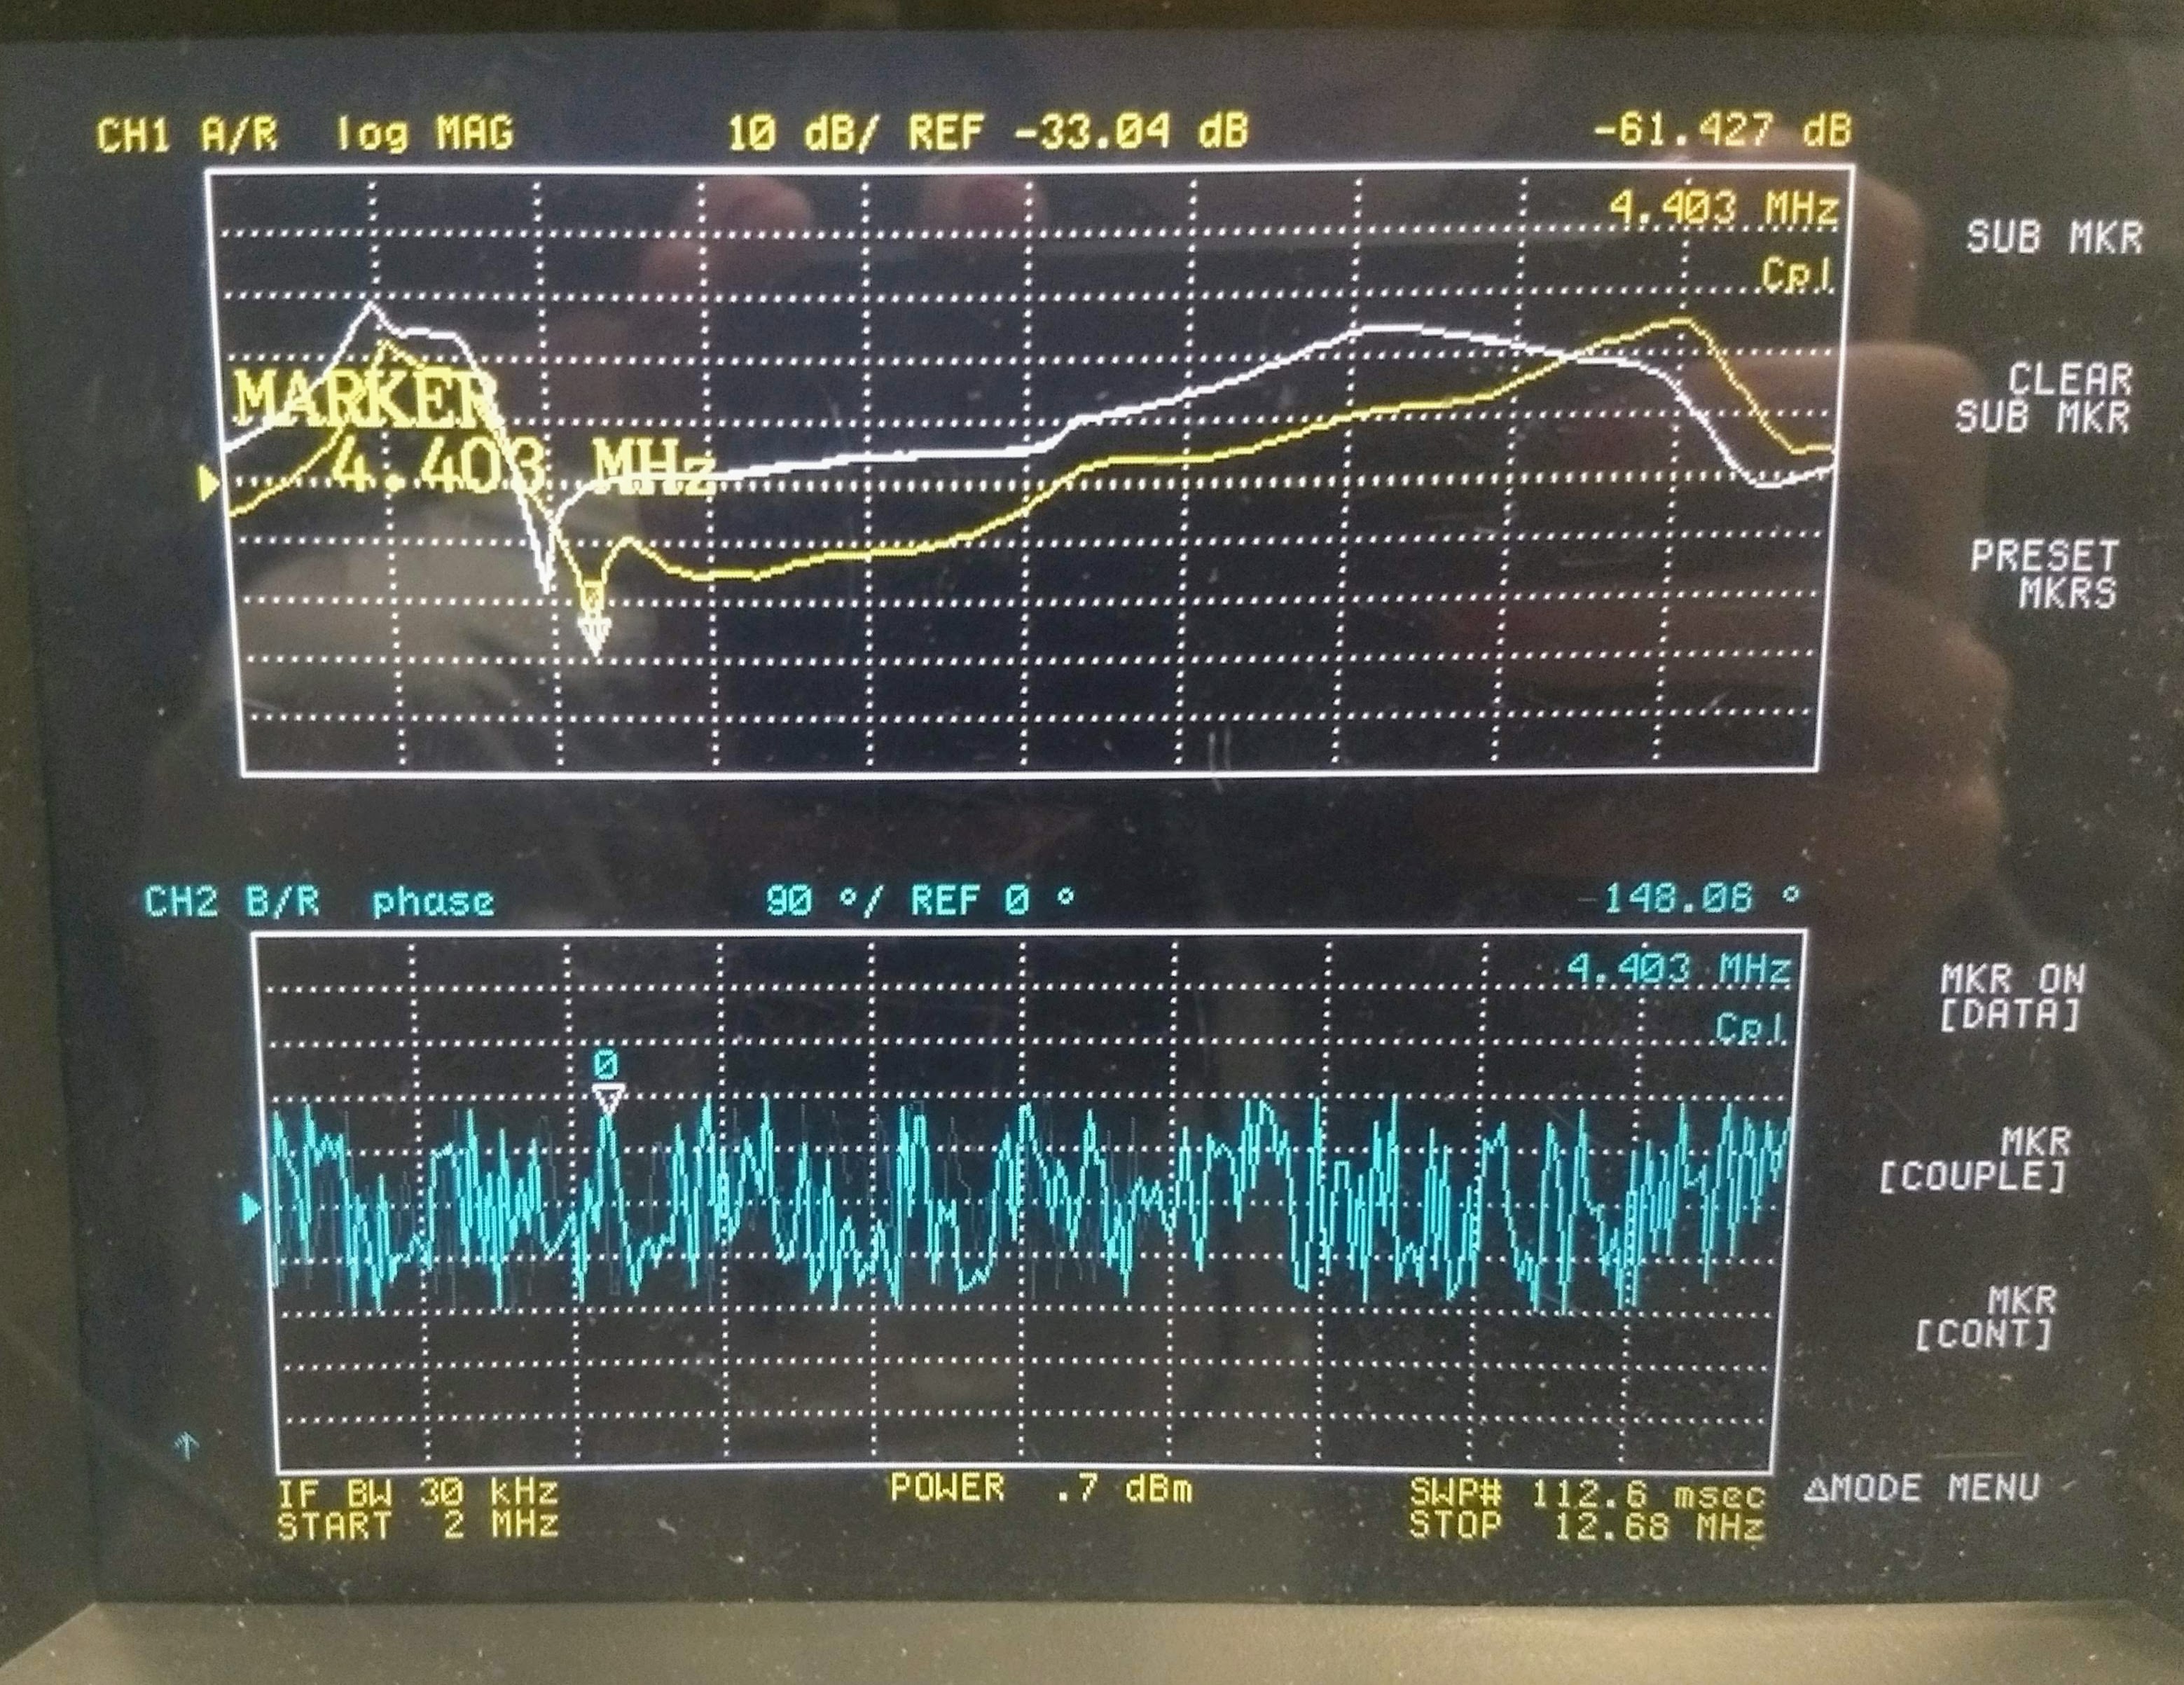
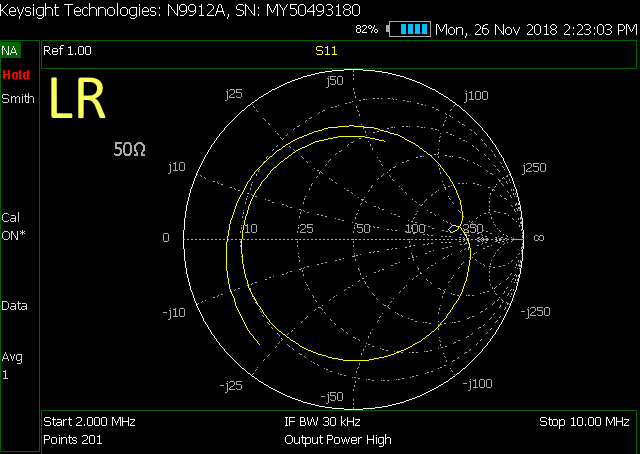
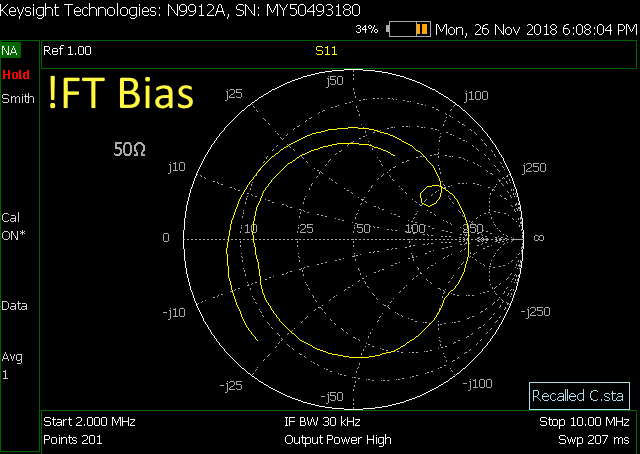
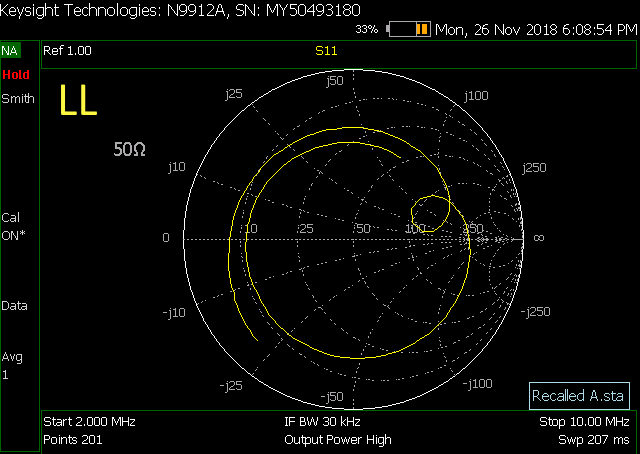
We looked at the cables using the FieldFox method recommended by Rich, T1800199 and here are the results. Our Field Fox is limited to 2MHz on the low end.
Bias cable ends at 64' from the ESD chassis
UR, LR, UL, and LL all end at 60' from the ESD chassis.
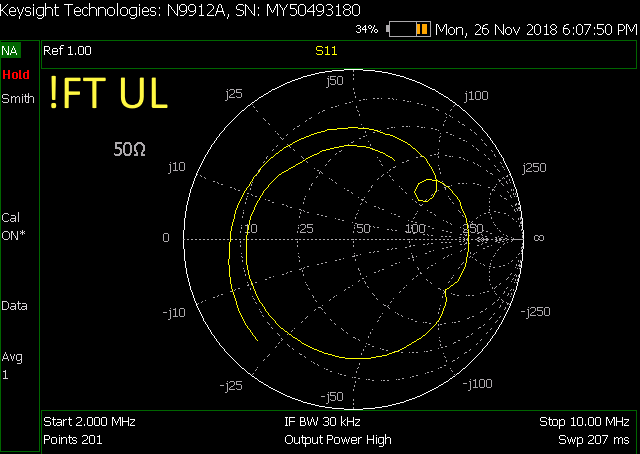
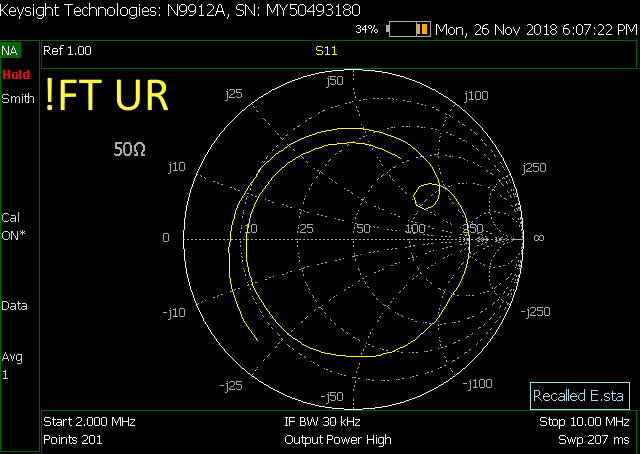
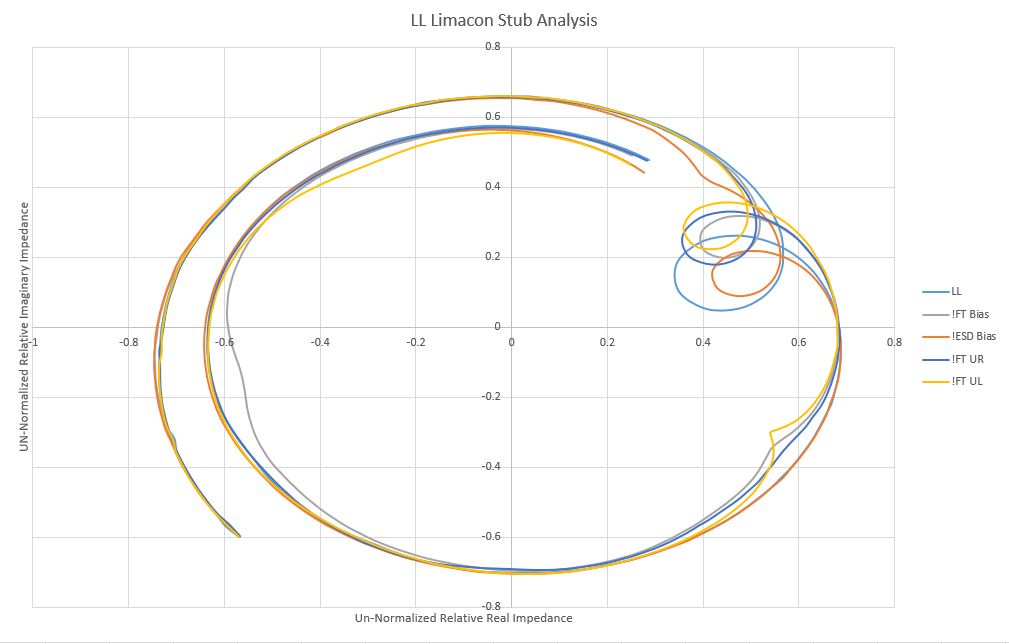
We noted a difference in the LR reflections so we took screen shots of each quadrant. I believe the length of the loop corresponds to the length of reflection on the test mass. The loop on the first reflection of the bias trace is quite large. The loop on the working quadrants are seemingly equal and smaller than the bias. The loop on the LR quadrant is very small.
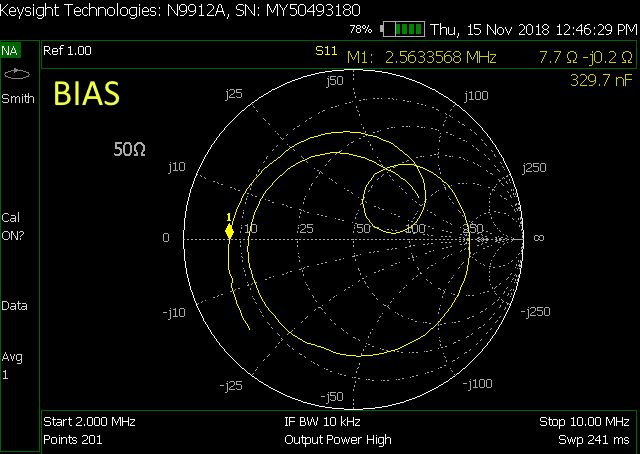
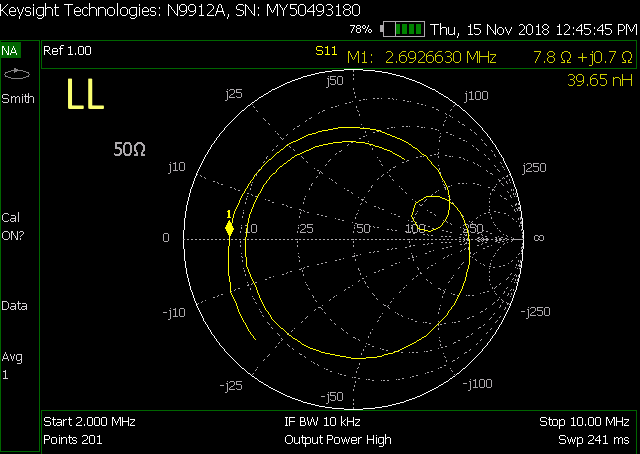
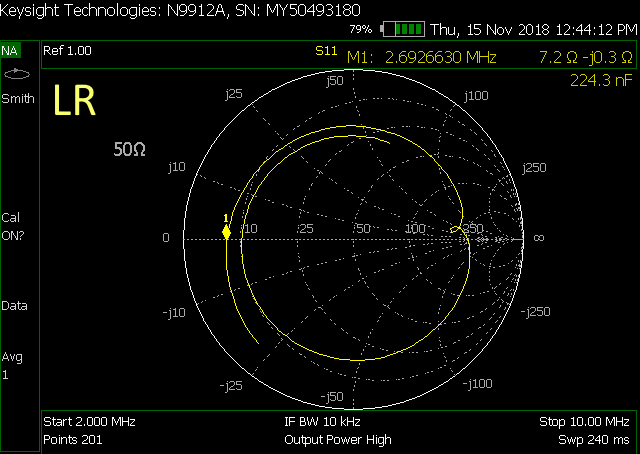
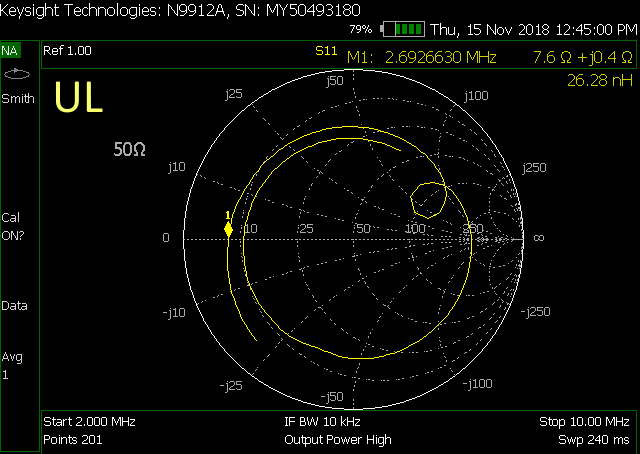
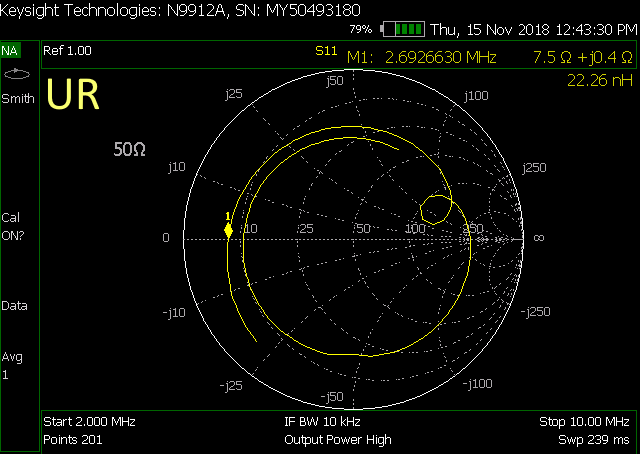
Note: Fil did the same open circuit test in May. The results of the electrode lengths are here, alog 41861.
It makes sense that LL is longer than the upper quadrant electrodes (UL and UR) given the extra length of electrode around the barrel of the AERM. LR being shorter seems to suggest a break close to the optic.
After speaking with some of the team, and reviewing Marc's data:

1.  It would be a good idea to take the transfer function at RF (say 2 to 10 MHz sweep) from the air-side coax leading to the bias, out to each of the 4 quadrants.  By examining these 4 transfer functions for symmetry, we can strengthen the case for there being a break in the gold mask on the LR quadrant of this optic.  The connection from the incoming wire to each of the 4 quadrants is made by little soldered gold tabs.  Were one of these tabs to break free, or if the pin that's soldered to the first tab on the top of the barrel of the reaction mass to come undone, it may account for the existing symptom.

2.  When closely examined, the RF data taken by Marc does have 2 asymmetries in the LR plot vs the other 3 quadrants.  The fact that the residual impedance at the first marker frequency (~2.69MHz) is different (capacitive for LR and slightly inductive for the others) is noteworthy, but not stunning.  The precision of this type of measurement relies on knowing the characteristic impedance of the entire cable assembly.  Given that these assemblies end in a single wire strung into space, it's not immediately compelling to see slight differences, and indeed there is variation in the other "good" quadrants.  However if you couple this observation with the funny looking loops seen on the right side of the plots, the story gets more interesting.  The funny loops are likely to be parasitic couplings to another resonant element (bias electrode?) in the cable/ESD system.  A smaller loop (as seen in LR) indicates less coupling.  This would fit the model of there being a break somewhere in the gold pattern distribution that exists on the reaction mass.  The coupling is likely to be a cross coupling to the bias element through parasitic electro-magnetic coupling.  when taking these transfer functions, it is likely that there will be enhanced coupling evident at the frequency of the loops as seen in Marc's data (manifesting in a lower loss in the RF transfer function).

3.  Continuity tests are done to the top electrodes on the reaction mass barrel at the 12 o-clock position.  If there was a break further down the chain (like the gold bond wires that are soldered on), then the continuity test would not catch that.  Calum thinks we used to examine the gold bond wires when we did incursions relating to ESD troubles.  I don't know if that was done during this vent cycle.

I ran a simulation of a coaxial cable with an open lossy resonant termination, and was able to mimic the loops and overall response seen in Marc's data.
Fil, Marc, Georgia
We went back down to End-Y to run some more tests on the ESD, including that mentioned in the first point of Rich's comment.
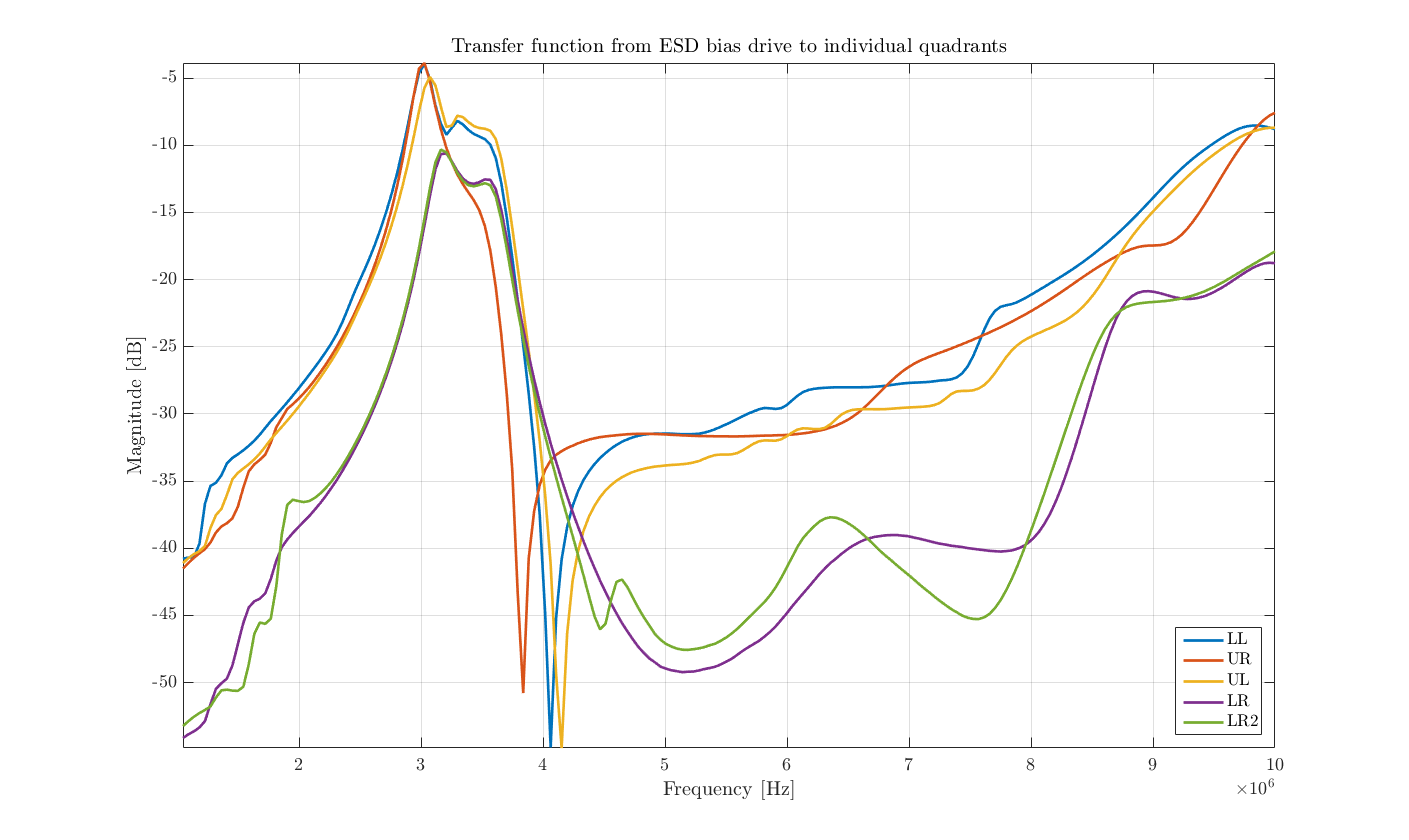

Following tests were redone yesterday afternoon.
Looking at feedthrough with pigtail connector attached checked for shorts across:
1. Pin to Shield on each individual SHV connector
2. Pin to Pin on all SHV connectors
3. Shield to Shield on all SHV connectors
4. Pin to Chamber GND on each individual SHV connector
5. Shield to Chamber GND on each individual SHV connector
All tests passed.
Place a T adapter in line with the LR segment and monitored voltage going into chamber. Same voltage was observed when connected to chamber vs not connected to chamber.
The AERM solder joints at the optic were intact in Jan 2018 during the install (alog 40336) - although this picture doesn't show the side shot for the LR.
It's hard to image that the solder joints (large and look very good in picture) have come undone. I know for a fact that upon my inspection of the top 5 pins while in-chamber this last Tuesday, the pins were still landed well and the solder/pin joint look the same as in this picture from Jan. It is very difficult to inspect the "bridges" that connect the barrel gold traces to the face traces, and I did not look specifically at those on Tuesday.

We have some new scans from ETMY Annular End Reaction Mass (AERM), LR quadrant. We tried scanning the LR quadrant while changing the other cable configurations to determine where the coupling is strongest. On the plot we can see the LR signal as it was in prior scans. We then disconnected the Bias at the ESD which shifted the trace slightly but not significantly. Next we disconnected the Bias at the feed through and saw a much larger shift. Next we reconnected the Bias at the feed-through, and disconnected the UR signal. This made the most difference to our trace which leads me to believe that there is more coupling between LR and UR, than there is between LR and Bias, which should be the case if we are disconnected at the joint on the side of the AERM. Disconnecting the UL signal made little difference to the coupling.
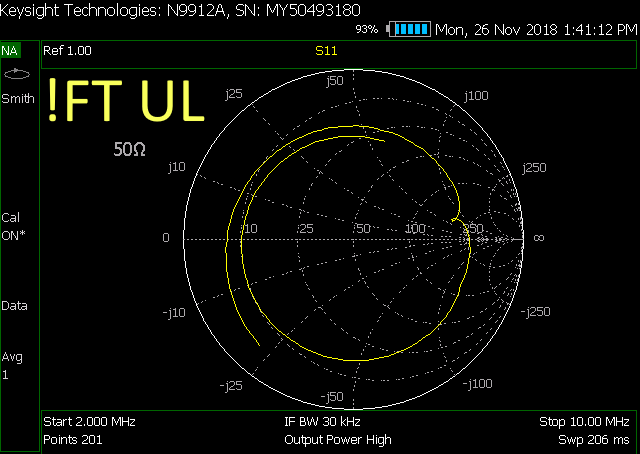
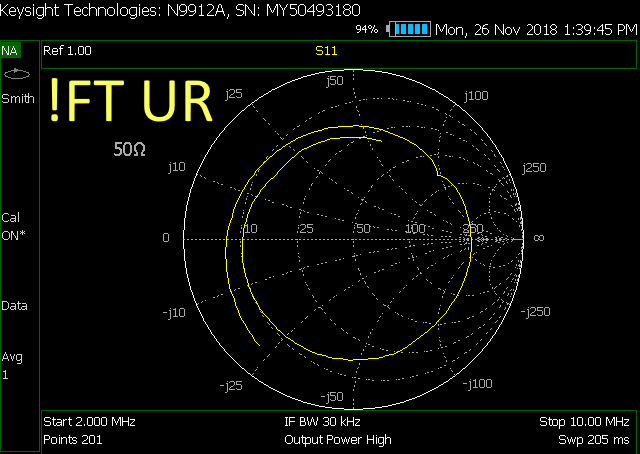
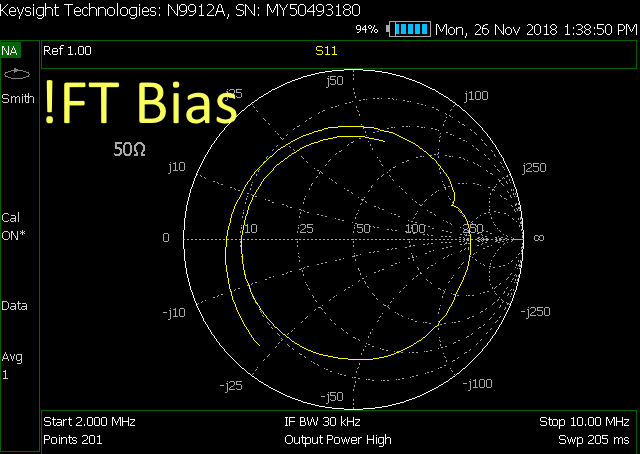

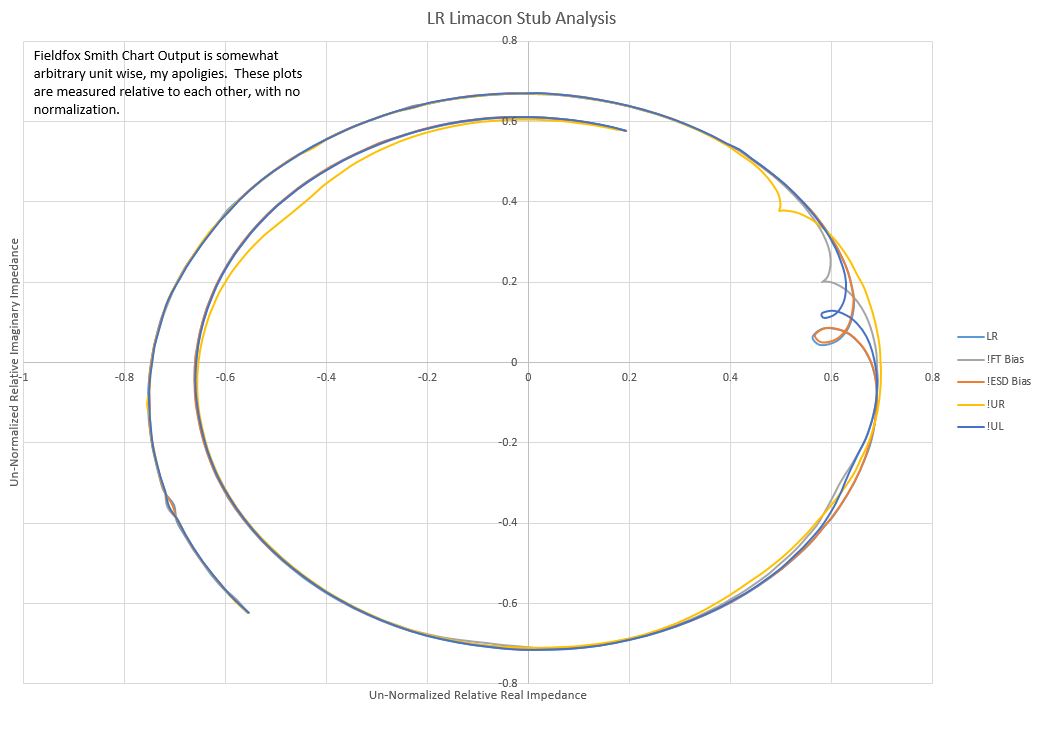
We scanned the LL quadrant in the same way we scanned the LR quadrant, I will post it here as a way to compare the known good lower quadrant with the sketchy lower quadrant.

Richard, Fil, Daniel
We are using the spare channel on the IMC demod board for REFL_B. This 2-chn demod has the new interface board which implements whitened readbacks for I and Q. The DB9 cable to the ADC was borrowed from the 4th port of the WFS interface in ISC-R4 (ISC_425). This port was never used.
Channels names are H1:LSC-REFL_B_RF9_I_ERR and H1:LSC-REFL_B_RF9_Q_ERR. We also get H1:IMC-REFL_RF24_I_ERR and H1:IMC-REFL_RF24_Q_ERR for free.
The 9.1 MHz LO is hooked up through a delay line. I measured 10dBm at the input to the LO. Earlier today the out-of-vacuum cables to the HAM1 flange were installed as well. The DC readback is through the 2nd port of the LSC PD interface in ISC-R1. The channel name is H1:LSC-REFL_B_LF_OUT. A separate RIN channel is also available.
Injected an RF signal into the RF input of the demod and checked that the readbacks and whitening are working. The whitening is 2 zeros at 2.98Hz and 2 complex poles at 30Hz with a Q of 0.57. The low frequency gain is 1, whereas the high frequency gain is 40.1dB.
Jeff B. phoned me while I was doing this as he had noticed a very large spike in particulate in the Y-end VEA which exactly correlated with my having done this. Investigation revealed that the Y-end Turbo's local scroll pump never got a particulate filter installed at its exhaust - Ooops! -> I located this unit and will install it.
Also, the chilled water booster pump used with the QDP80 is now leaking at the pump end -> will put this on the list.
FRS ticket 11827
11/15/2018
I installed the particulate filter on the exhaust of the Y-end local scroll pump.
The phase frequency discriminator (PFD) and both IQ demodulators in the corner have been upgraded with the local oscillator (LO) modification and in the case of the IQ Demods their power interface board has been upgraded to allow more readbacks. End Stations and and some spares remain to be upgraded.
S1000771, S1000772 Demods
S1000761 PFD (this was completed here ALOG43041)
I verified that the I outputs of the demodulators for REFL_A and REFLAIR_A are hooked up as I channels in the DAQ. For both demodulators the I channels is sent to the summing board. This is consistent with alog 44378.
I also verified that the remote controls for the IMC-REFL/LSC-REFL_B dual delay line phase shifter are working correctly.
Continuing work on this, all installed chassis have been upgraded.
End X PFD - S1000758
End X Demod - S1000778
End Y PFD - S1000759
End Y Demod - S1000779
Spares are still being worked on awaiting parts.
