jim.warner@LIGO.ORG - posted 13:39, Wednesday 03 October 2018 (44321)
Weekly PSL Chiller reservoir top off
Added 50 ml to Wallace.
Added 50 ml to Wallace.
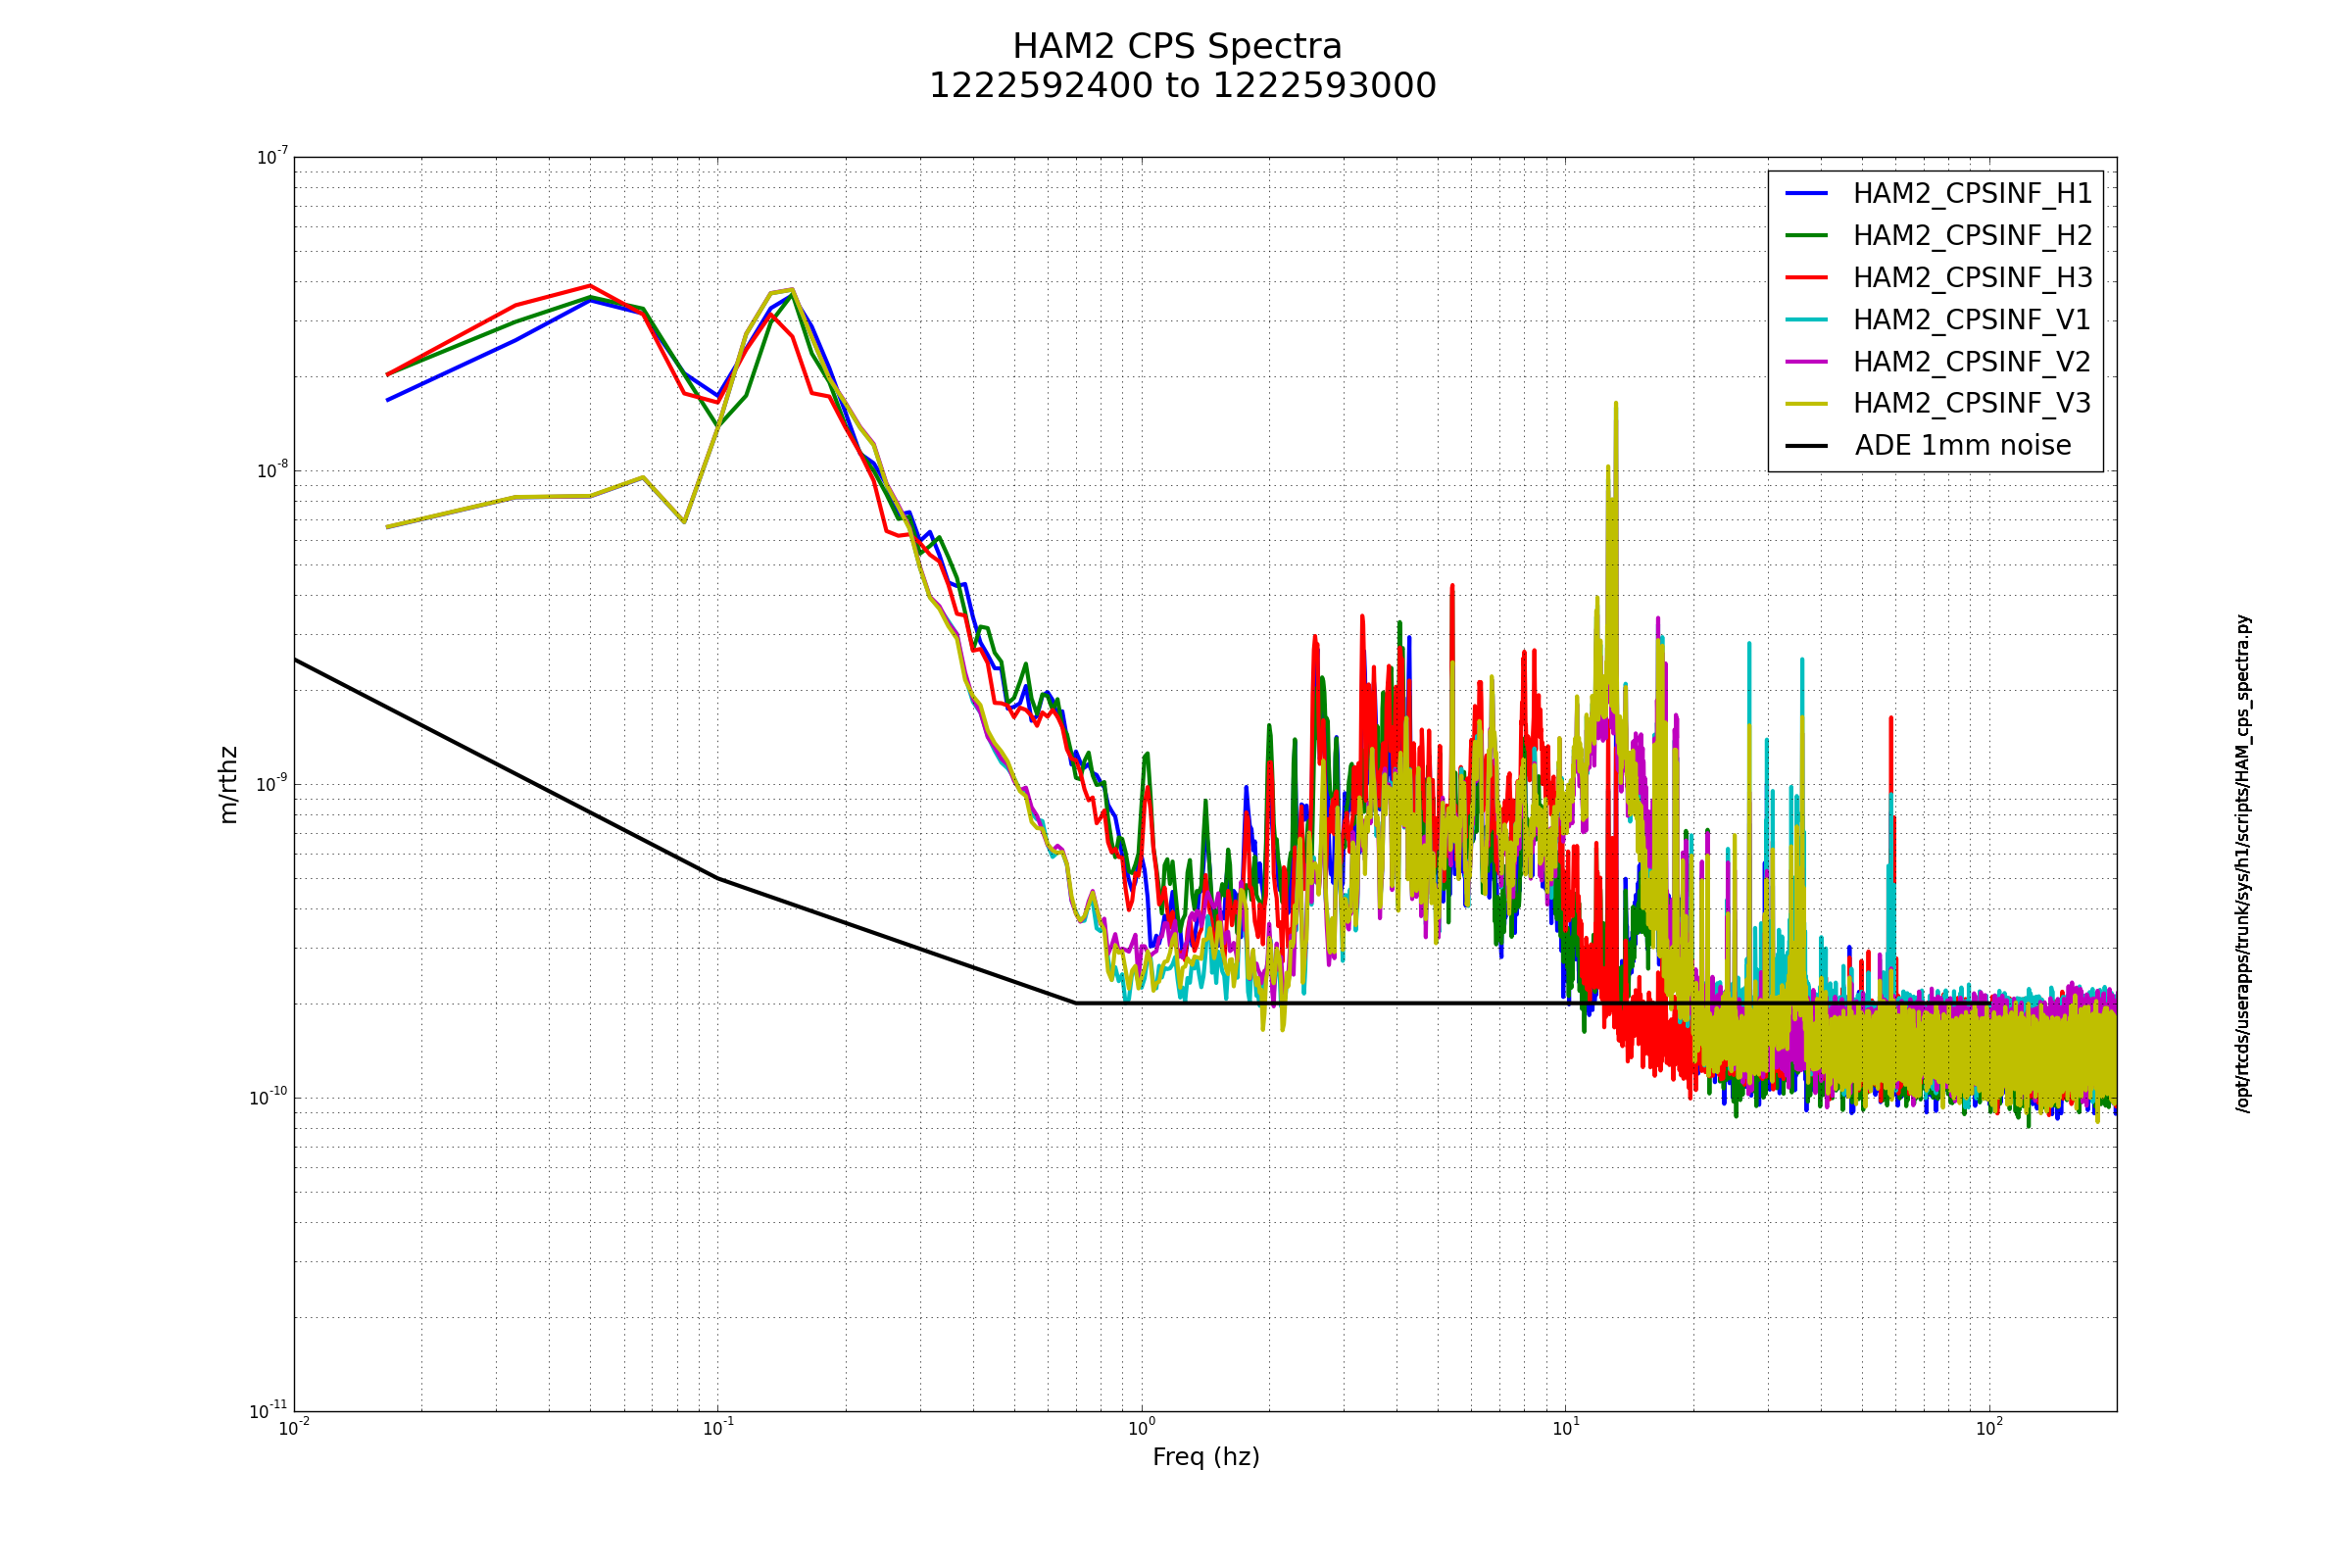
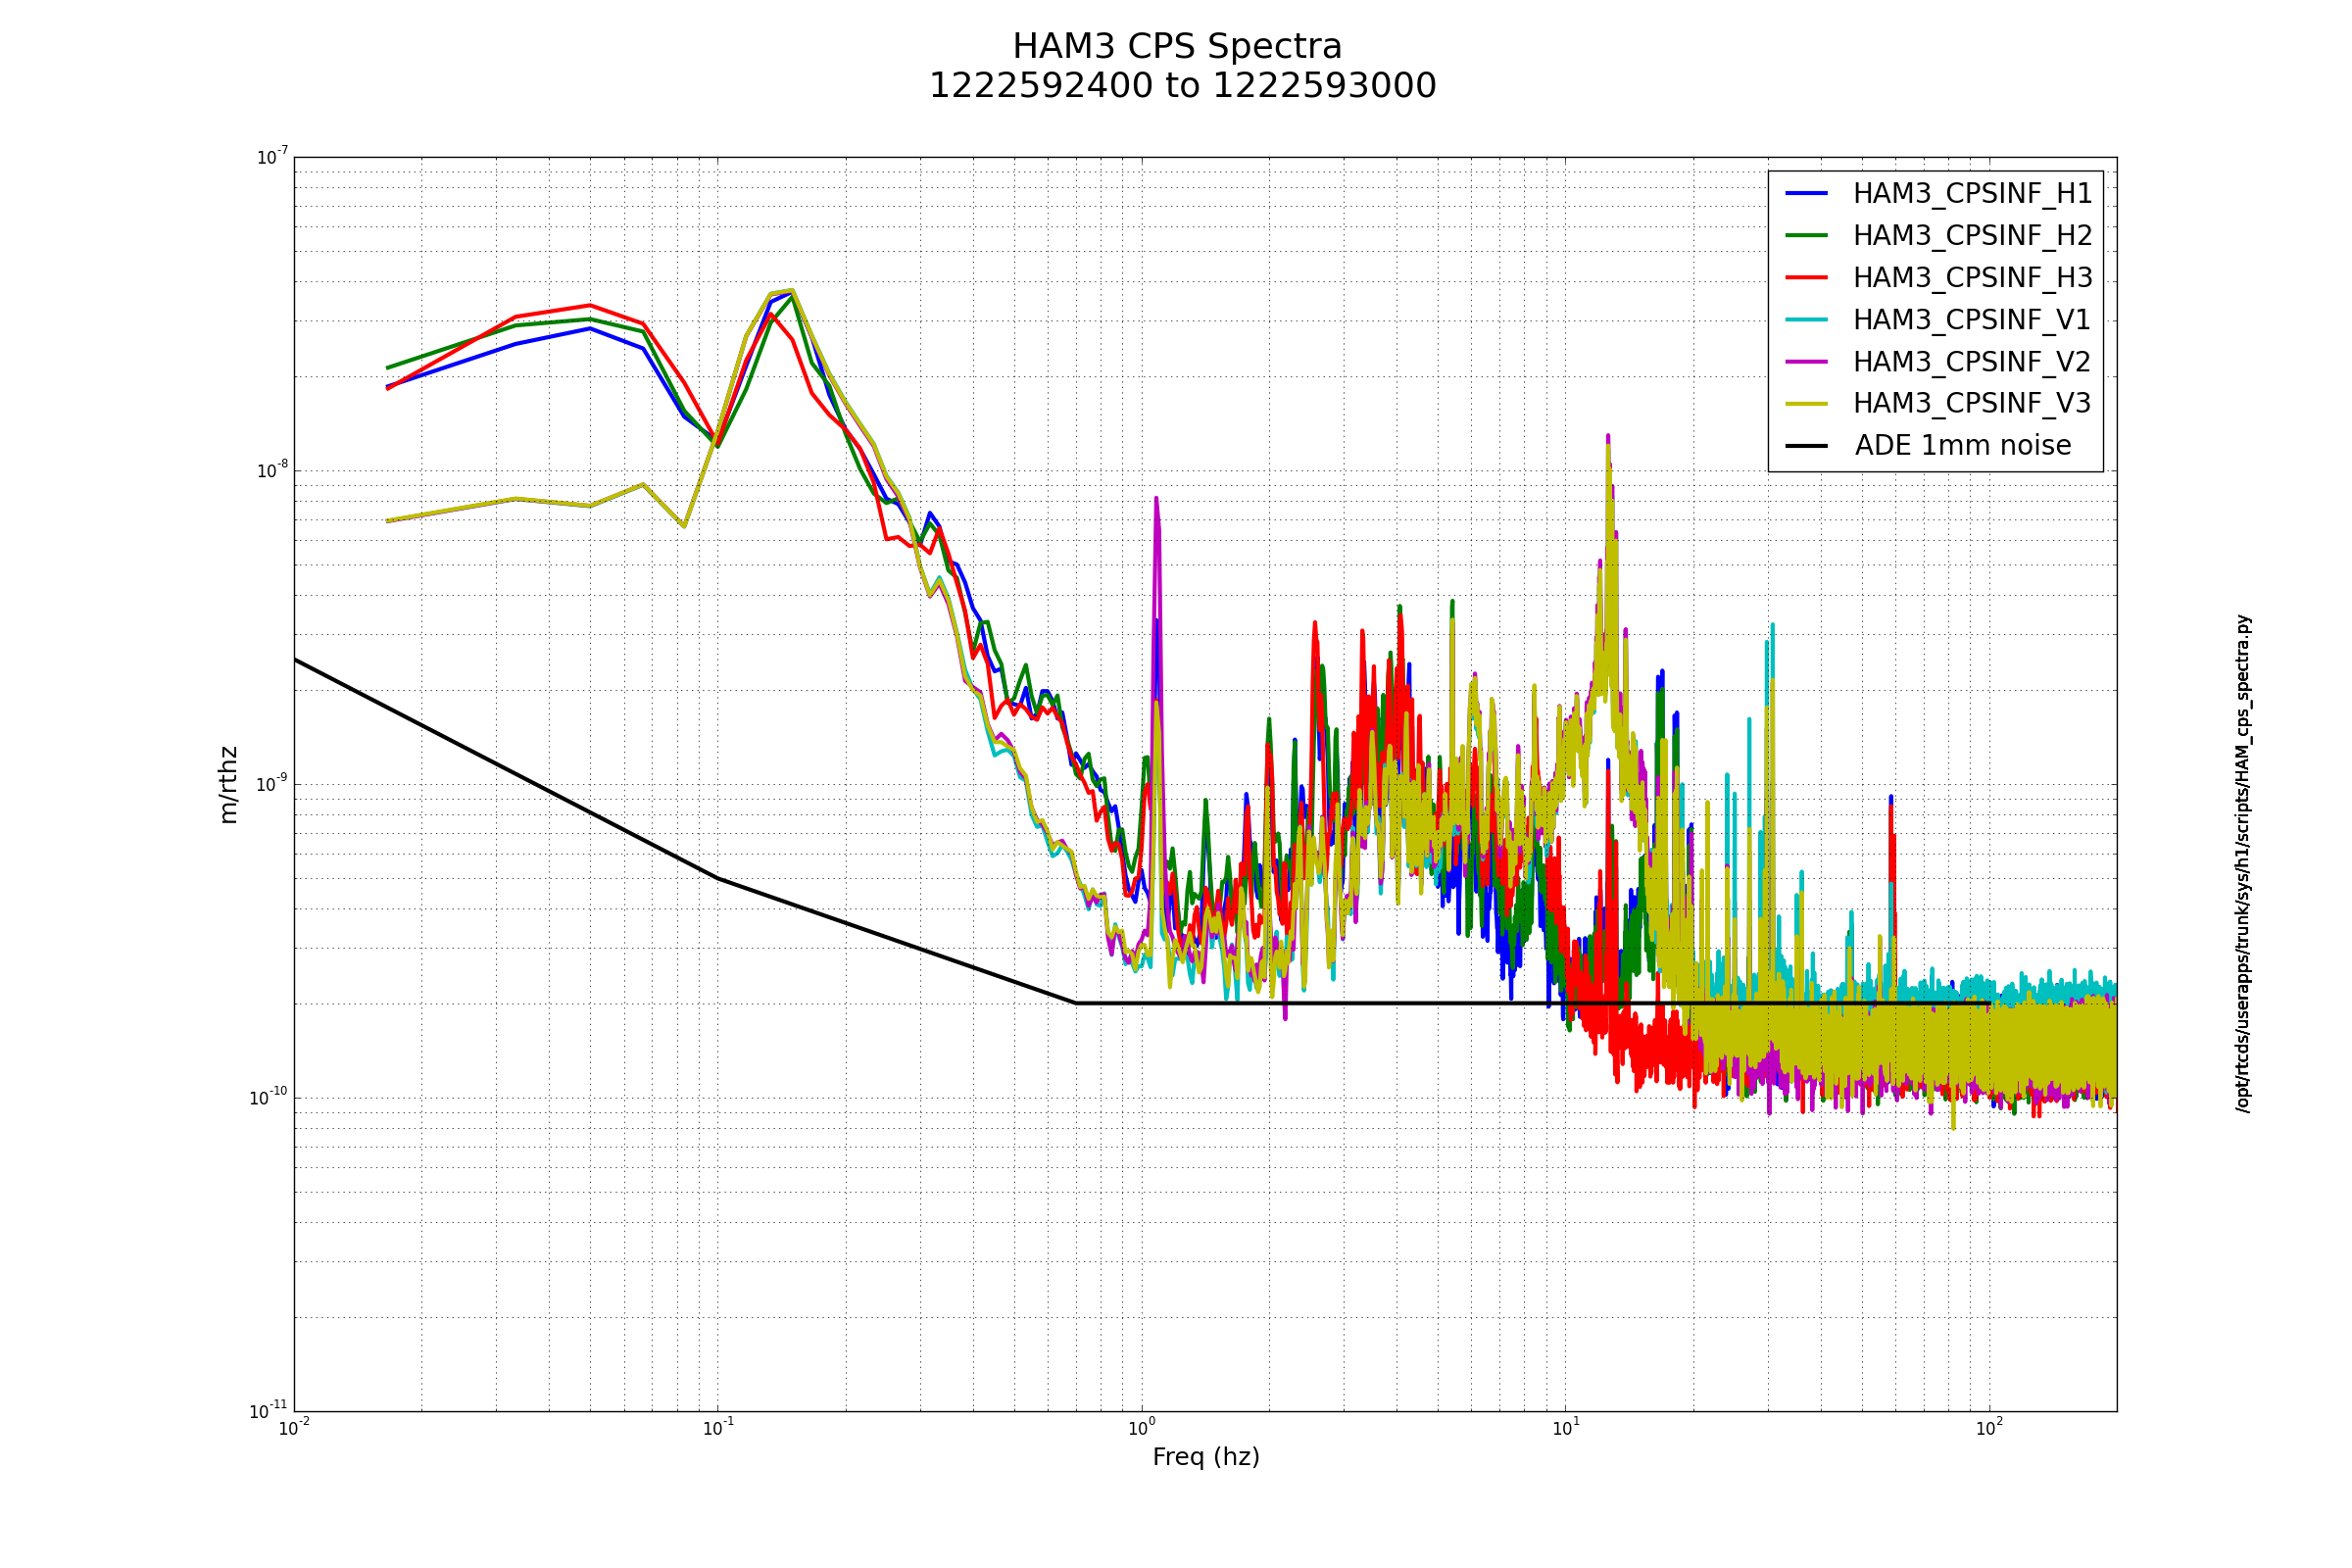
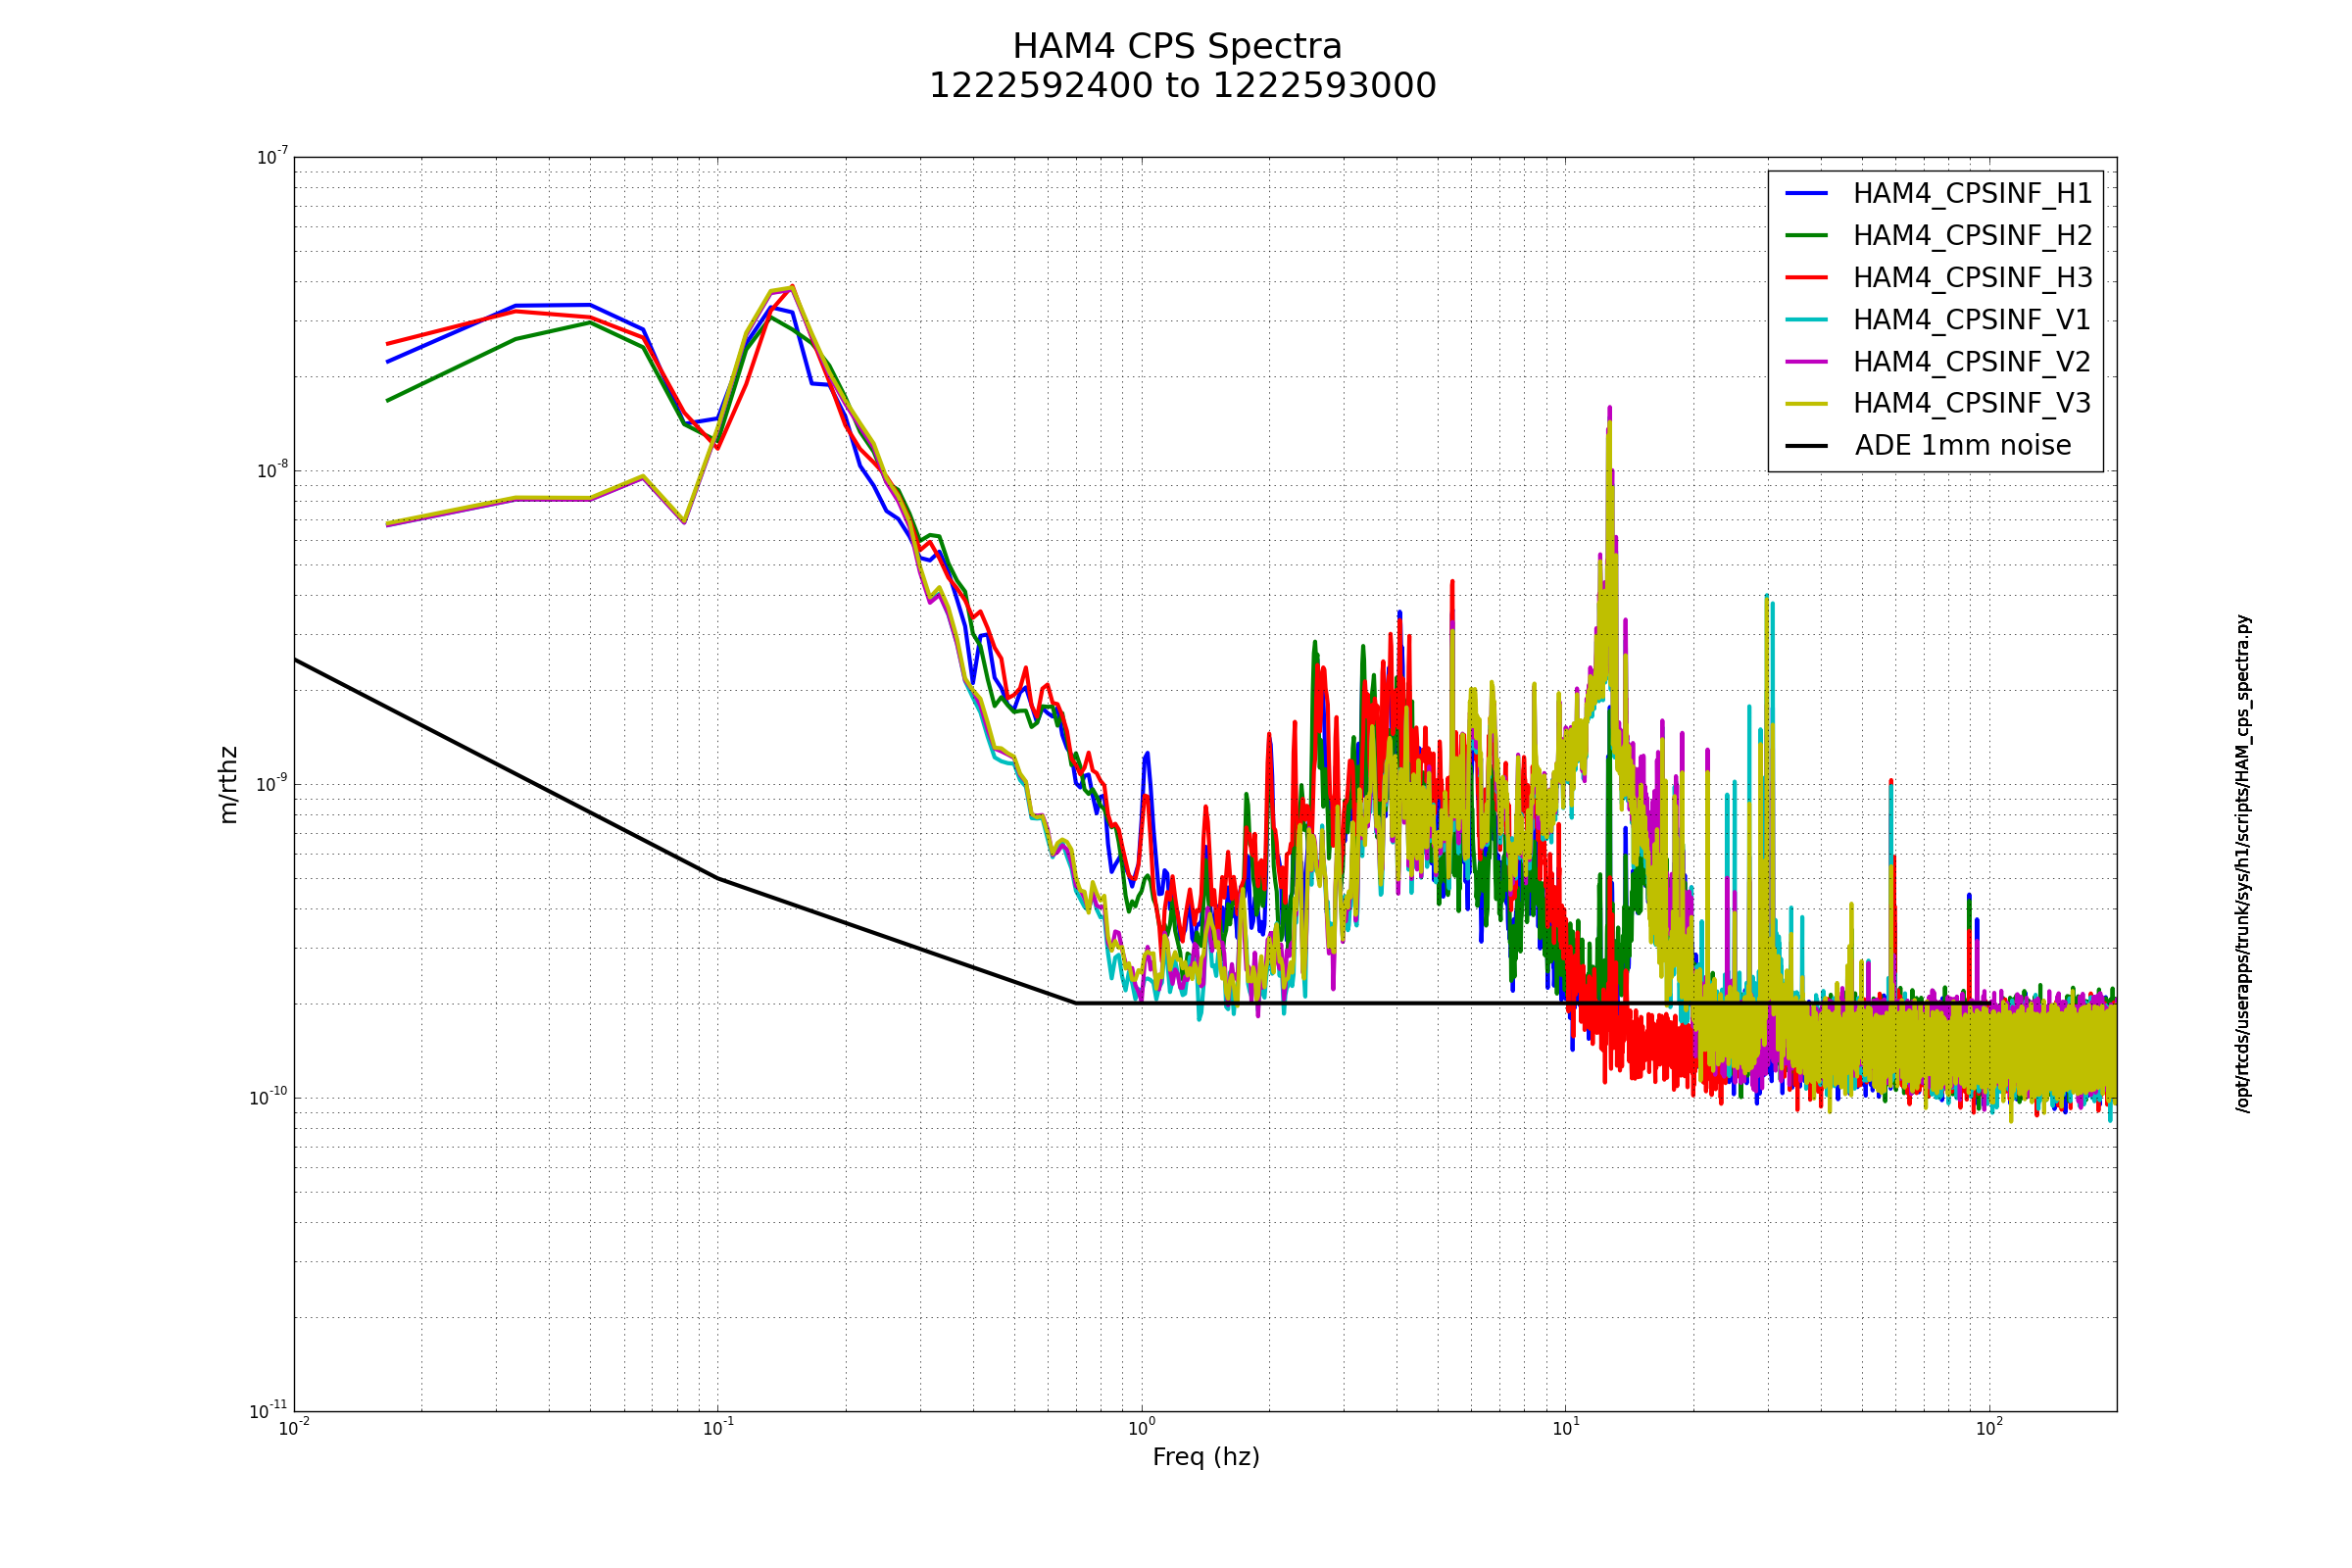
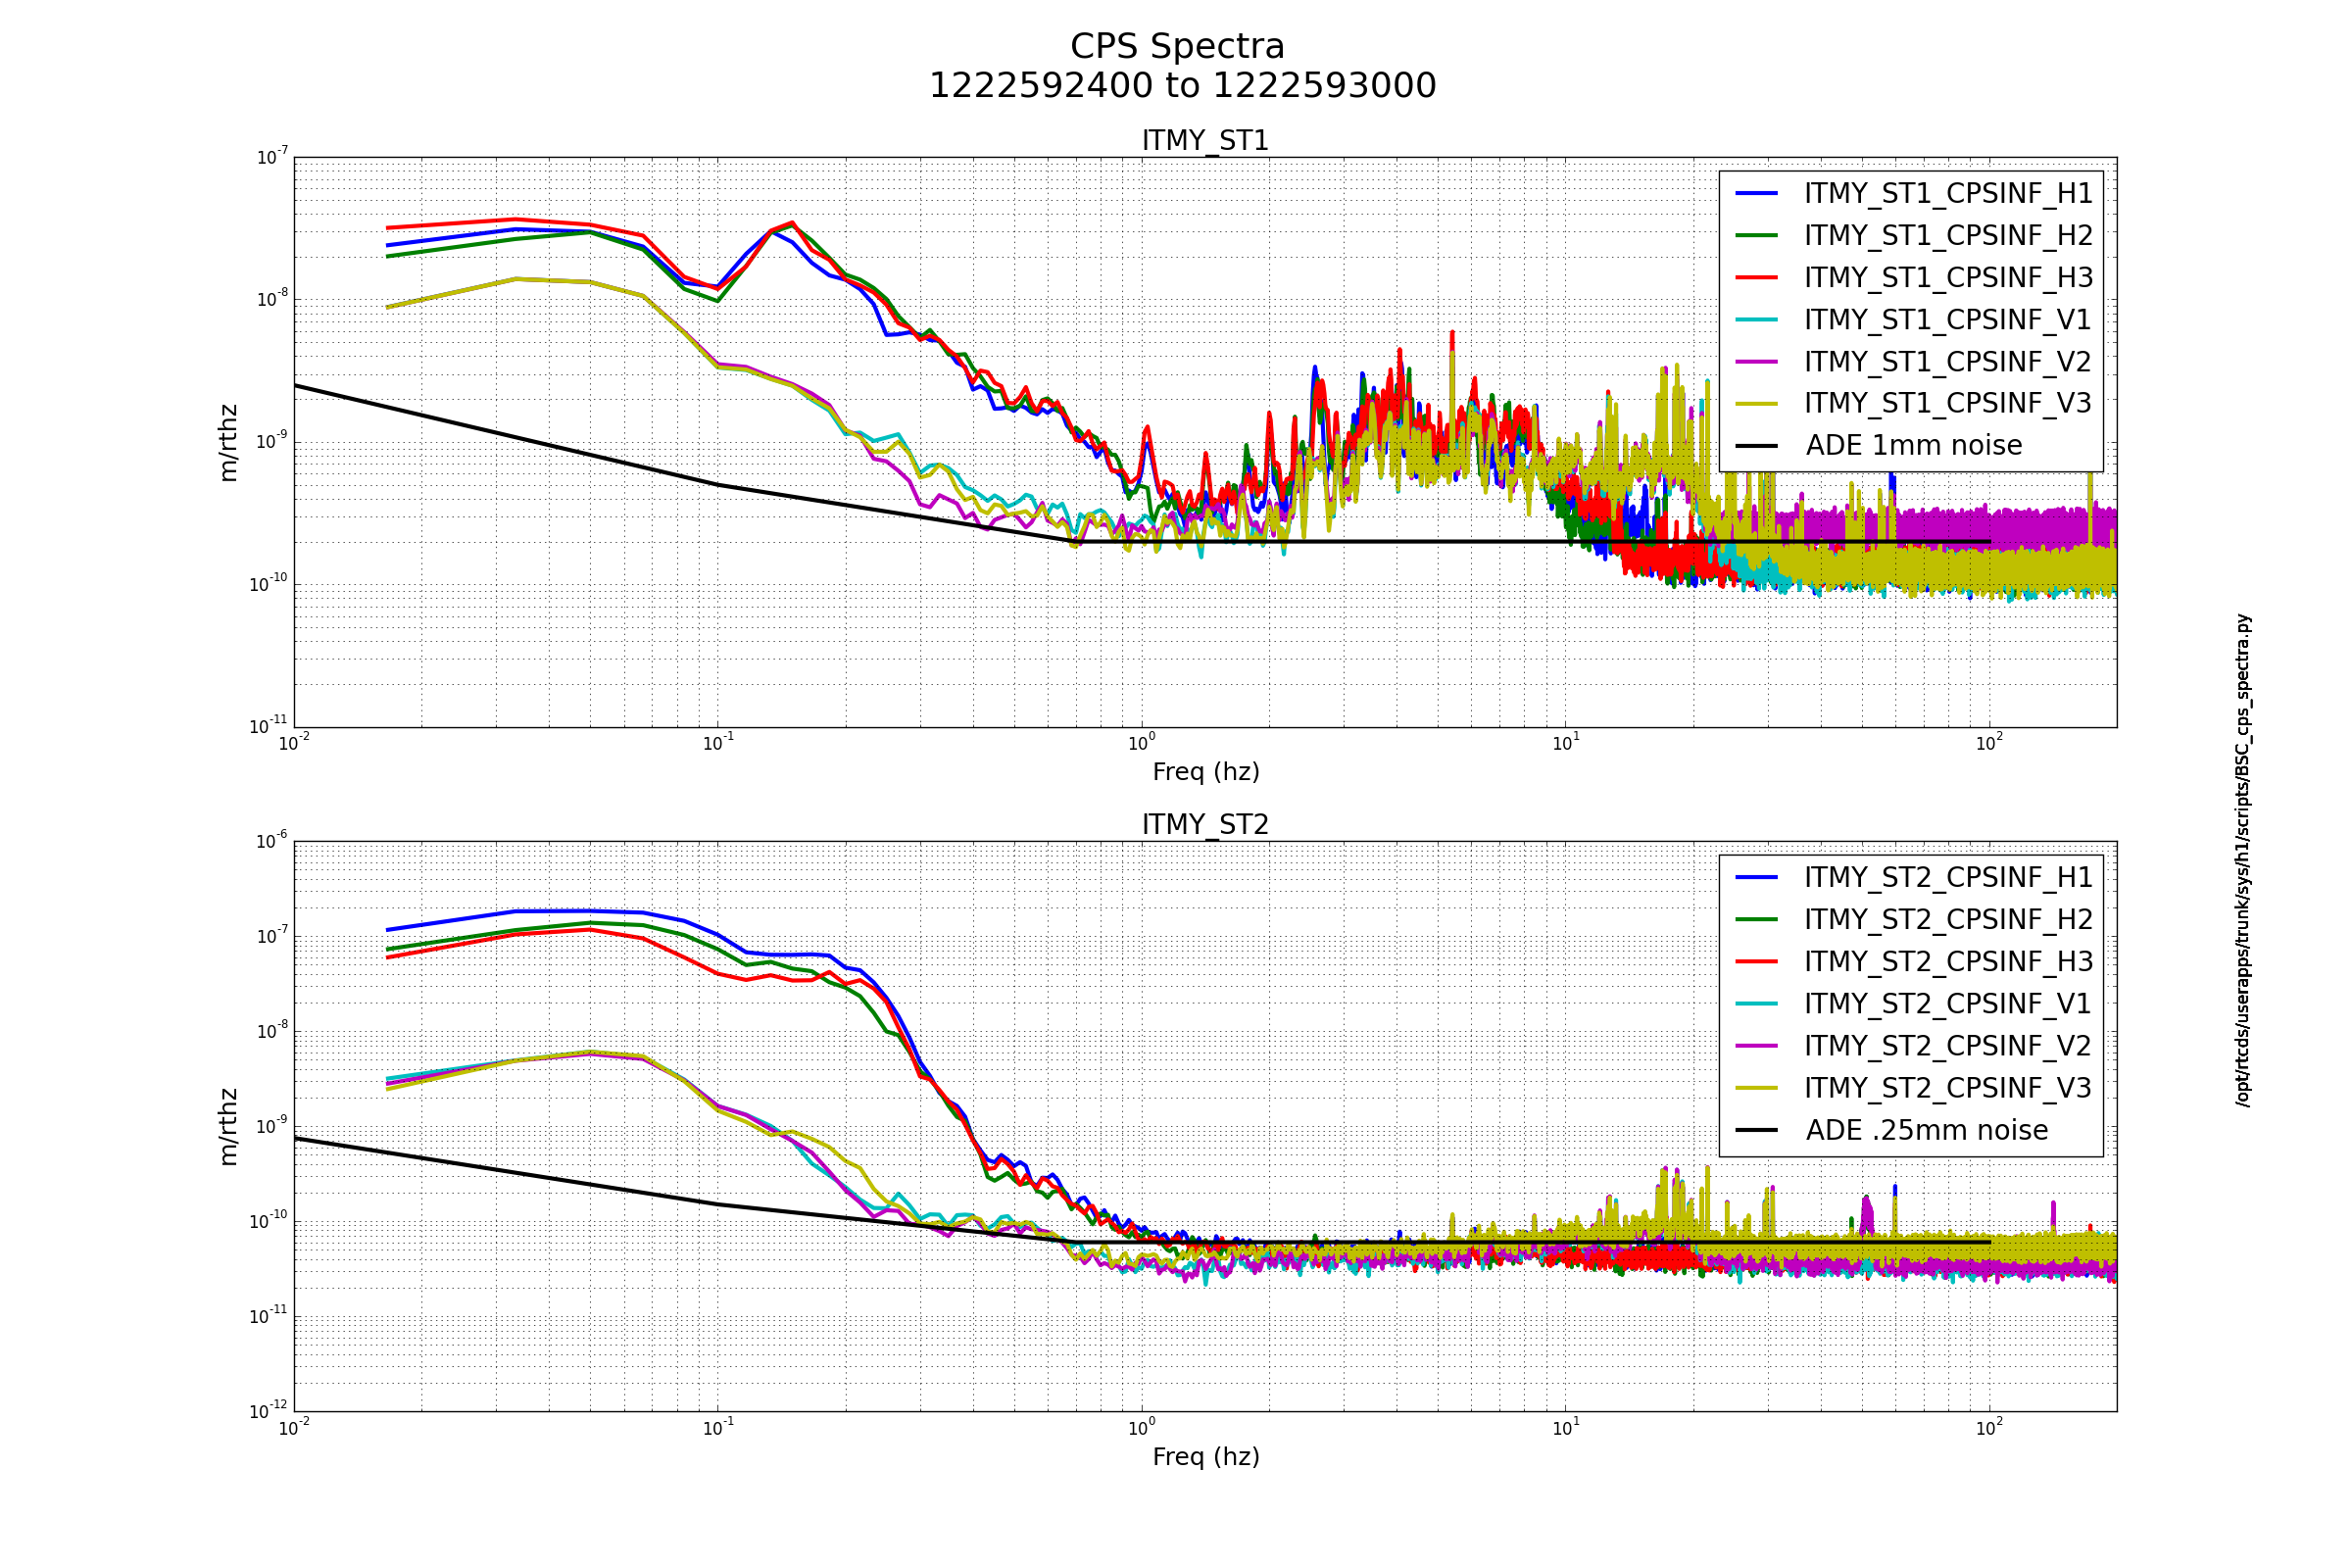
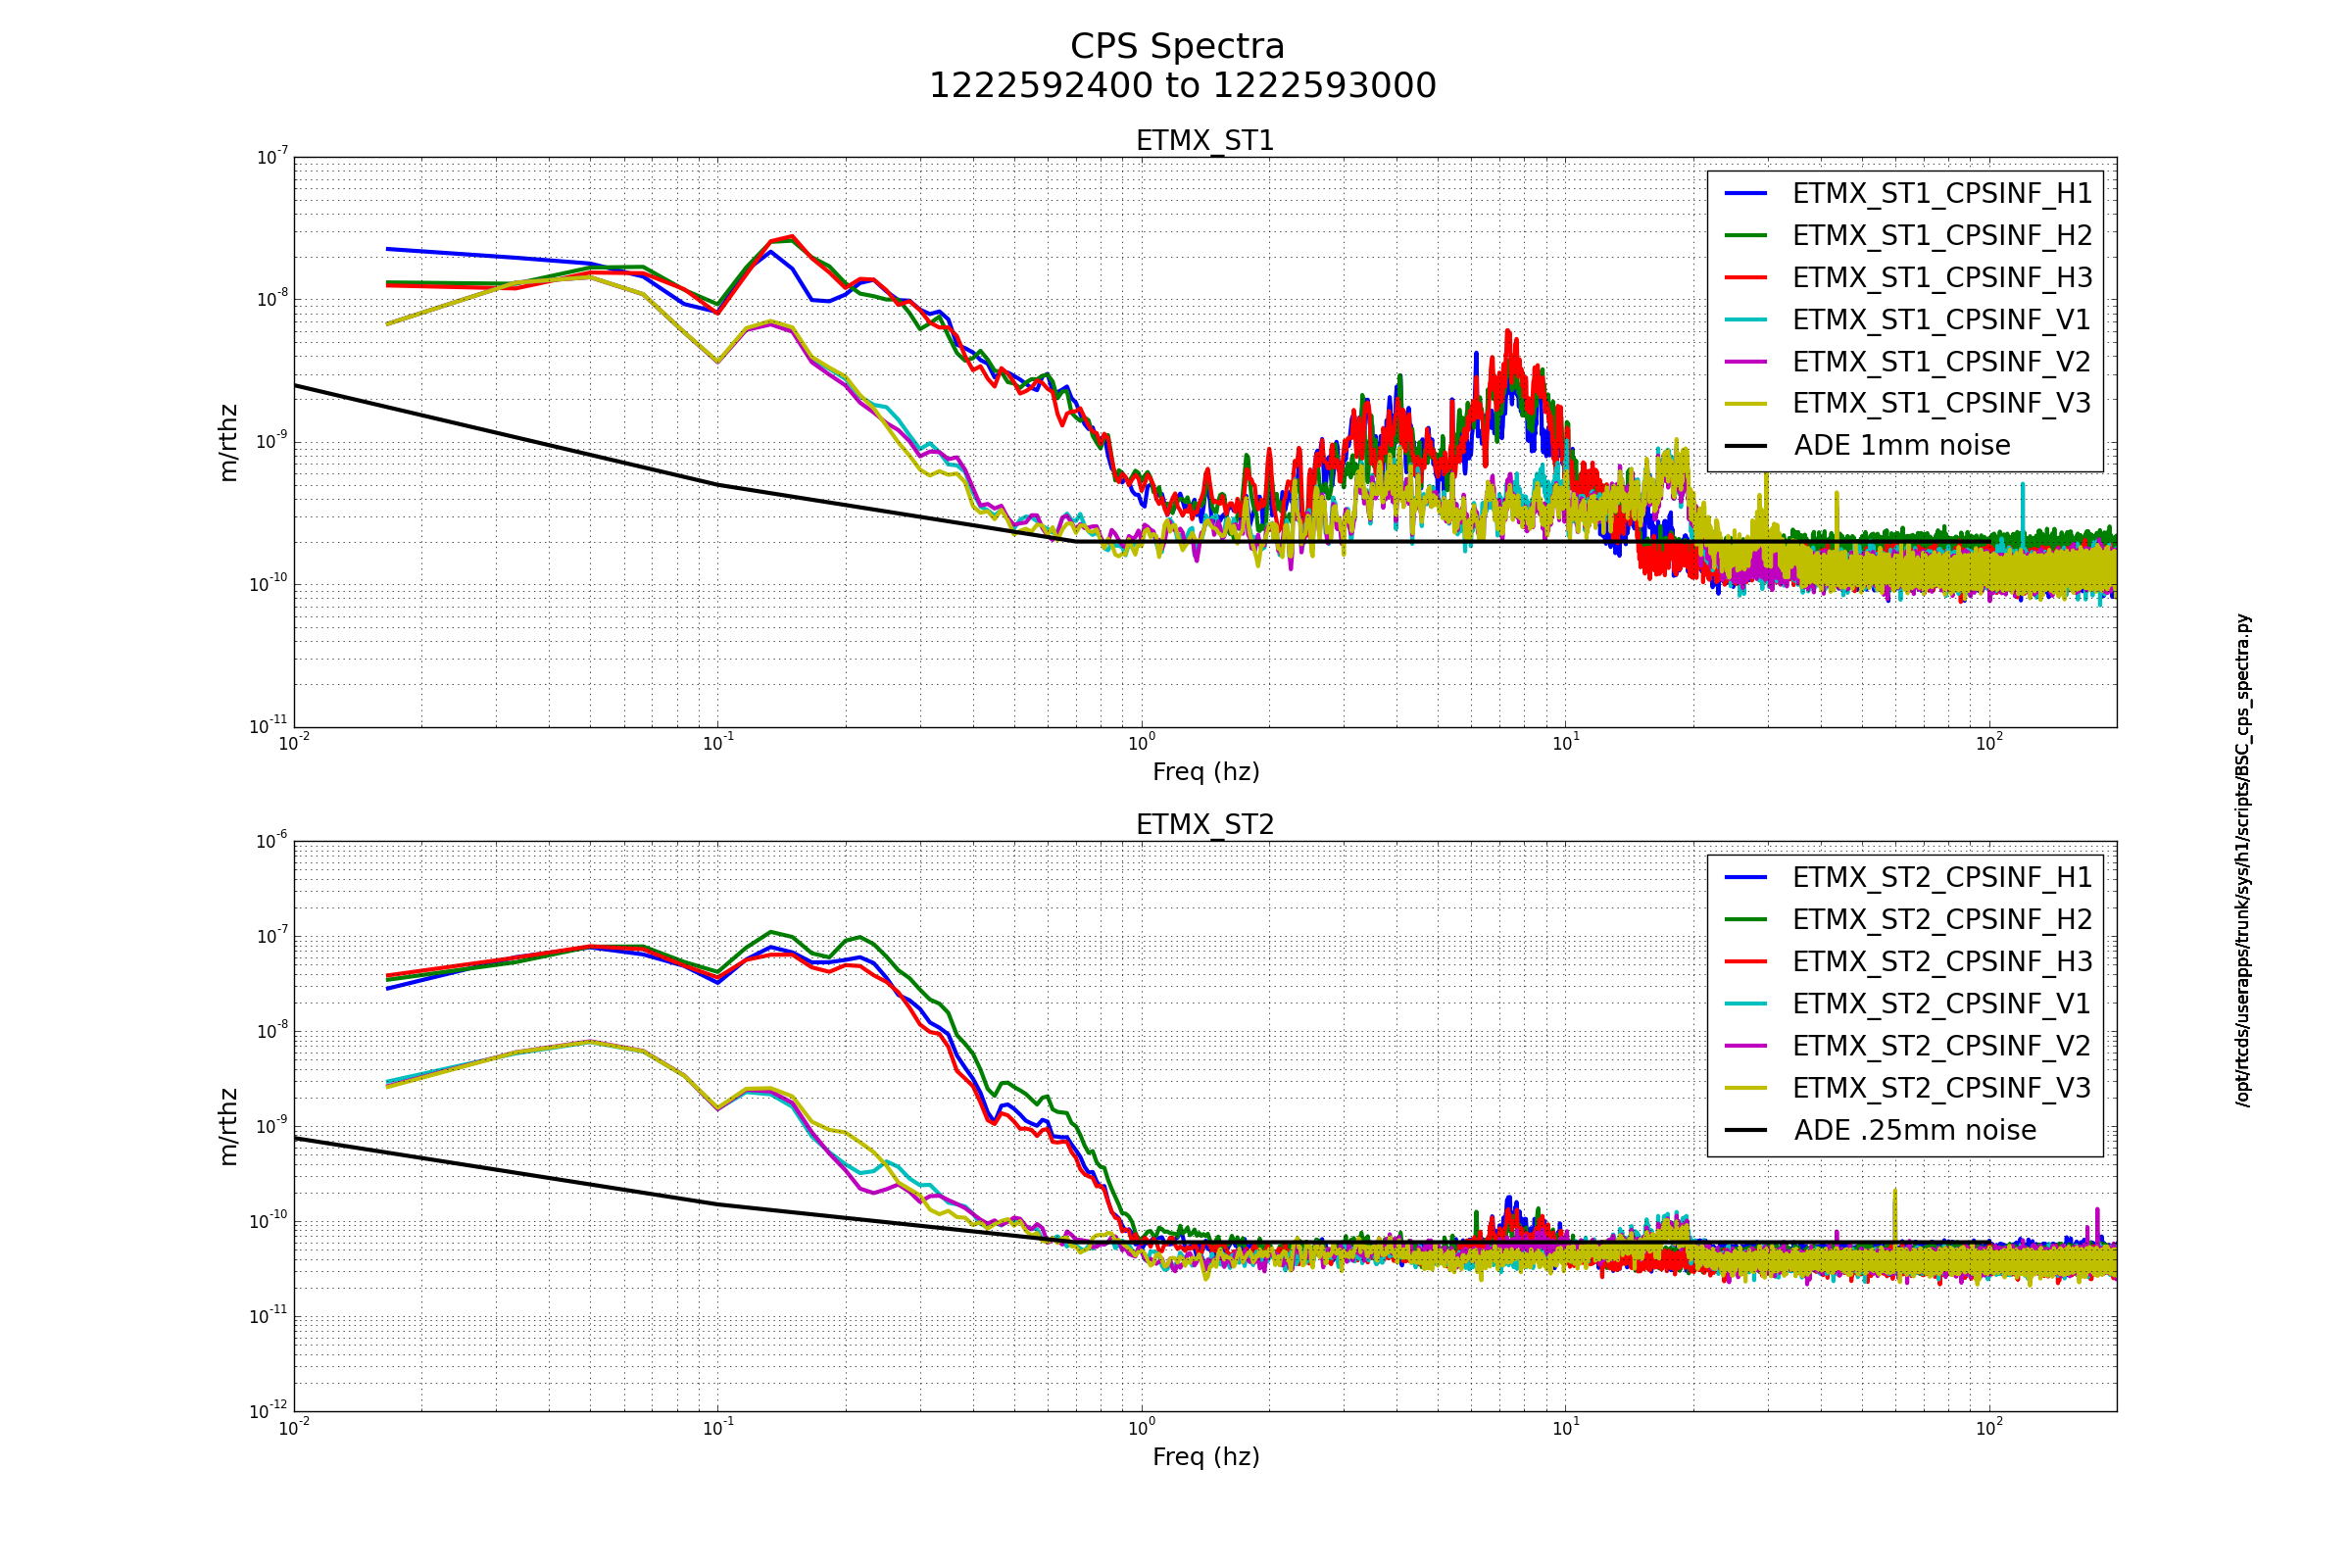
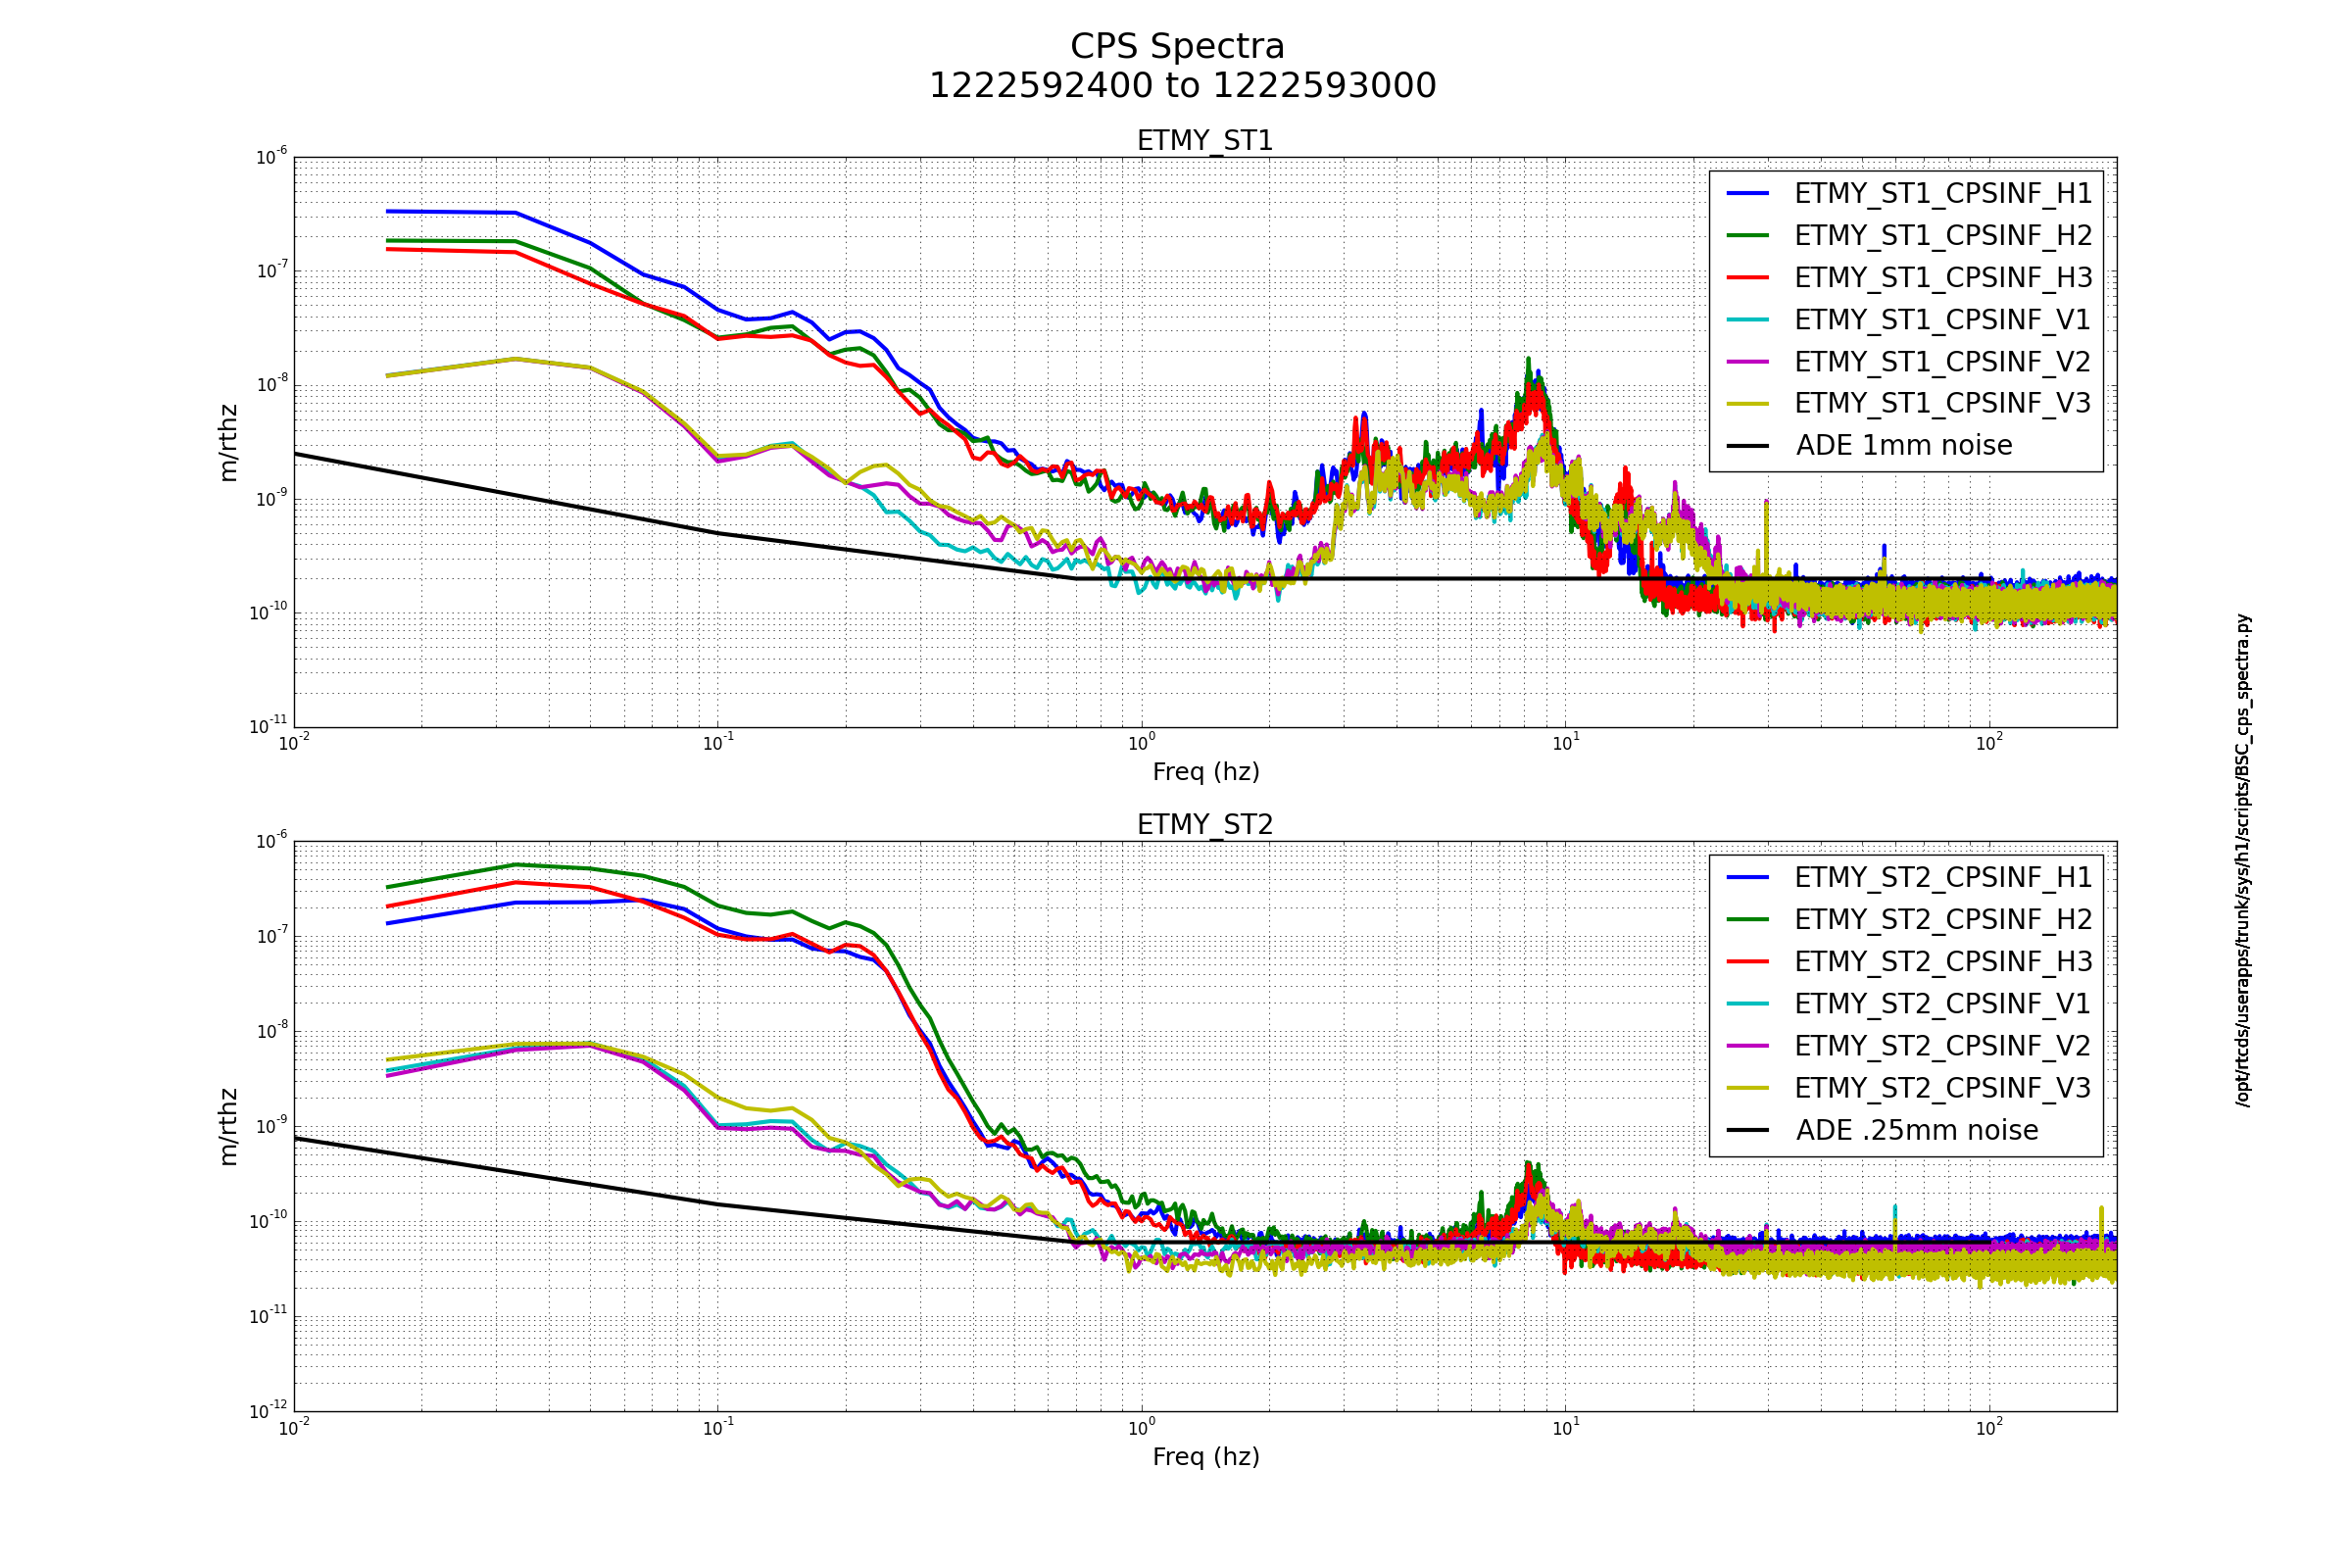
High frequency noise looks okay for all chambers, although a couple on the BS are a little high.
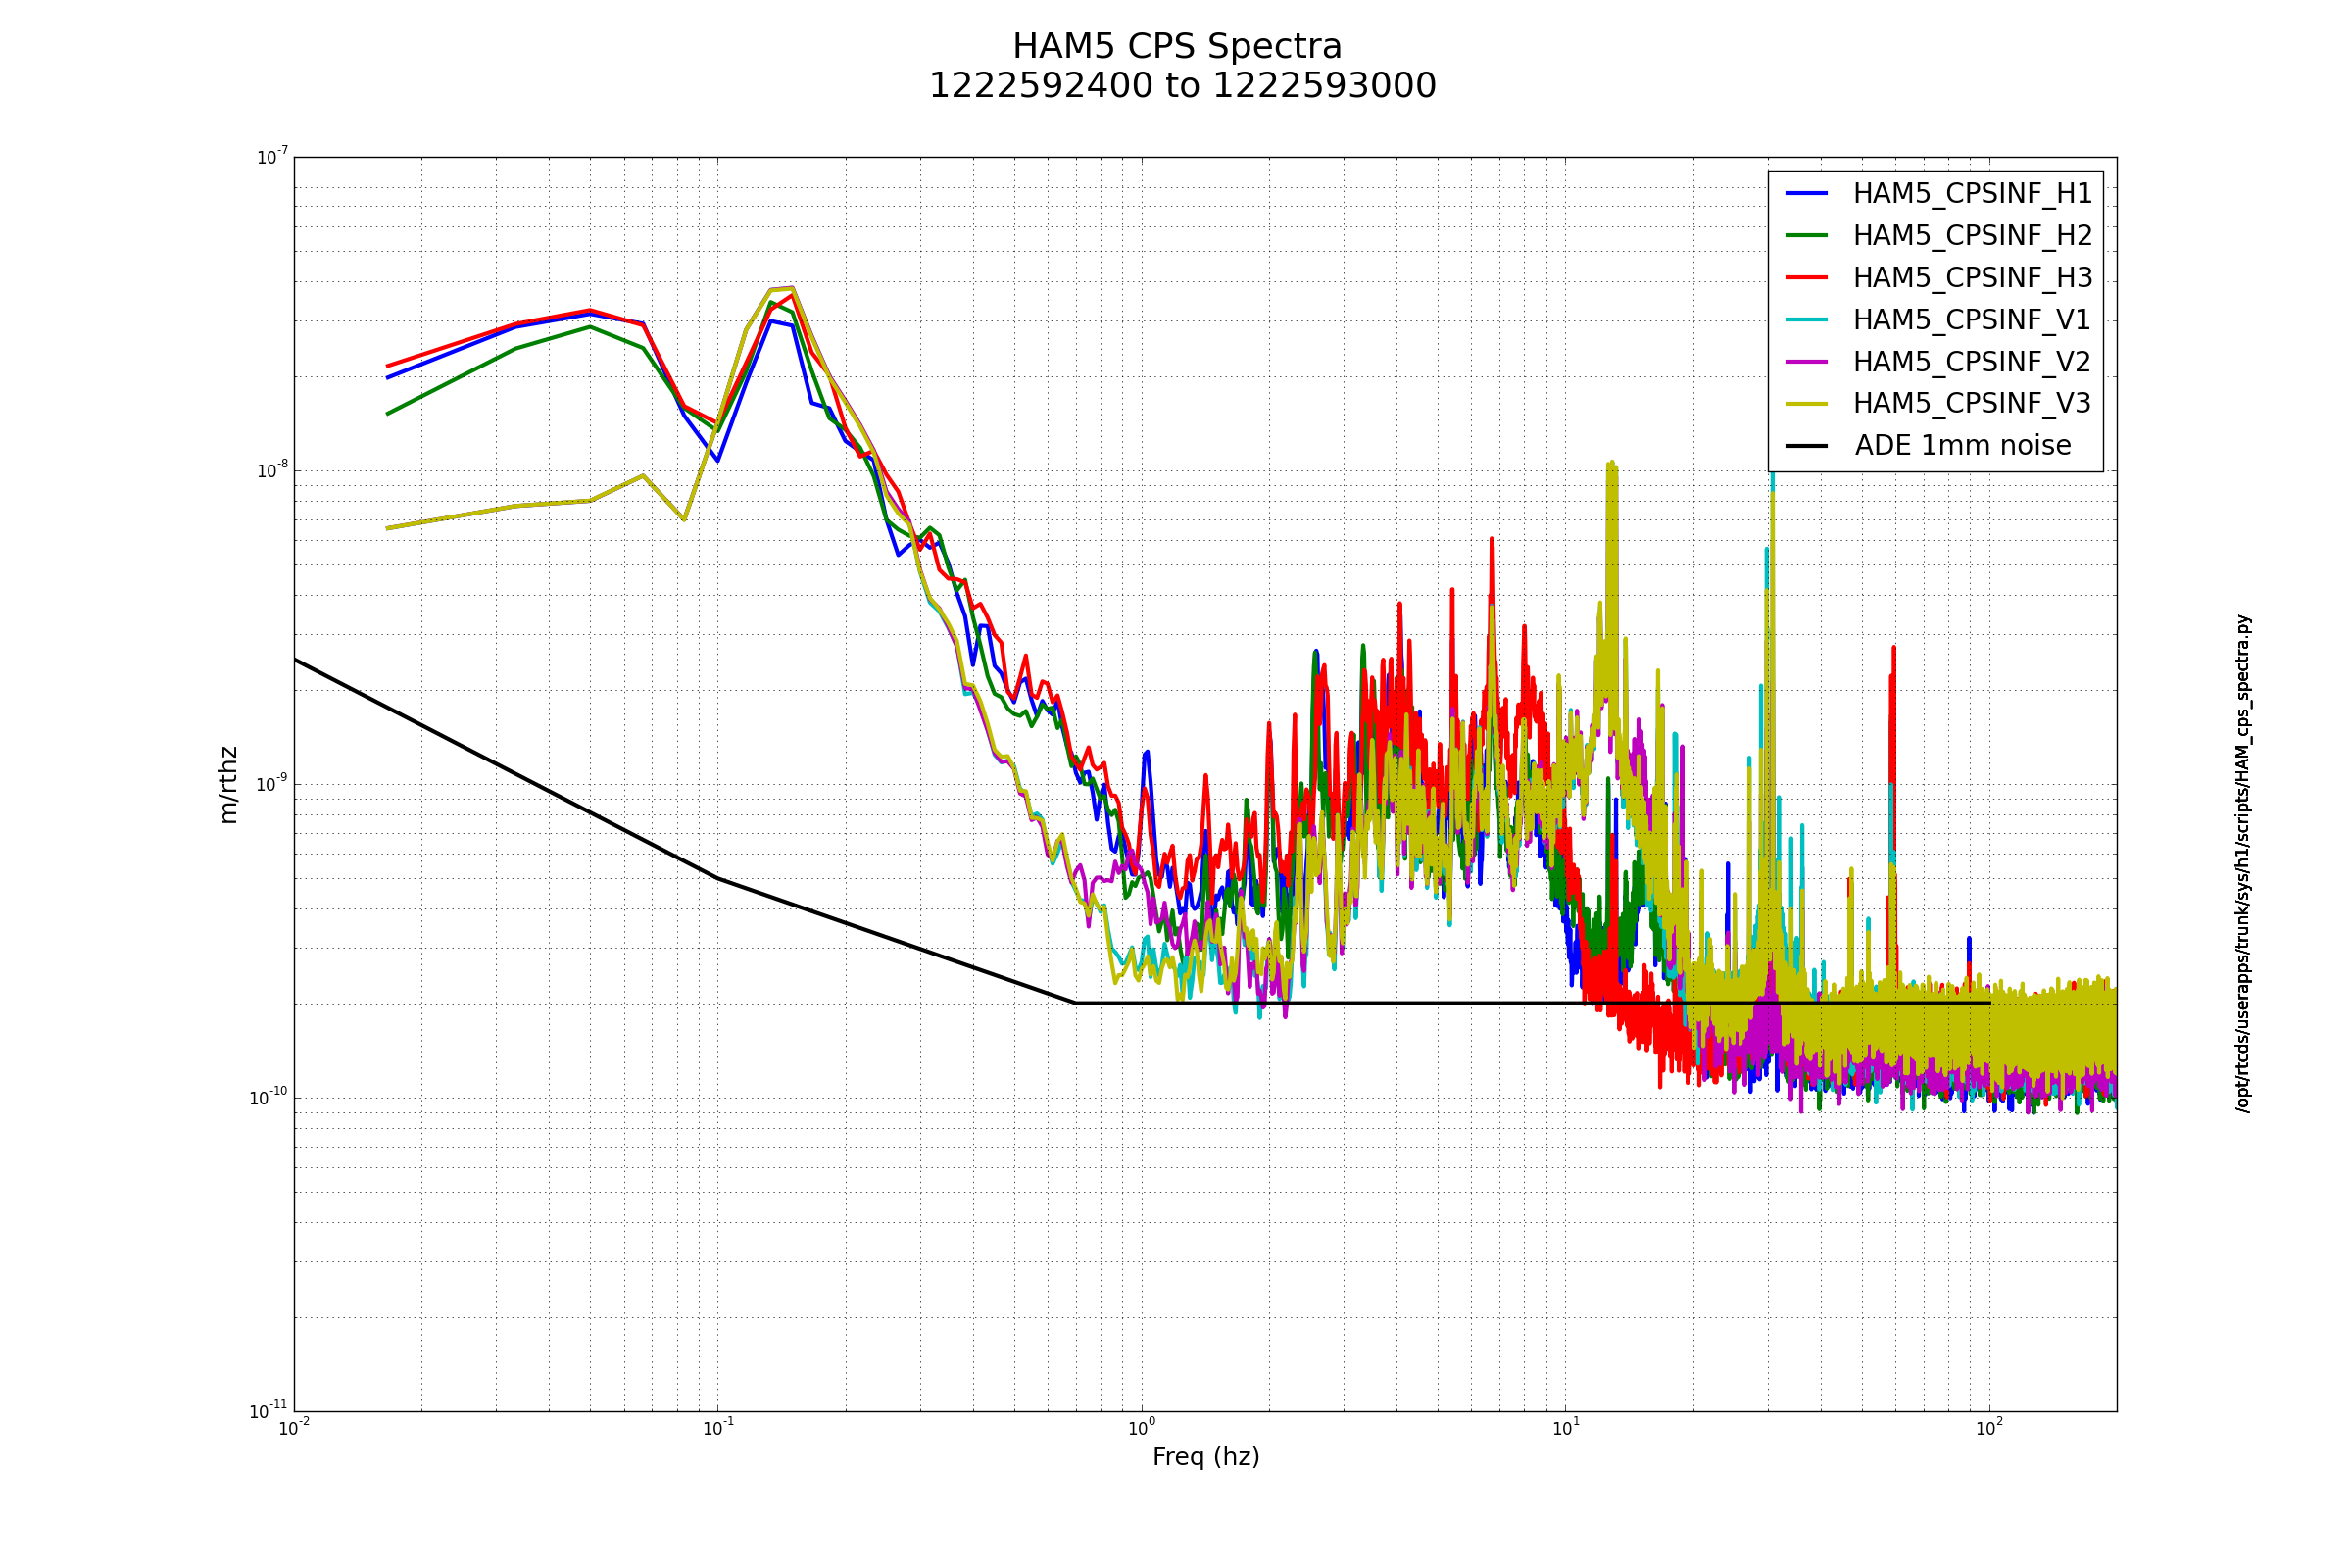
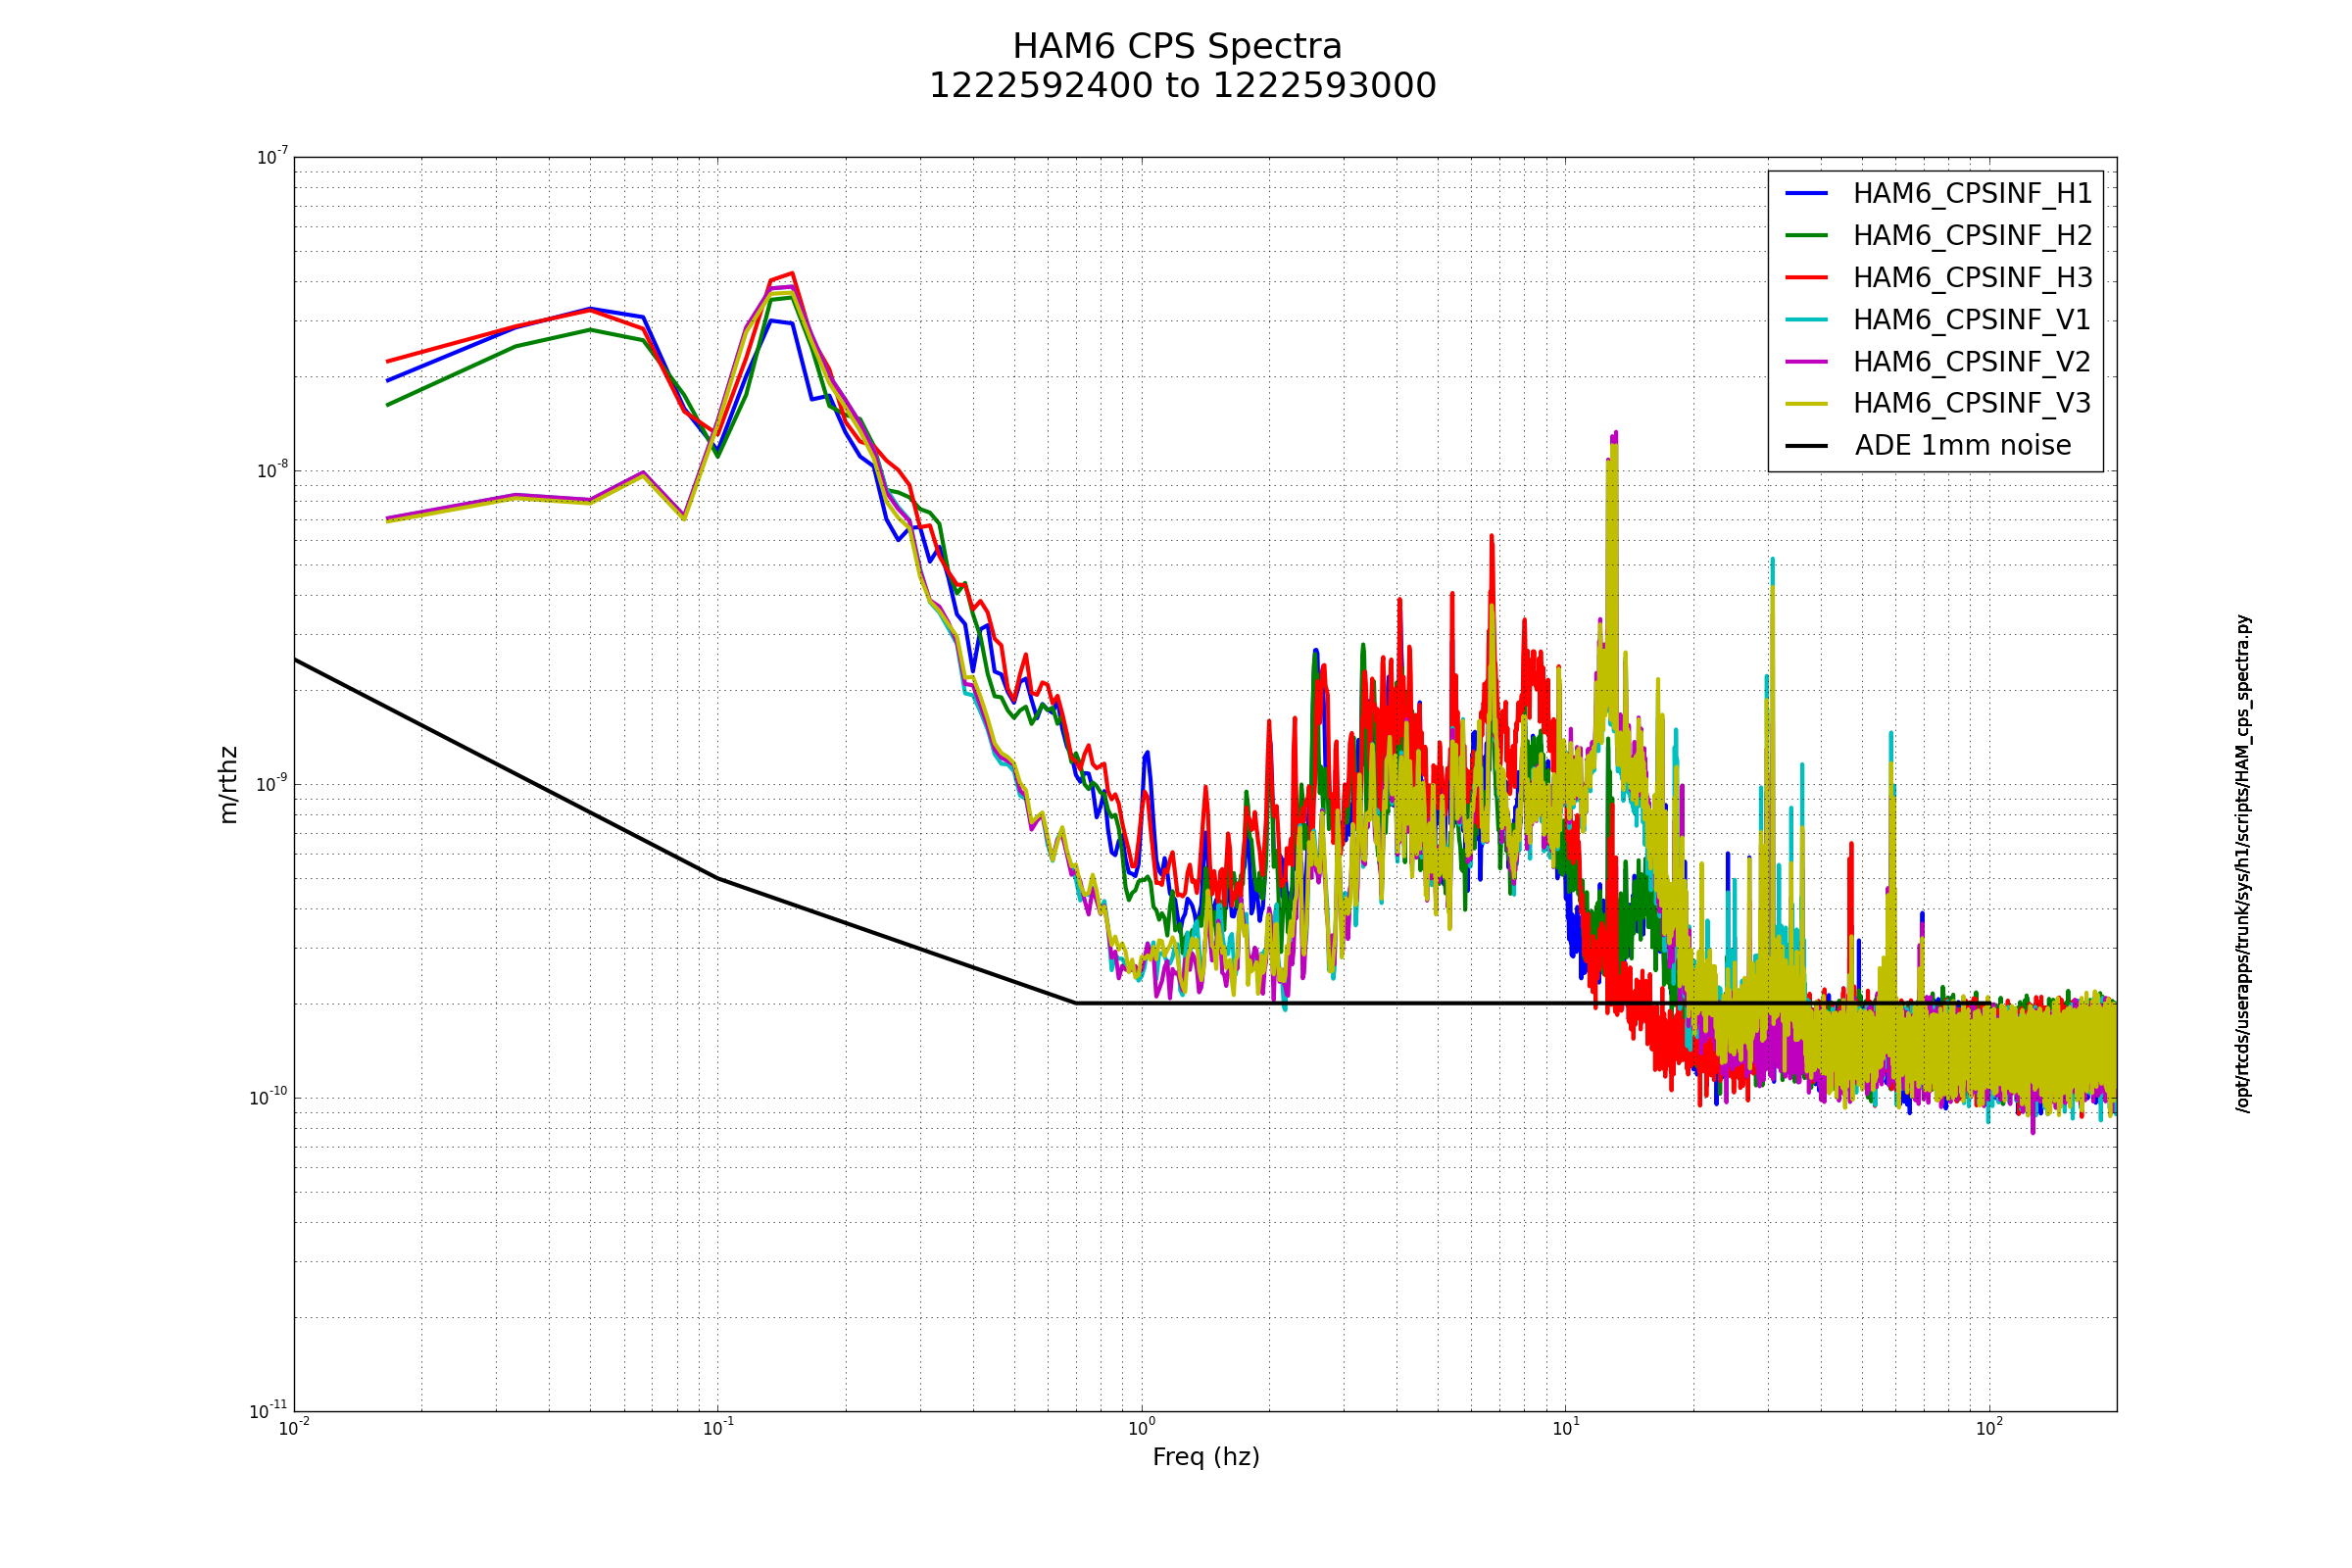
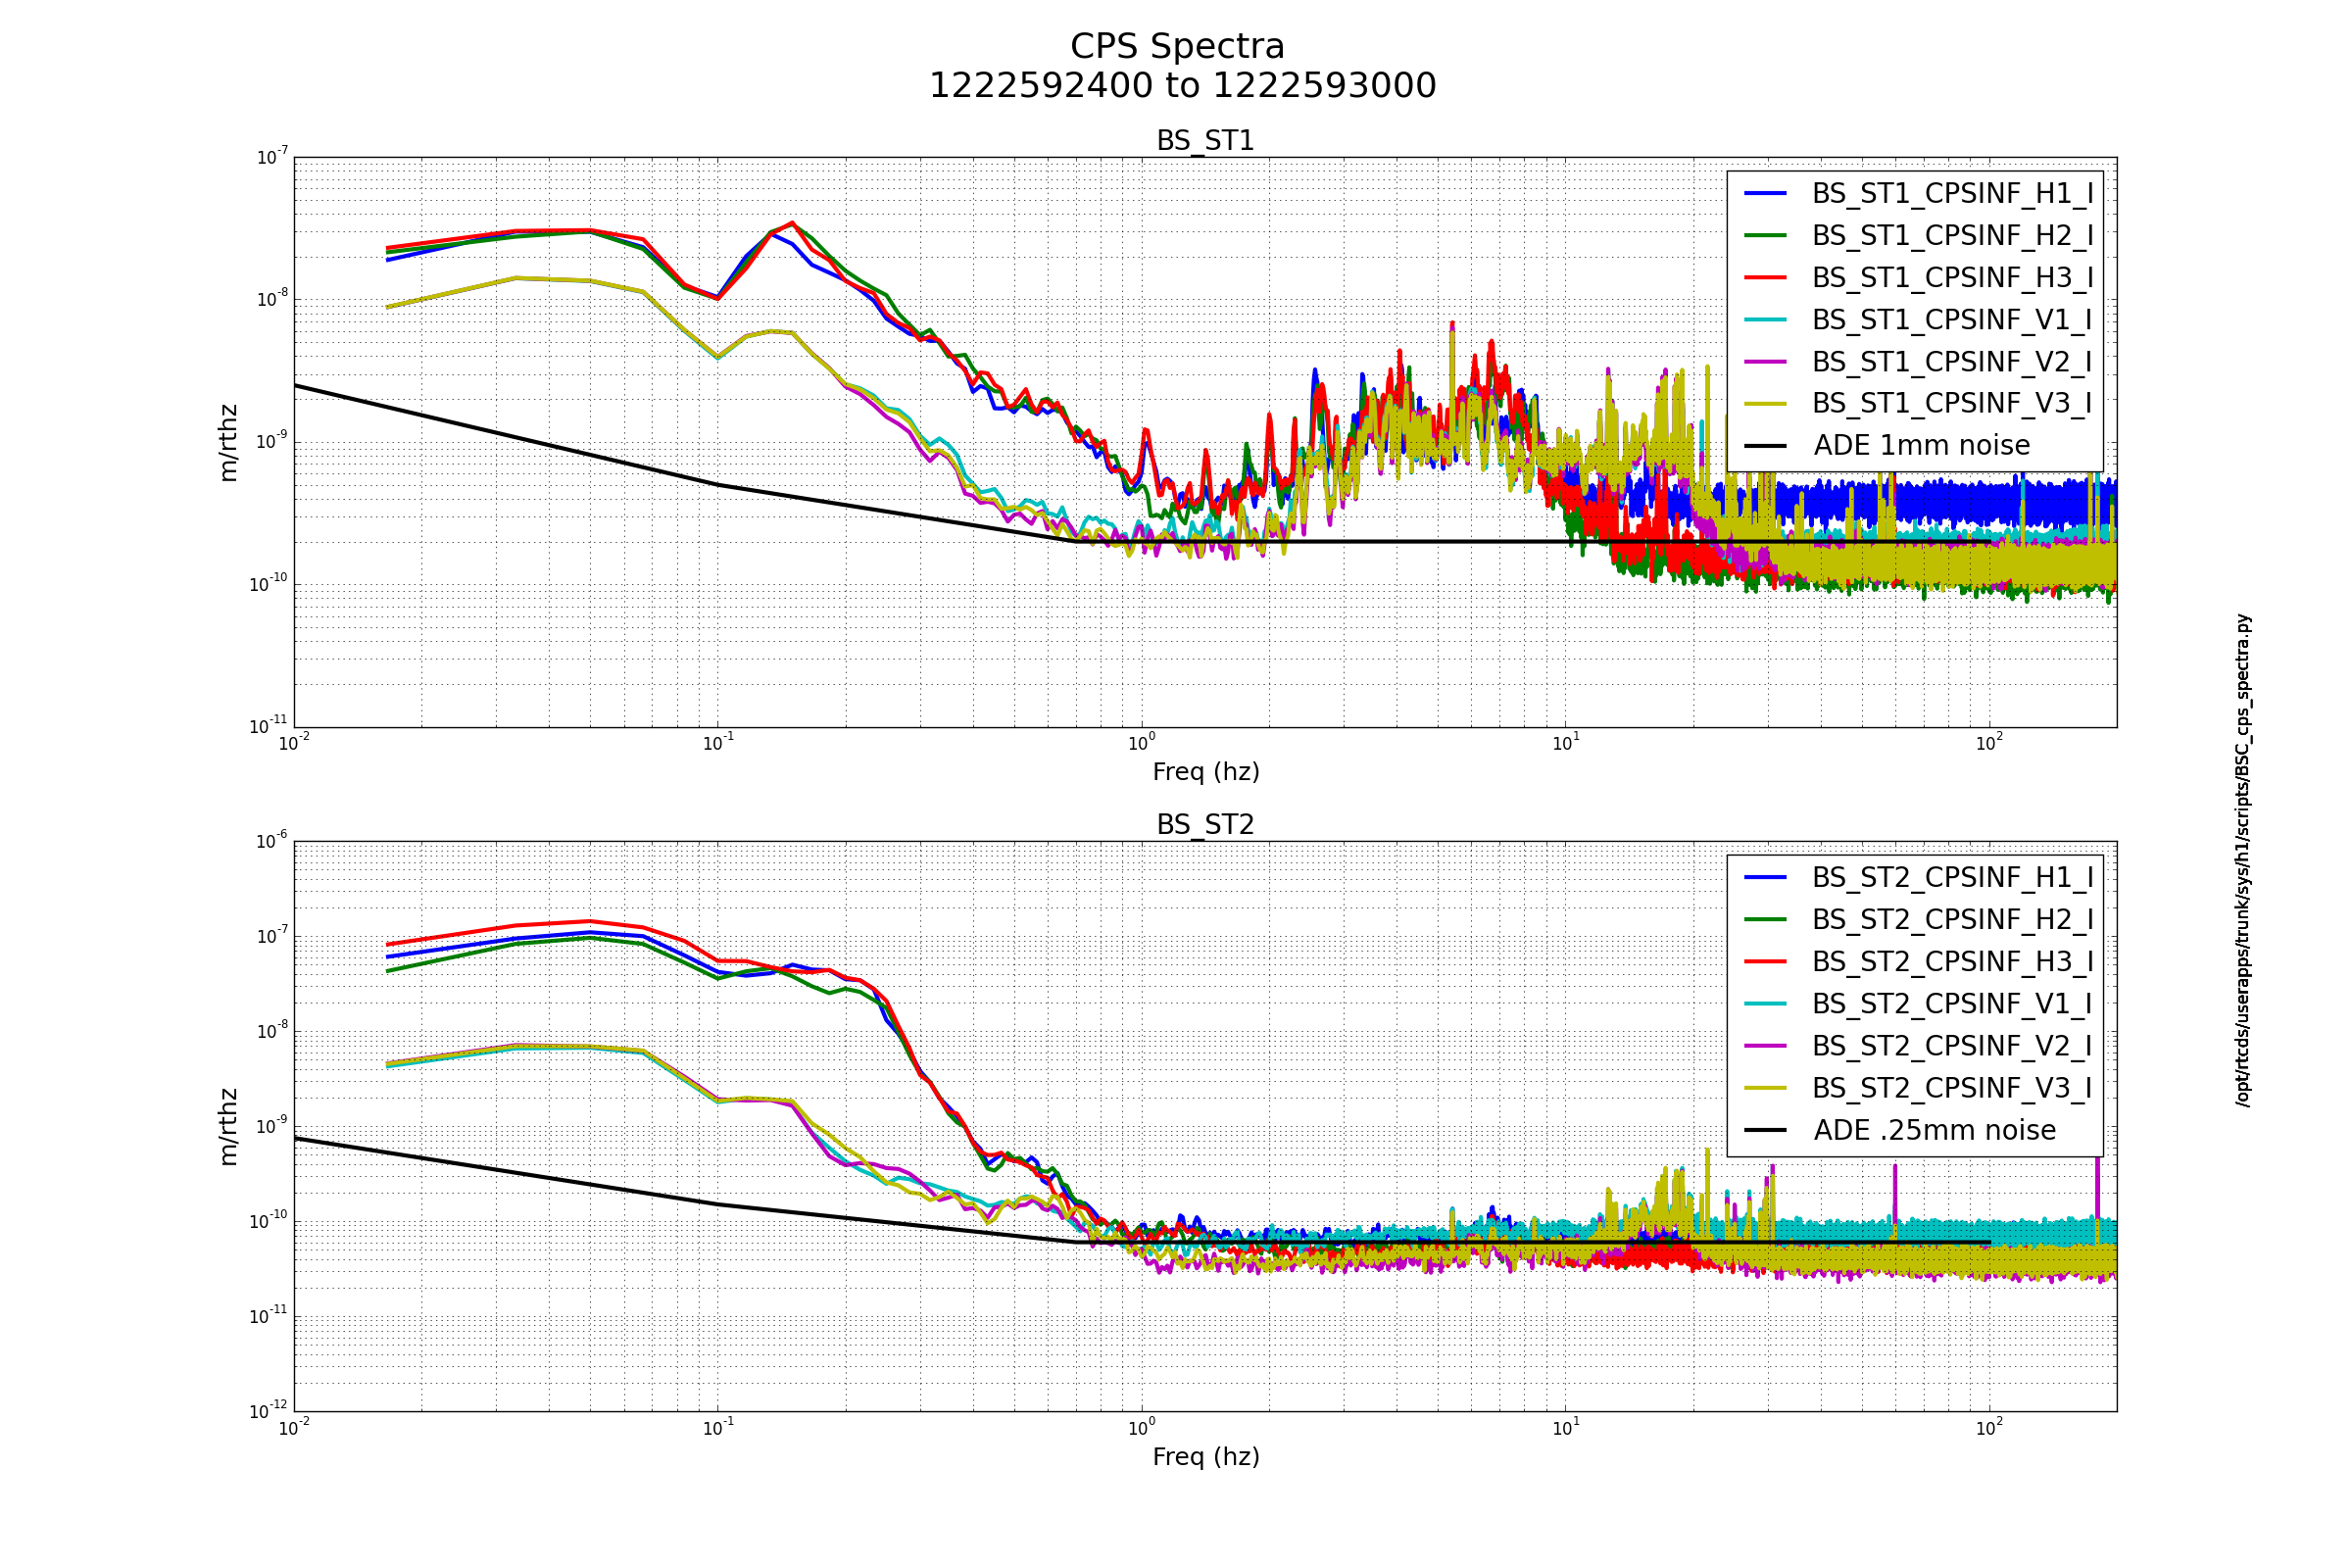
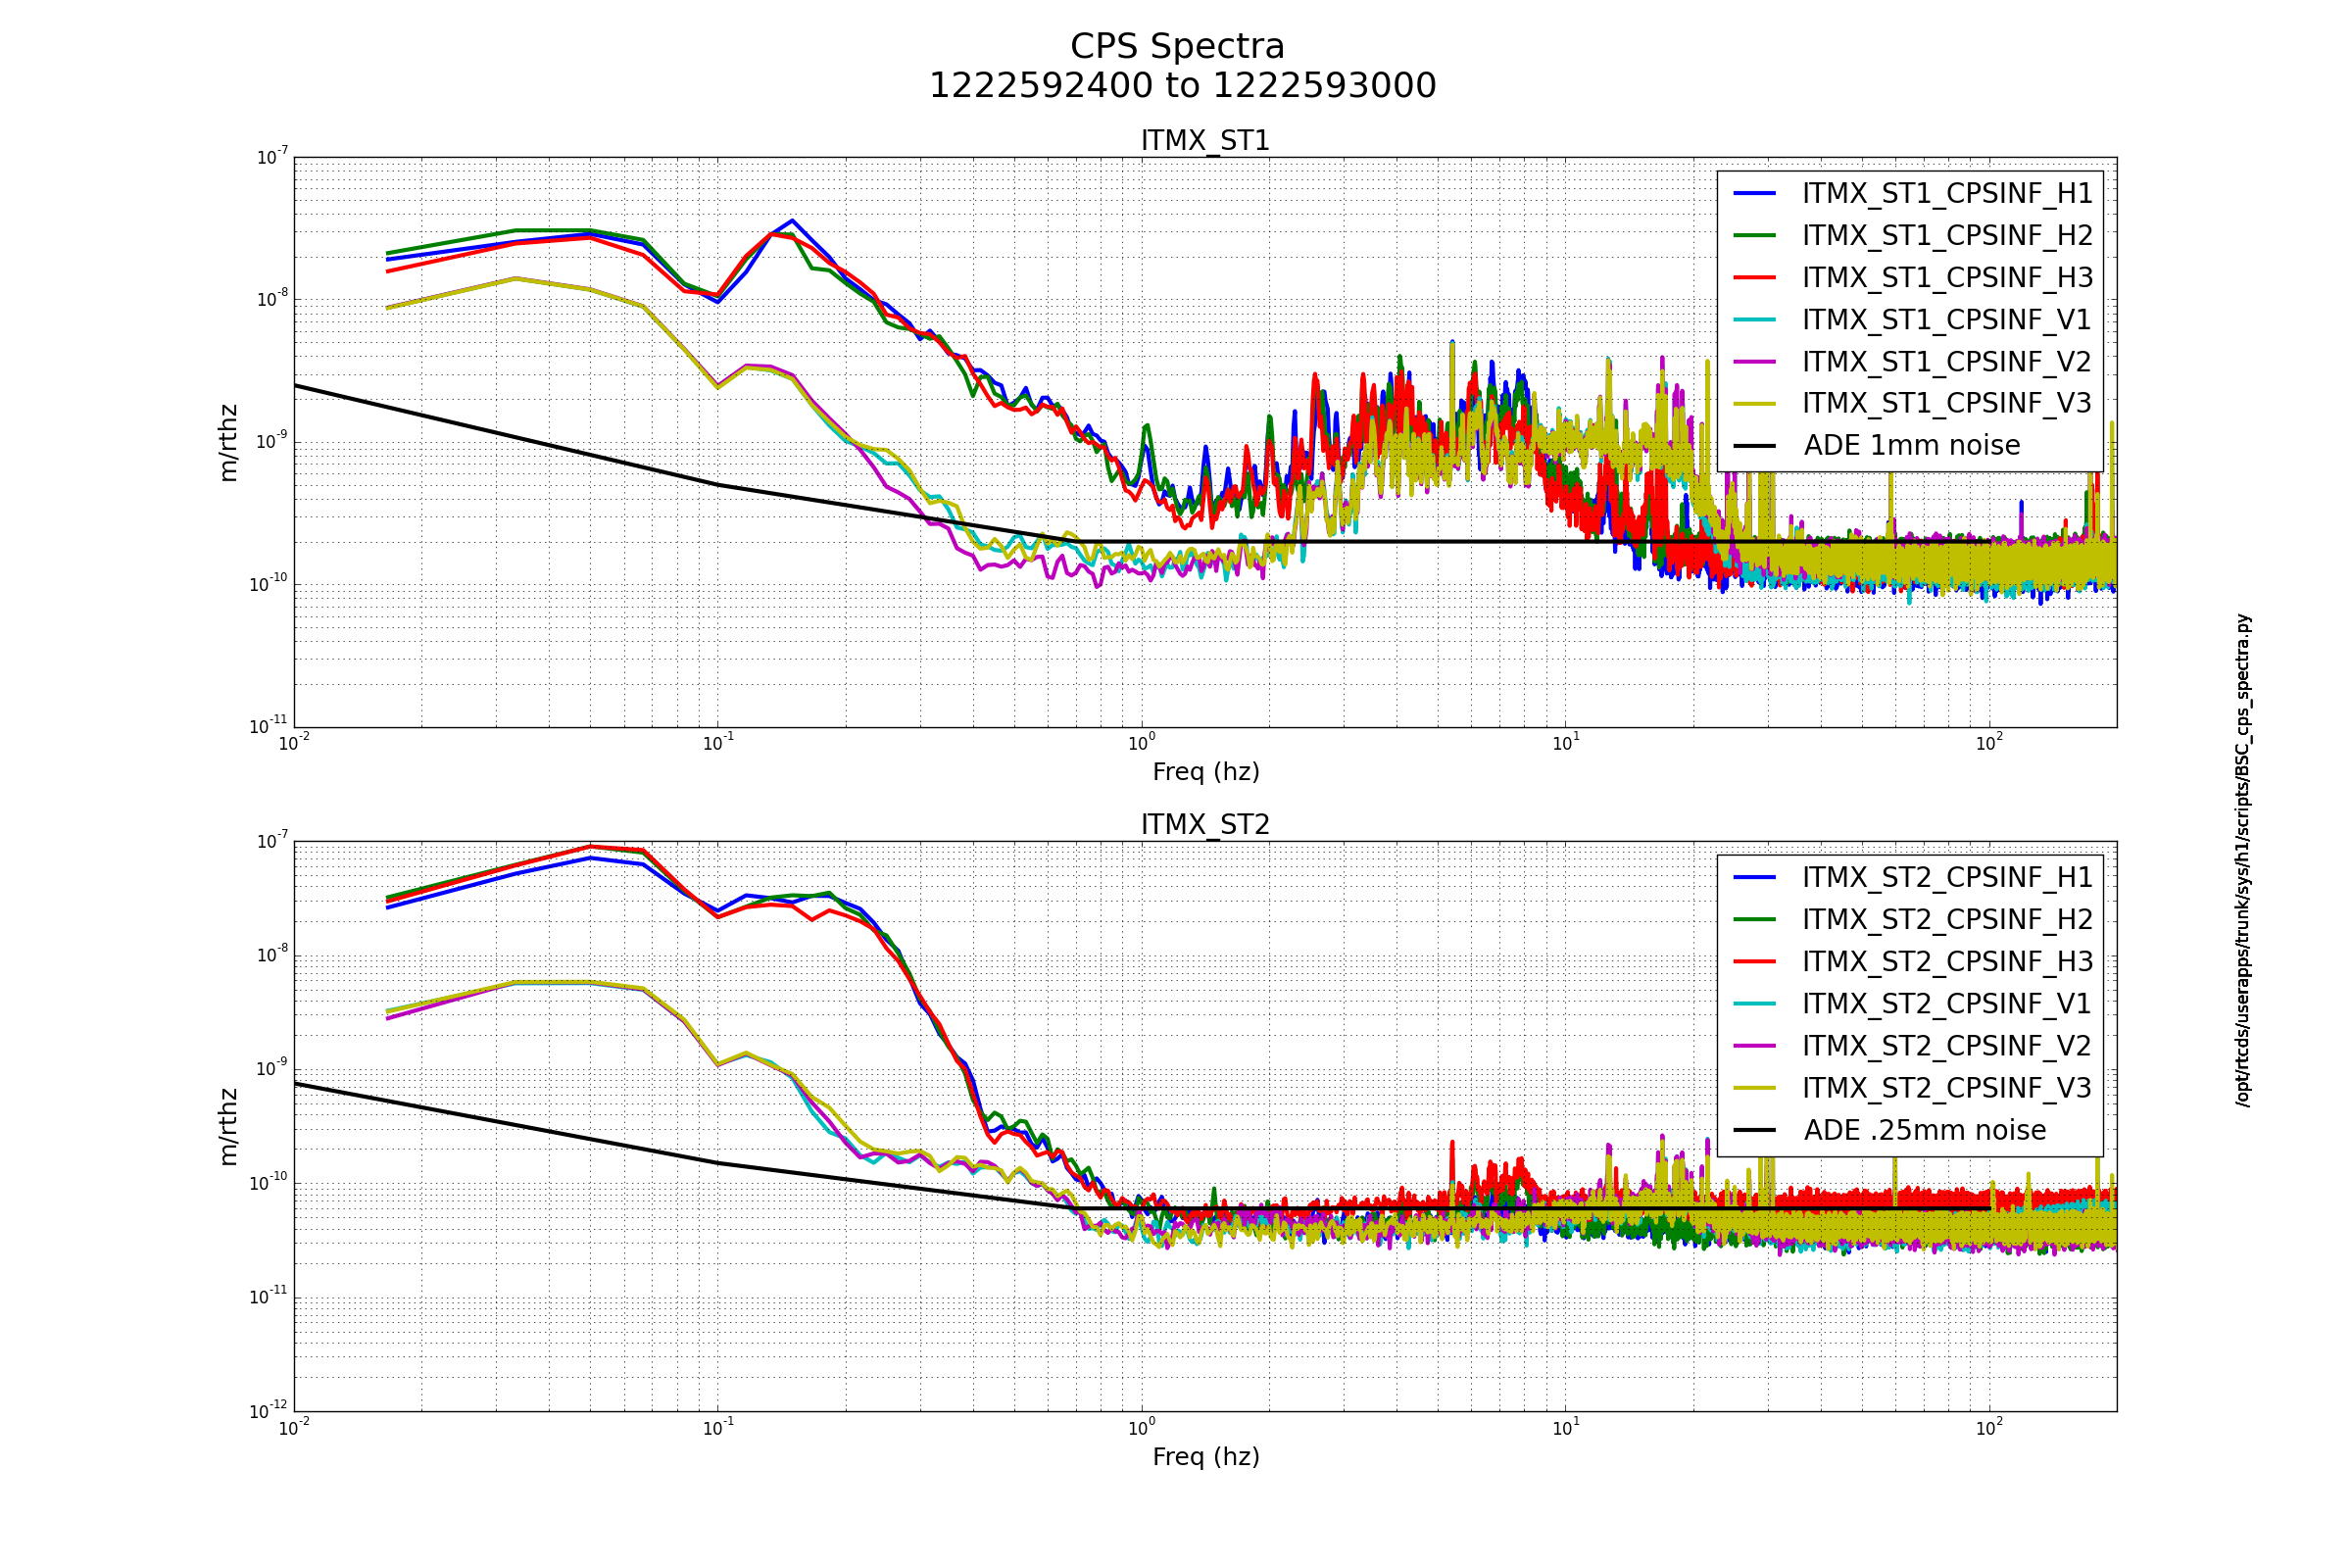
J. Kissel, E. Goetz

Evan and I are working on implementing time-dependent corrections to DELTAL EXTERNAL in prep for O3 (hoping to get it installed by ER13 in "mid November" for us to debug and get used too prior to O3). We've not installed anything yet, we're only slowly but carefully walking through the CAL-CS front-end model. For an incremental progress update, check out the presentation I gave on the CAL call today G1801594 (-v2 attached here for your convenience), and associated technical note T1700106.

A lot of this work is Evan and I putting together the pieces that Joe and company spent the summer R&D'ing, and so I've necessarily updated the following building blocks for this upgrade:
/opt/rtcds/userapps/release/cds/common/src$ svn st -u
        *    16671   RAMP_VALUE.c
        *    16671   BUFFER_AND_MEDIAN.c
        *            COH_GATE.c
        *            SINGLE_POLE_ZERO.c
        *            LARGE_BUFFER_AND_AVERAGE.c
        *    16671   .
Status against revision:  17883
jeffrey.kissel@zotws10:/opt/rtcds/userapps/release/cds/common/src$

/opt/rtcds/userapps/release/cal/common/models$ svn st -u
        *    16661   CAL_CS_MASTER.mdl
        *    16661   CAL_LINE_MONITOR_MASTER.mdl
Status against revision:  17883
jeffrey.kissel@zotws10:/opt/rtcds/userapps/release/cal/common/models$

The goal is to complete the drawing and compile the model in the remainder of this week, in hopes that we can install and start to commission all of the new infrastructure "pipes" next week.
[Jenne, Gabriele]
Trying to understand why locking PRMI and DRMI takes much longer, we looked at a few things:
Then we moved to DRMI and found that the demodulation phases for REFL9 and REFL45 were a bit off. So we retuned them(REFL9 from -23 to -20, REFL45 from 97 to 88)
Then we measured the longitudinal loop gains (with DRMI still locked on REFL 1F), and found
At the next lock attempt, we should try to switch off the BS notches and see if this makes the lock acquisition easier. We should also improve the REFL 1F sensing matrix to get rid of those cross couplings.
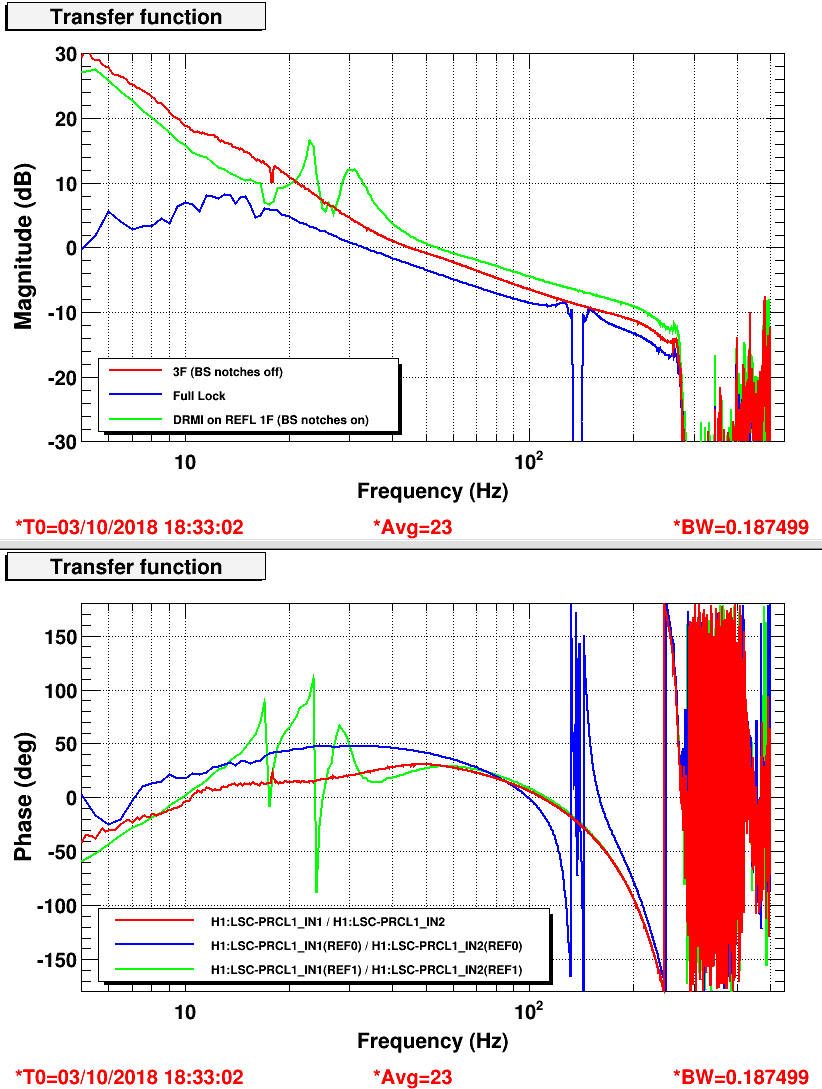
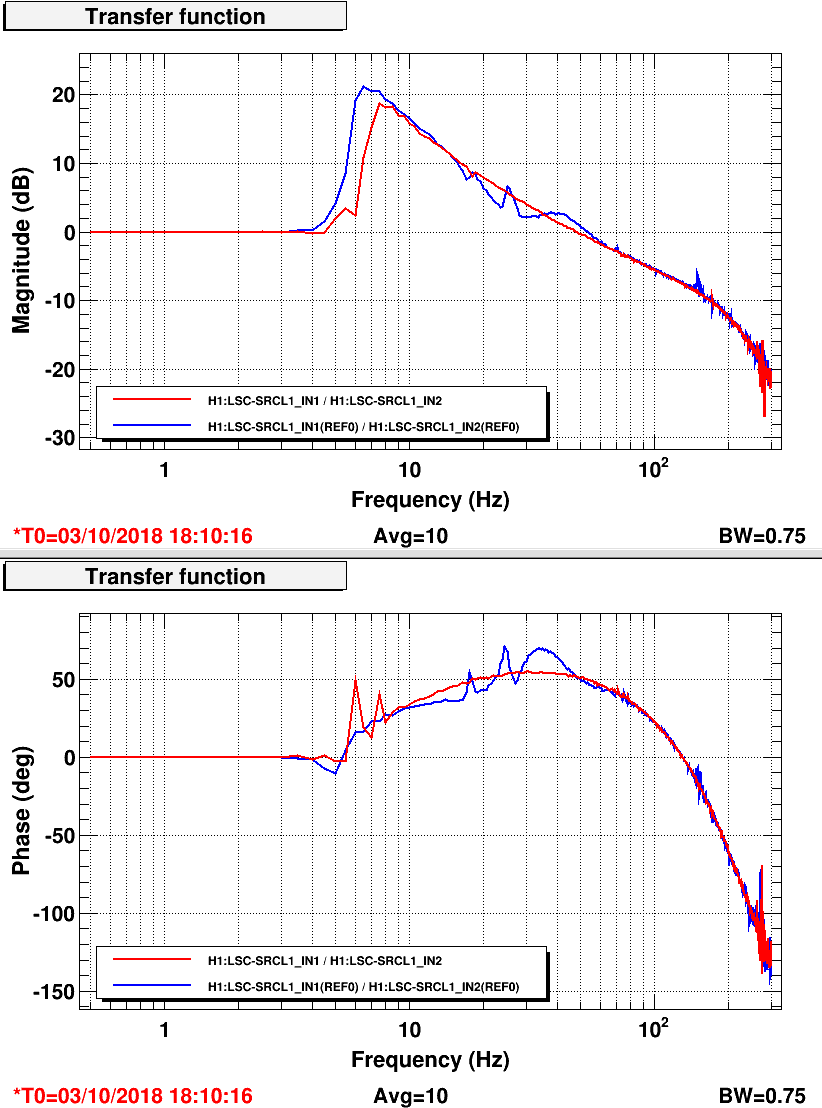
Changed the DRMI REFL 1F sensing element that subtracts PRCL from SRCL from -5.508 to -1.8. This made the SRCL transfer function better.
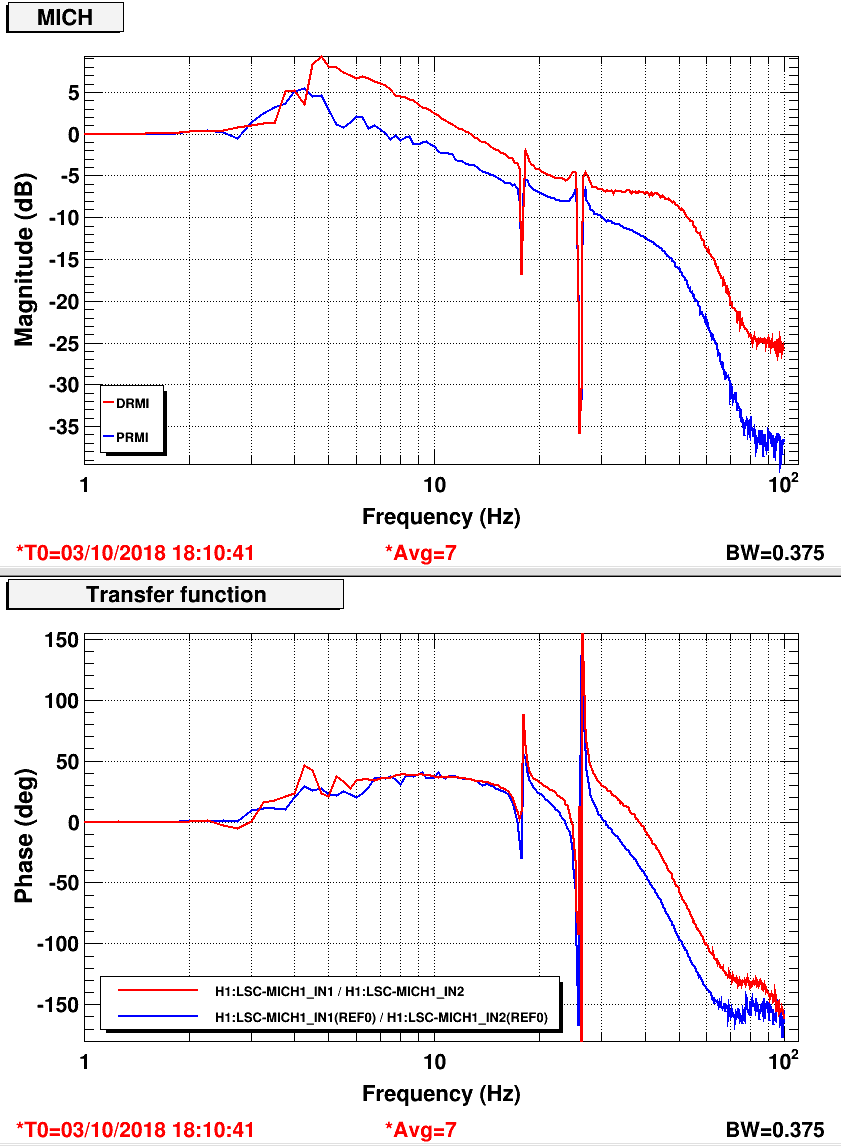
Also, tuned back REFL45 phase to 96, since this makes the MICH transfer function less coupled to PRCL.
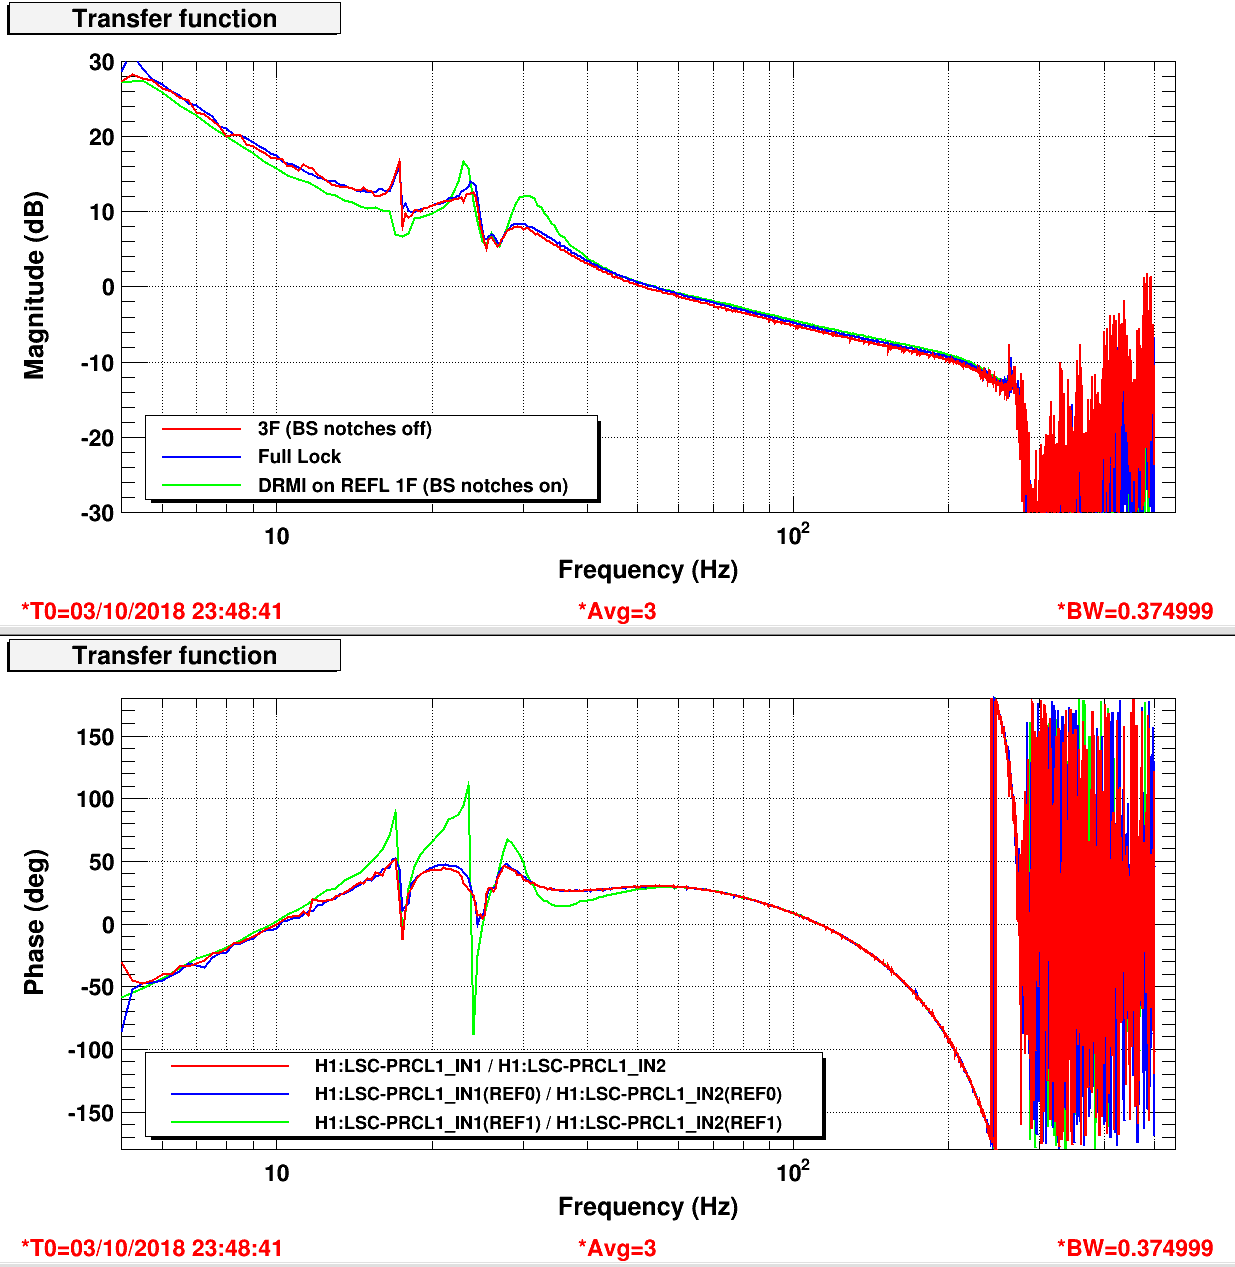
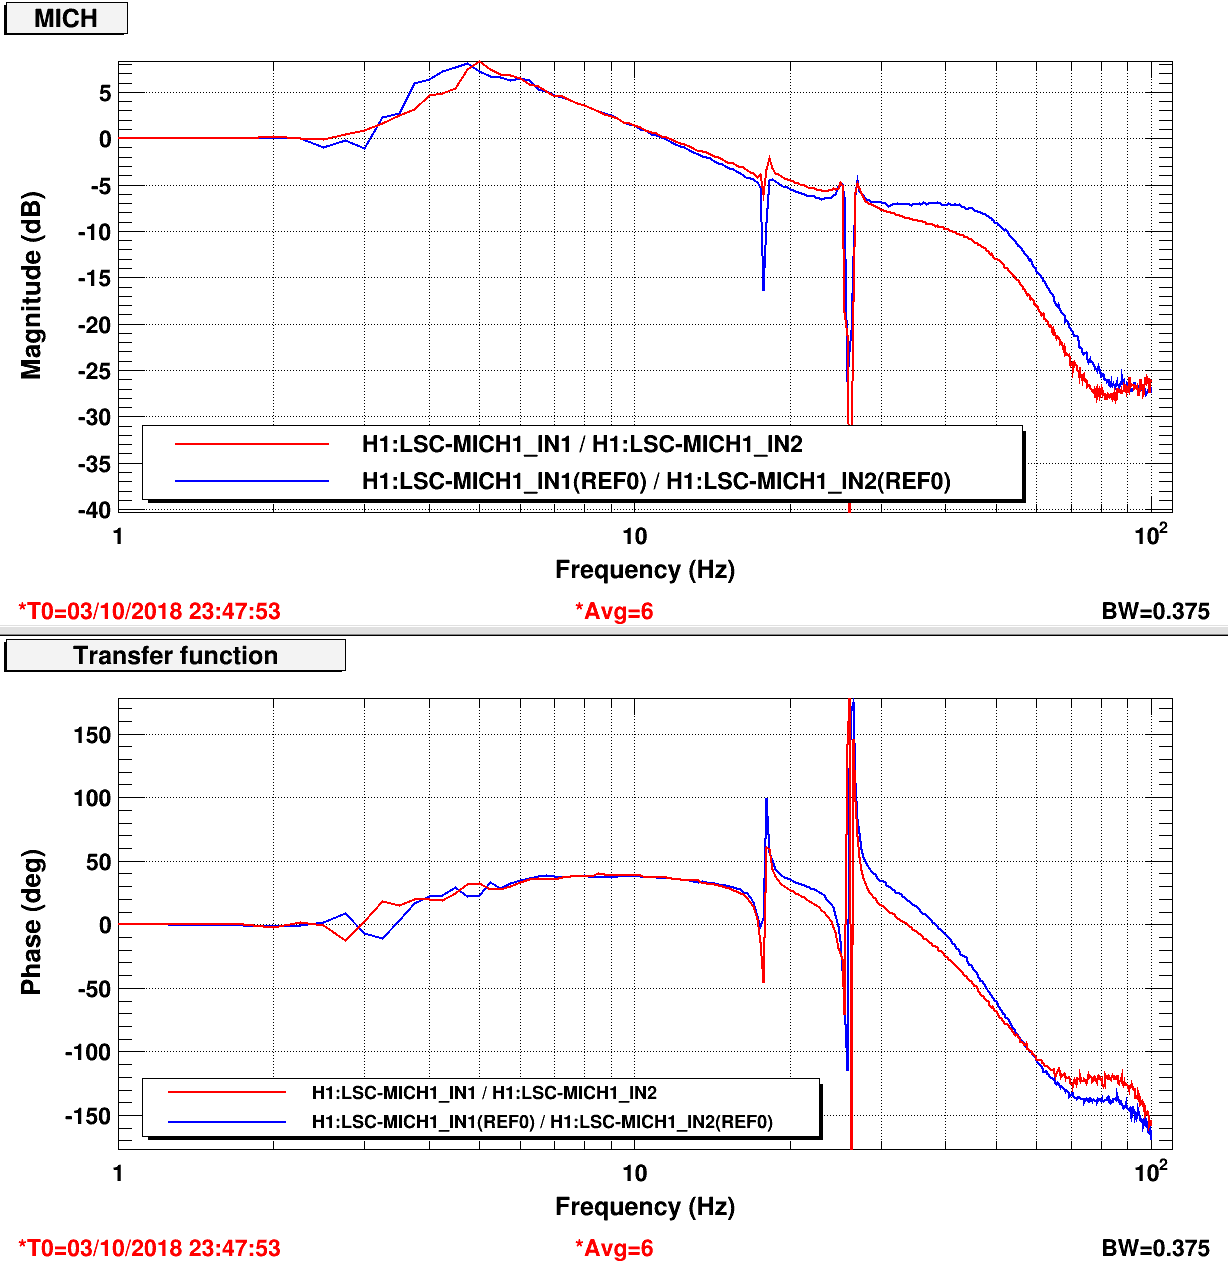
Then I tried adding a MICH to PRCL decoupling to get rid of the BS band stop filter issue. I could get a good transfer function by adding a gain of 4.0 in the REFL45Q to PRCL matrix element. This fixed the PRCL transfer function, but somehow has a large effect on the MICH transfer function: MICH overall gain increased by a factor 2. I don't like this, so I did not implement this element permanently.
My guess is that the real reason we see an effect on the PRCL transfer function due to the BS bandstop filters is that we are currently actuating MICH only on BS, and therefore we are inducing a large driving coupling from MICH to PRCL. We should split the MICH actuation to both BS and PRM, with the right ratio.
However, none of all this seems to have any impact at all on the DRMI lock acquisition times. And the open loop transfer functions look good in full lock, once we are locked on POP signals. So moving on...
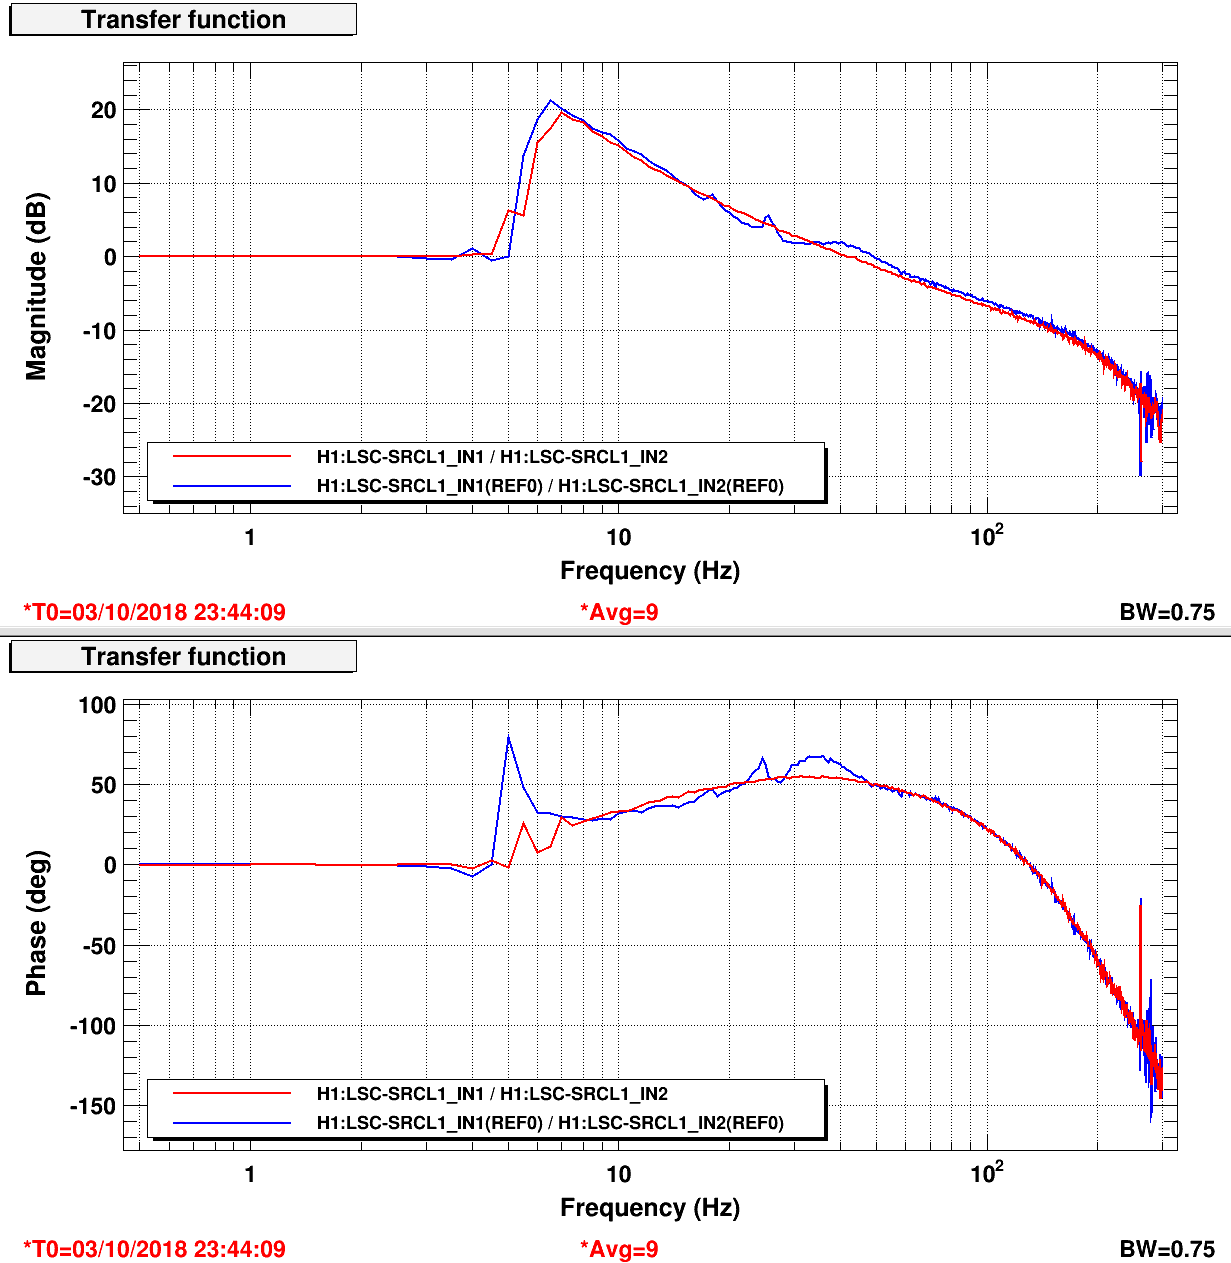
More notes about DRMi acquisition, which has been very slow tonight and is preventing us from working on anything else.
Sheila, Haocun, Terry, Nutsinee
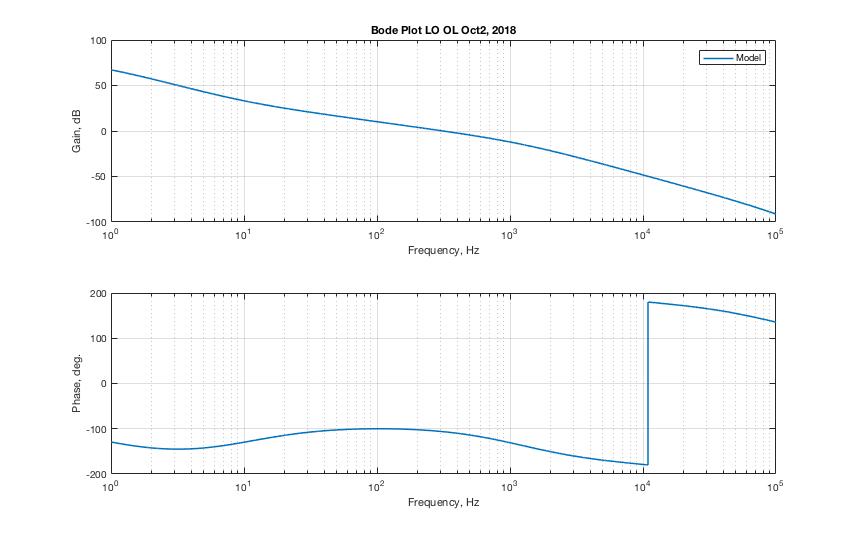
Still trying to lock 3MHz with PSL LO. We've bought back IQ demod into the loop (well, we tried). The most current plan we have is to loosely lock the 3MHz with signal out of PFD and hand off the locking to the signal that comes out of IQ demod by ramping gain up and down (I signal from PFD goes to INPUT 2 of the LO common mode board and I signal from IQ demod goes to INPUT1). We routed the input through an attenuator box that has -40dB of gain (before the common path slide bar). We double routed the signal from IQ demod so it had -80 dB of gain since it has to be able to engage before slowly ramping up and hopefully takes control of the loop (a model suggested that we can't have much more than a gain of -60dB for the UGF to fall on 1/f region. I'm not sure if PZT driver has a gain of 25 or 15 so could be off by a factor of ~1.6). What happened before for we left yesterday was once the PFD path (INPUT2) was engaged it did what it's supposed to do and brought the two peaks (+-3MHz +- offset) on top of each other but once the IQ demod path was engaged it kept pushing the two peaks away from each other.
matlab filter and gain used:
filter2 = zpk(-2.*pi.*[ 400 10],...
-2*pi.*[ 0 1200 100e3 1 400], (1/400)*(1/10)*1200*100e3*400*...
5.06*15*10.6e6*0.001);
Sheila, Georgia,Craig
We had some difficulties earlier tonight probably because it was windy and now things have quieted down.
We did a few things to get locked:
Working on powering up:
We're leaving the IFO locked at 10W with no CO2. Morning commissioners beware- the CO2 laser power guardians are paused.
Interferometer is still locked at 10W!
Niko, Tvo, Georgia
A couple of weeks ago (alog-44087) TVo and I posted a comparison of HWS contours for the ring heater, IFO beam, and CO2 beam positions on the HWS. Niko has since added a feature to the HWS contour code to calculate the centroid of the contours, which I am still tweaking up. This will help work out spot (mis-)centering on the ITMs using the Hartmann
Attached screenshot is the same contours as those from TVo's log with the centroids added (see blue spots, and position info in the plot titles). The full IFO and CO2 positions relative to the ring heater centroids is tabulated below:
| ITMX (x, y) | ITMY (x, y) | |
|
IFO beam centroid relative to RH centroid [mm, HWS] September 12 September 13 |
(+22, -0.5) (+24, 6) |
(+16, +6) (+22, +7) |
| CO2 beam centroid relative to RH centroid [mm, HWS] | (+2.1, -0.9) | (+5.9, +5.6) |
I don't think the 5mm shift in the IFO beam x position between September 12 and 13 is real but rather an indication of the uncertainty. It's interesting that we seem to generally be better aligned in x (yaw), and worst in y (pitch) given the snowman mode we see at the AS camera with the CO2 lasers on.
Currently the centroid calculation only uses the highest 1/3 of the wavefront contours, as using the full data biased the data away from the beam center. It also currently only works for cool-down data.

The headings in the figure are the wrong way around: ITMY is on the left and ITMX is on the right. The ring heater, ifo, and co2 labels are all correct though.
TVo, Georgia
Last night we powered up to 20 W before losing lock. Today TVo and I had a look at the ETM HWSs to see if we can see any thermal lensing caused by absorption. There is some absorption visible on ETMY HWS.
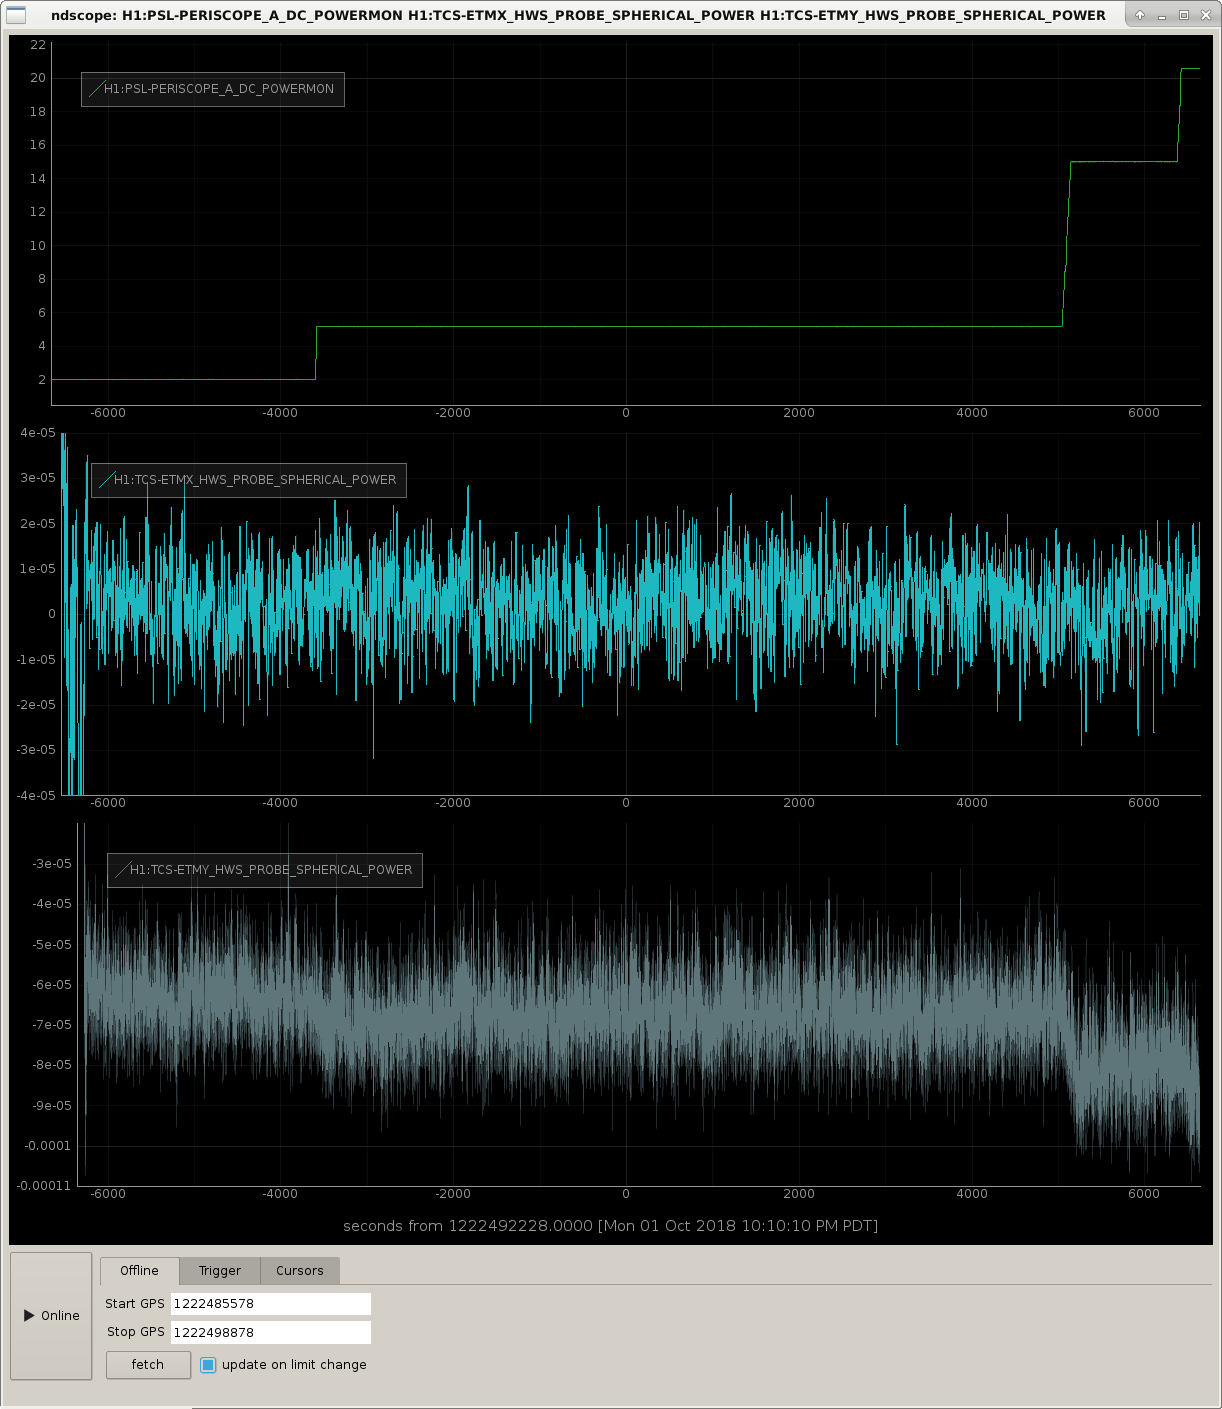
The first screenshot shows the PSL power [W], ETMX HWS spherical power [diopters], and ETMY HWS spherical power [diopters]. We can estimate the absorption of the optic from the circulating power, the measured thermal lens on the HWS, and the substrate and surface deformations (or lensing per unit power). A back-of-the-envelope calculation puts a first estimate of total absorption at 0.21 ppm. The absorption on ETMX is not visible above the noise.
The HWS beam passes through the substrate of the ETM, reflects off the HR surface, and passes through the substrate again. It samples the substrate lens twice and the surface lens once. So the thermal lens measured on the HWS is
L_tot [D] = (2 A_sub [D/W] + A_surf [D/W] ) * P_circ [W] * alpha
Where L_tot is the total lens in diopters, A_sub and A_surf are the substrate and surface deformations respectively in diopters per W, P_circ is the circulating power in the arms, and alpha is the optic absorption.
Going from 2 W to 15 W we see ~15 uD of thermal lens on the Hartmann. The circulating power at 15 W is ~95 kW (assuming 45 PR gain, 280 arm gain, and 50% reflectivity of the beamsplitter). The substrate and surface deformations as assumed to be 3.86e-4 D/W and -2.93e-5 D/W respectively (numbers acquired from the TCS simulation tool, not sure if they need updating with new test mass coatings).
This gives us an absorption of 0.21 ppm, which seems reasonable.
Final screenshot shows the HWS contour plots between the cold and hot ETM states.
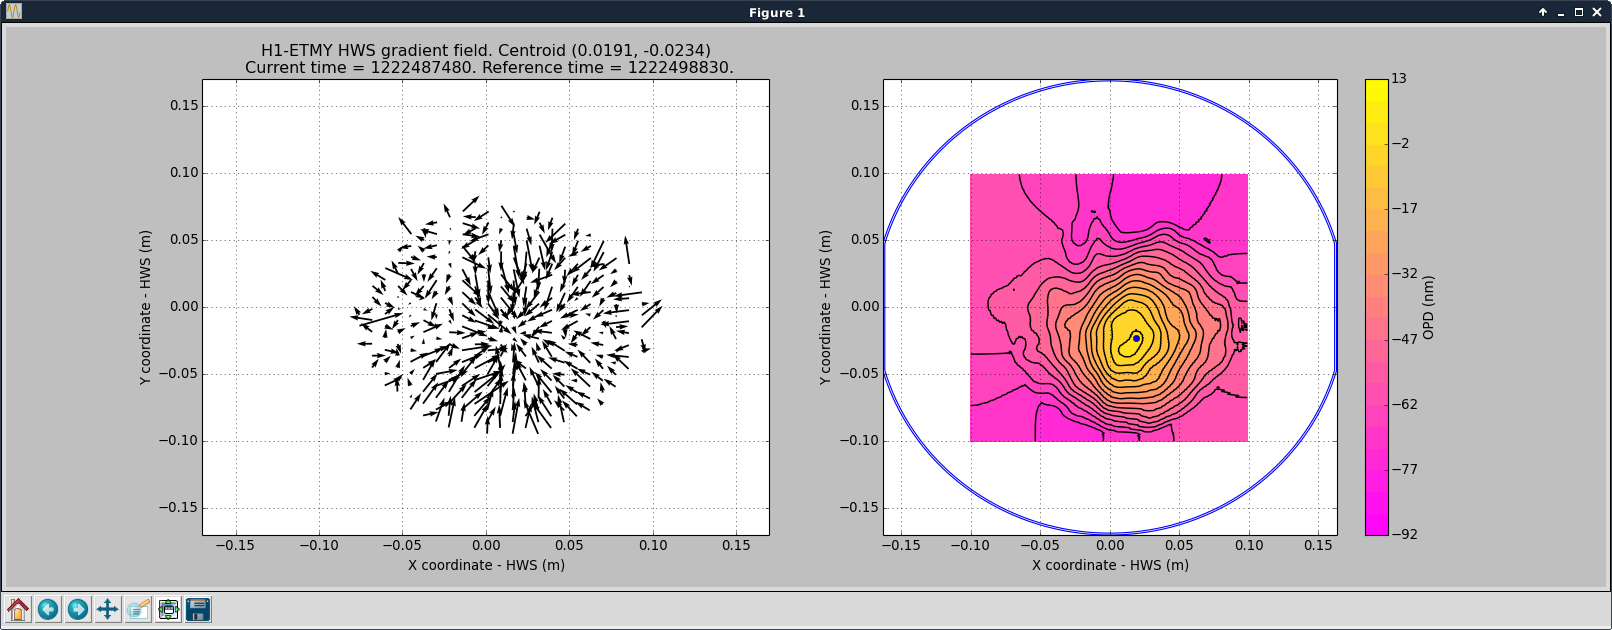
My interpretation from the coating documentation shows that this measurement is in line with what was measured during metrology characterization circa 2015, see last page.
https://dcc.ligo.org/DocDB/0059/C1103241/001/C1103241-v1_Coating%20Characterization%20Report_ETM16.pdf
Stefan, TVo, Danny
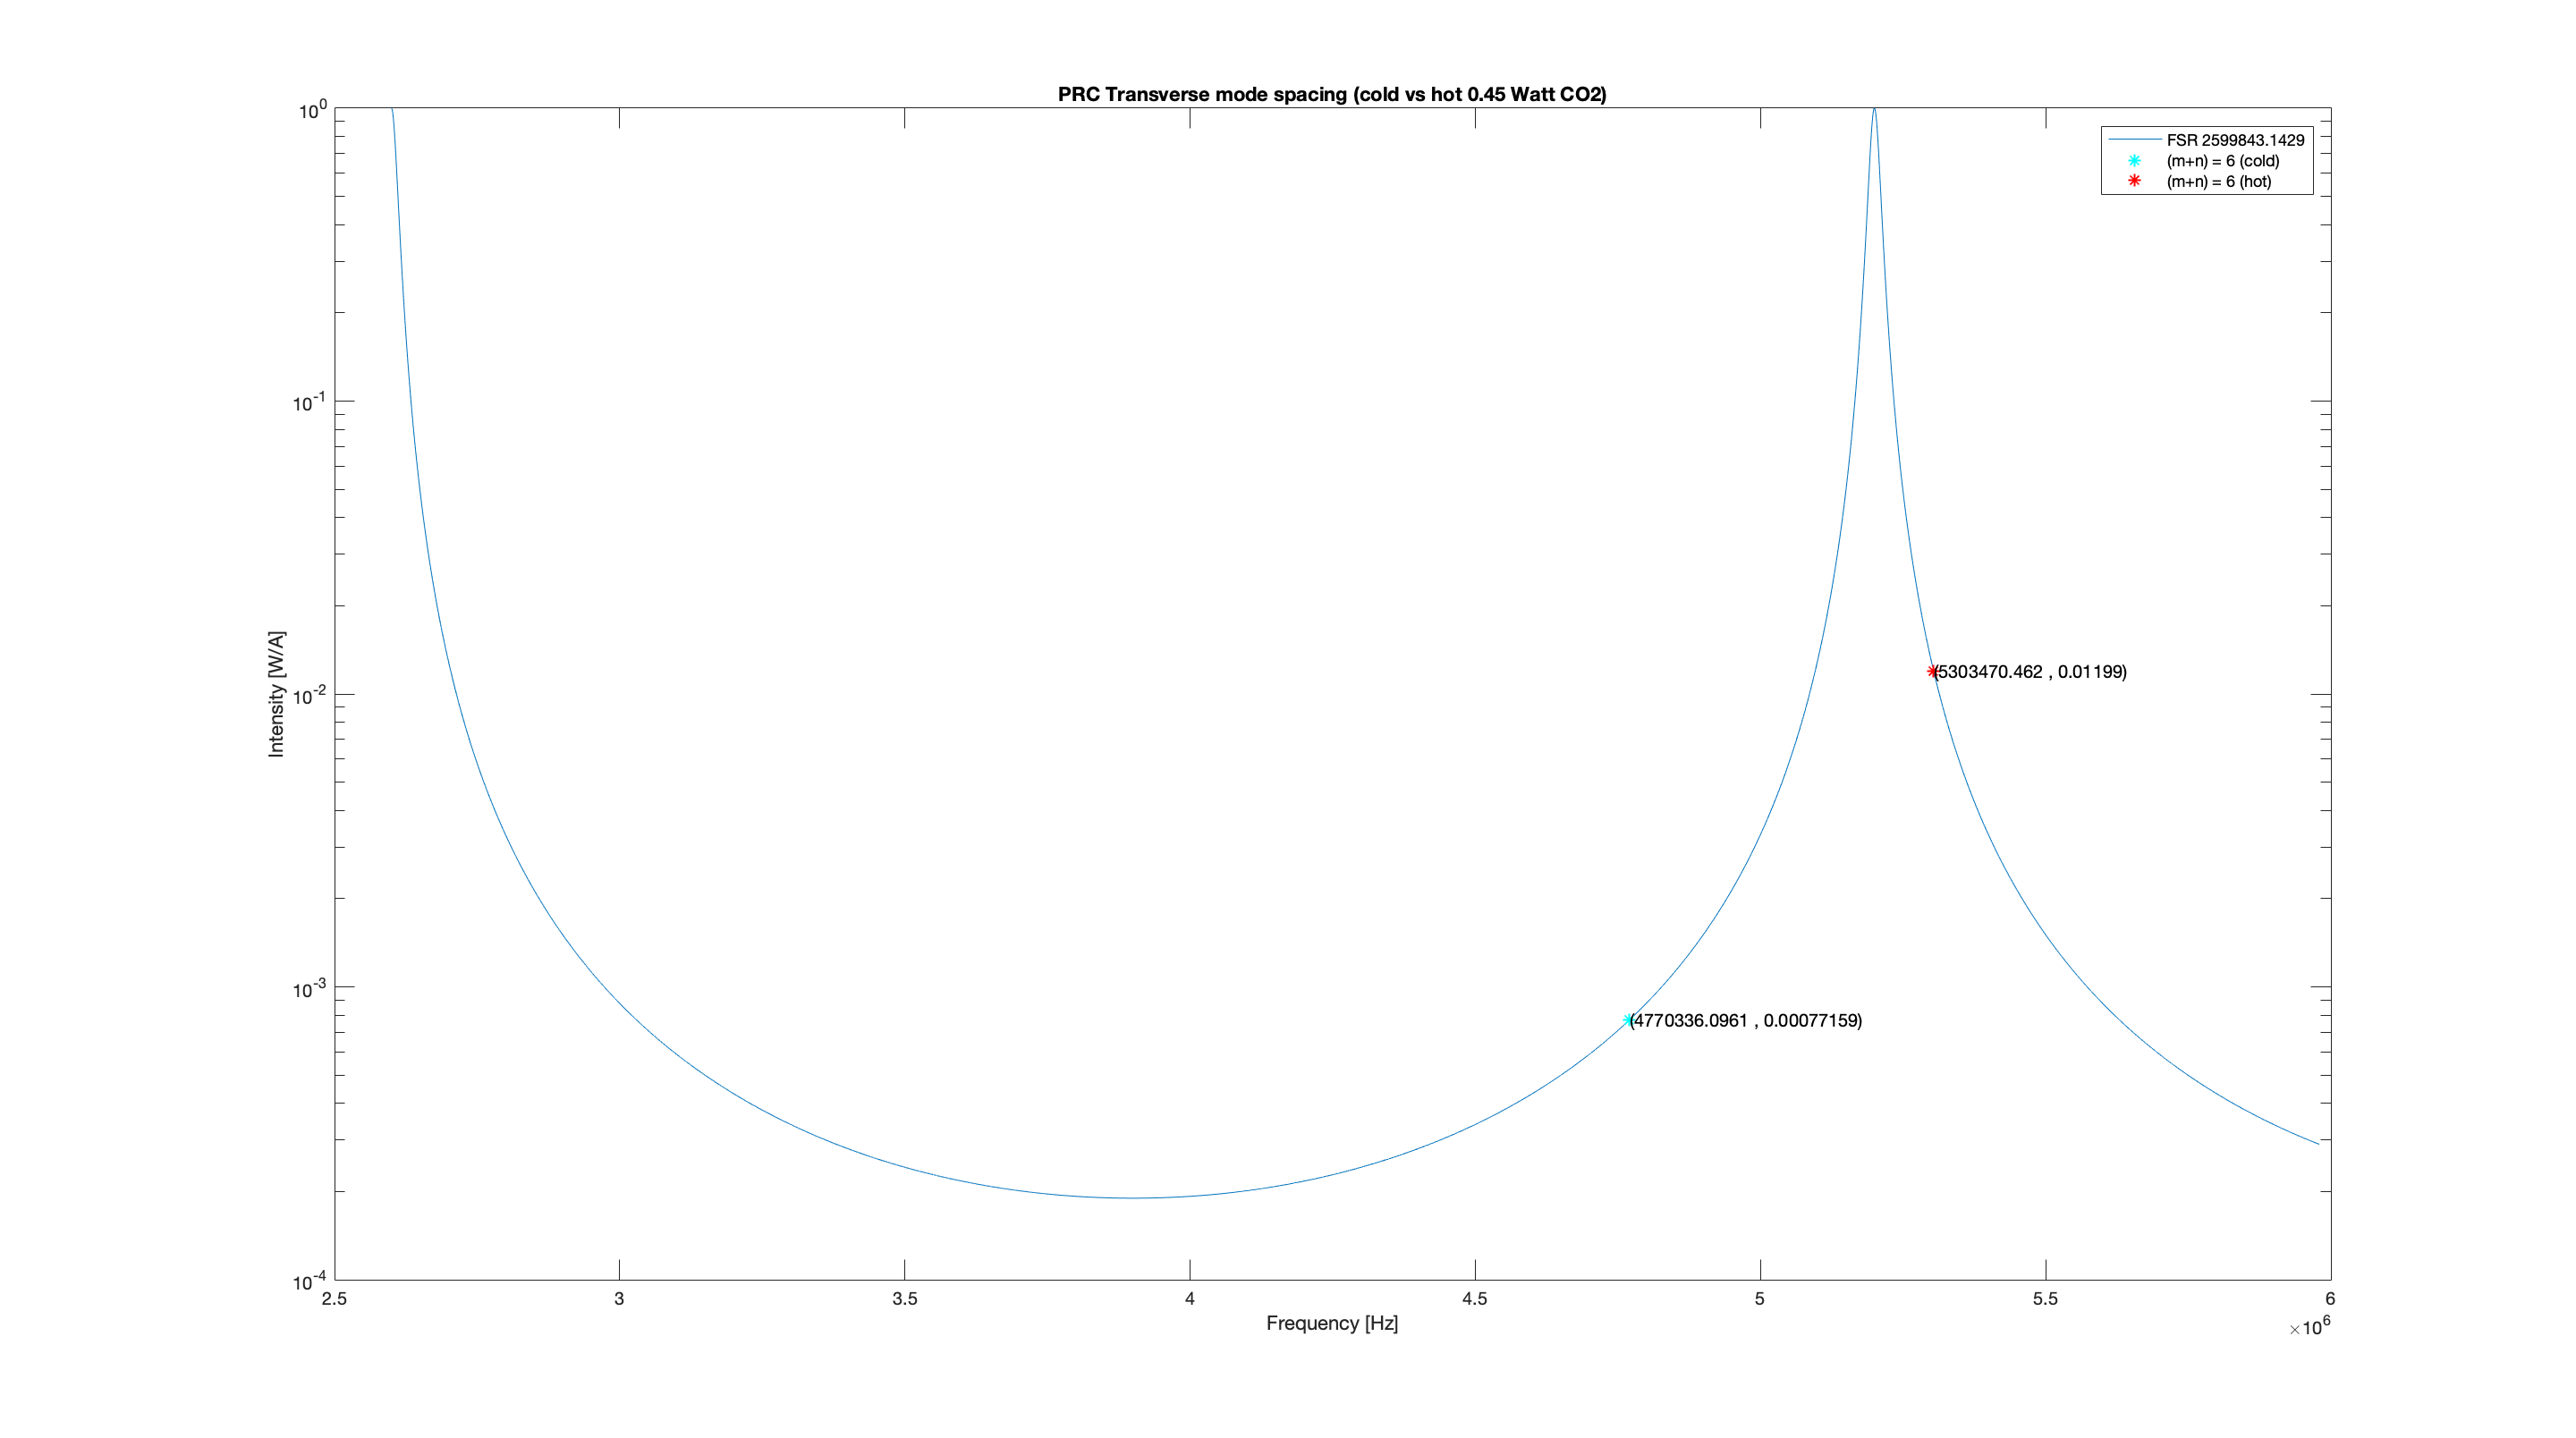
A while back Shiela and Stefan saw a not so 00 mode at the AS camera (alog 44106) that seemed to be caused by the increased common CO2 lensing. We suspected it may be due to the higher order modes sweeping through PRC resonance with the increased common lens. To identify what modes exhibit this behavior, we did the following:


(Kyle, Gerardo)
Removed and replaced the annulus ion pump for GV14. No issues were encountered during the replacement, after new pump was installed the annulus system was pumped for about 5 hours, and it appears that the ion pump is able to maintain vacuum, aux cart is off and decoupled.
Done per WP#7849.
Closed FRS ticket 8350.
TravisS, RickS
Today, we went down to address the reduced laser output power.
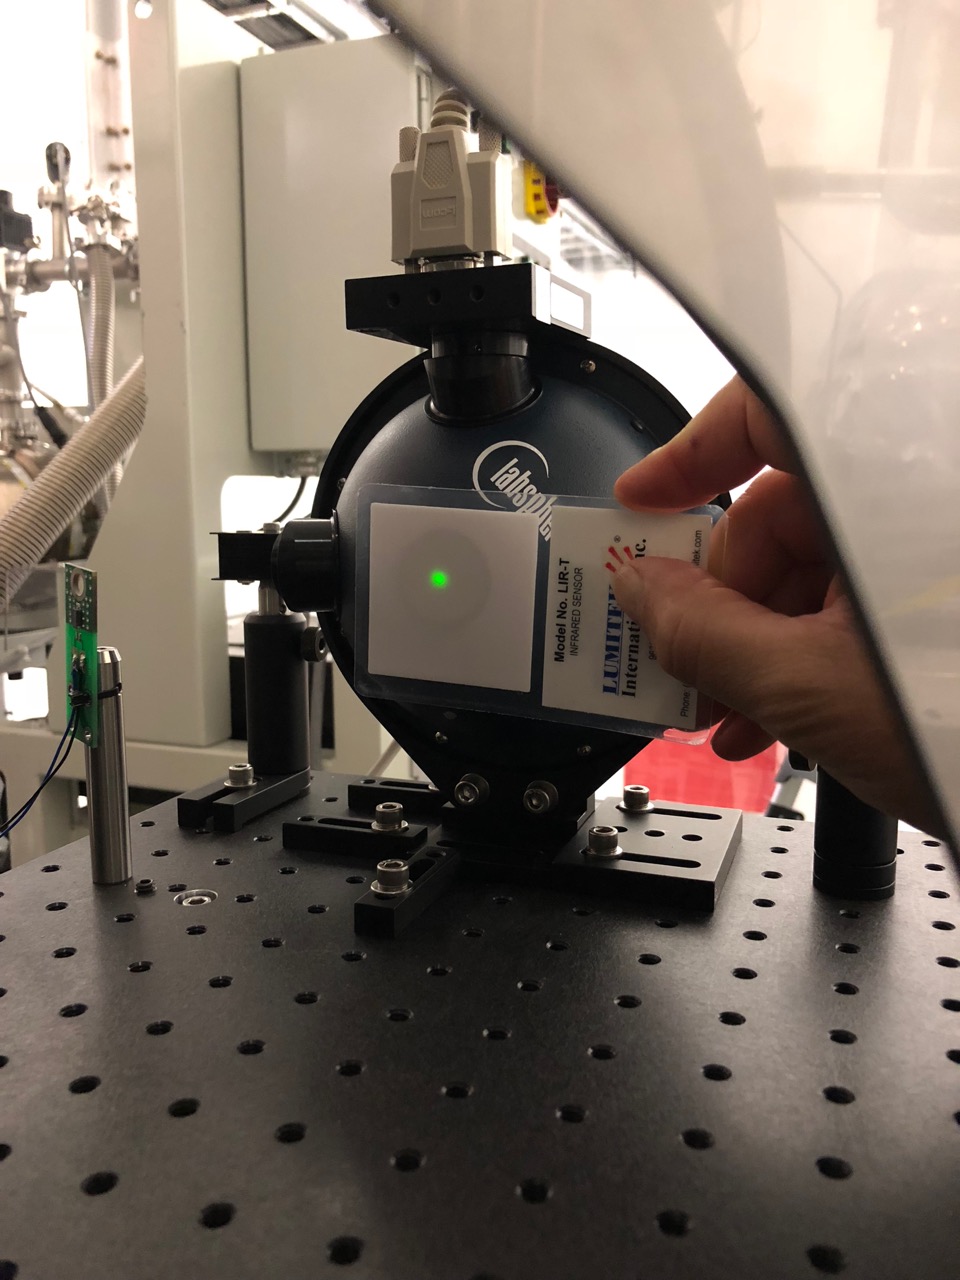
First, we assessed the beam pointing by looking at the entrance to the Rx-side integrating sphere. The beams were right on top of each other and well centered in the aperture (good news, the pointing seems quite stable). See attached photo.
The laser output power was down to 1.67 W, from 2 W. Given that this laser has been running continuously for about 5 years, this is not unexpected. By tuning the diode temperature (W1 pot on the laser power supply), we increased the power to 1.72 W. Then, by increasing the diode current slightly (5.135 V on pins 1 and 6 of the "Current and Temp Monitor" DB9 connector on the front panel of the Pcal interface module increased to the max level of 5.218 V) the power increased to 1.76 W. We will check with the manufacturer to see if the current can (and should) be increased beyond this limit.
Note that there are issues with the current and temperature monitor channels on the MEDM screen. The current monitor is railed at 10 and the temperature is at 4.8, but apparently responding to temperature changes. Both should be investigated.
We then worked through sections 4, 5 and 6 of T1600436-V8 (which will soon be edited to address a couple of issues we discovered). We found that the OFS servo was able to handle the maximum requested offset of 10.0 V. Thus, we replaced a ThorLabs NE01A-B filter (OD 0.1) in front of the OFS PD with a NE02A-B filter (OD 0.2). The max offset level in this configuration was 7.2 V. (Note that the calibration of the requested modulation amplitude is impacted by this change.)
The "95 % OFS Offset" is thus 6.8 V and the "Operating OFS Offset" is now 3.4 V.
The AOM input power was 1.66 W and the diffracted power was 0.959 W with 0.339 W un-diffracted power. The AOM efficiency was only 58%.
By opening the OFS servo and driving the modulation input for maximum power (~1.5 V by running the OFS servo gain to max with the loop open), we got 1.11 W measured between M5 and WBS. 1.66 W in and 1.11 diffracted is only 67 %. Should be 70-80%.
About 18 mW is rejected by the PBSC downstream of the AOM.
The measured 80 MHz drive level to the AOM with the modulation input at max. was 1.242 W (spec. is less than 1.3 W).
We ran out of time to investigate further, but we might try replacing the AOM in the future.
The optimum OFS gain setting will have to be revisited too.
FRS ticket created: https://services.ligo-la.caltech.edu/FRS/show_bug.cgi?id=11604.
Since the PCal beam localization cameras have been removed and we have been worried about the decreasing output power of the lasers, we needed a method of maintaining the alignment of the PCal laser in the case of a laser failure or some other sort of laser alignment issue. We have installed a set of irises and mirrors in the output side of the TX module to mark the current alignment into the vacuum system (the beams coming out of the the vacuum system use the RX integrating sphere as a alignment fiducial, so no additional irises are needed here). The mirrors are mounted on magnetic kinematic mounts so that they can be reproducibly removed and replaced since they would otherwise block the PCal beams entering the vacuum system. See attached pics of our setup at End X.
Apologies for the rotation of the .pdf photos. They were created with the correct rotation, but apparently the aLog doesn't agree.
I started by probing the bad readback reported by Jenne per FRS11582 and WP7853 on filter 3 of AS_B_RF45. After ruling out the AcroMag, I pushed on to the Whitening Chassis S1101585 in ISC-R3 near HAM6. I secured the chassis and retreated to the EE Lab to perform a system check. This check determined that we had a bad IC. I replaced the IC, reinstalled the chassis, and the readback works correctly now.
I continued on to the next objective, and investigated EtherCAT Corner 5 per FRS11525 and WP7844. Time was running short. After testing I found that the Beckhoff module was working properly, and the problem must originate upstream of the chassis. The offset was traced back to the CM Summing Node on ISC-R4, and then ... I was out of time and the final objective was not reached. But we survived another maintenance day.
   Ran Zero count and flow testing on all installed dust monitors (except for PSL-101 and PSL-102, will test these on next access into the PSL enclosure). All Zero count test were good. I adjusted Lab-1 up and EY-1 down to bring them to the 2.8/cf/m flow rates. All other units are operating within spec.

   No issues or problems observed with the installed dust monitors.

   Closing FAMIS task #7320
Following the Corner Station Dolphin issues early this morning, most of the maintenance period was involved with recovery and documenting the problem.
WP7842 ECAT code changes related to TwinCAT3 preparation
Patrick, Dave:
PLCs were restarted in corner and both end stations. New DAQ INI files generated for C1PLC2, X1PLC[1,2], Y1PLC[1,2]. New SDF monitor lists for [X,Y]1PLC2.
h1sysecat[x,y]1plc2sdf faux-models were restarted to use new monitor lists.
DAQ Restart
Dave:
DAQ was restarted for ecat changes.
With the noise and problems we have been having with ALS X I attempted to Clean the fiber ends at all junctions between the LVEA and the End station. I used a FiberScope to look at the end before and after cleaning. The attached pdf shows one of the worse. This was the fiber that runs from EX patch panel to the Table. This is the patch panel end. All fibers showed visual improvement after cleaning.
I did not take apart the patch panel main runs. This would be the next step if we find this helps.
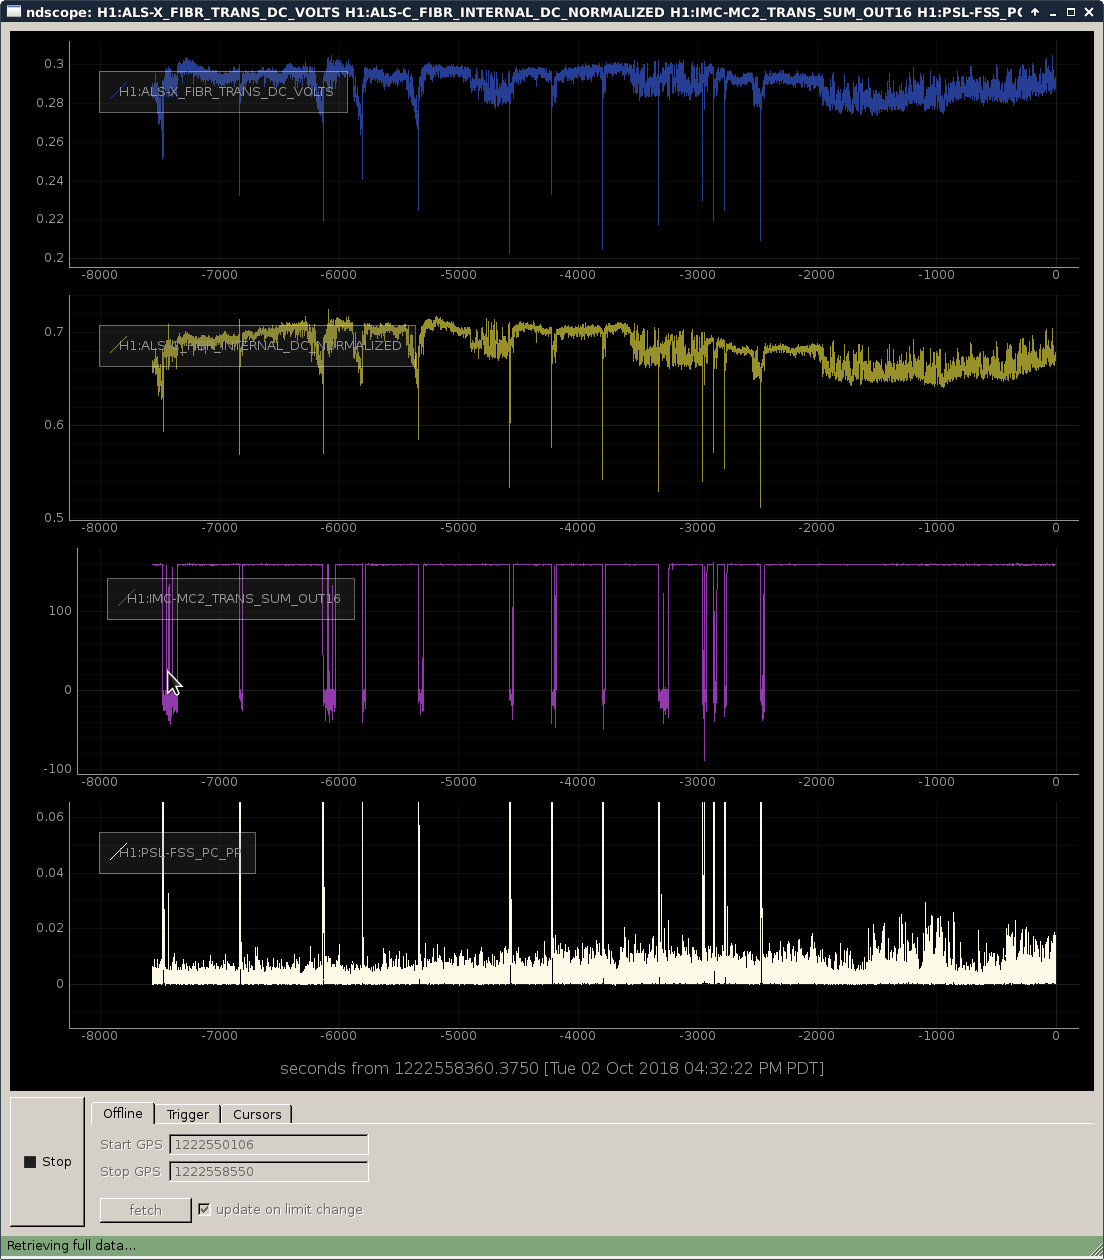
X end got better, now it's similar to Y. See the first plot (top) showing the past 18 hours or so, zero-power period corresponds to the maintenance. You need to look at peak to peak, ignoring the spikes.
Don't worry about spikes as far as fiber is concerned, that's the result of failed locking attempts after the maintenance (IMC loses lock, FSS is kicked). See 2nd attachment.