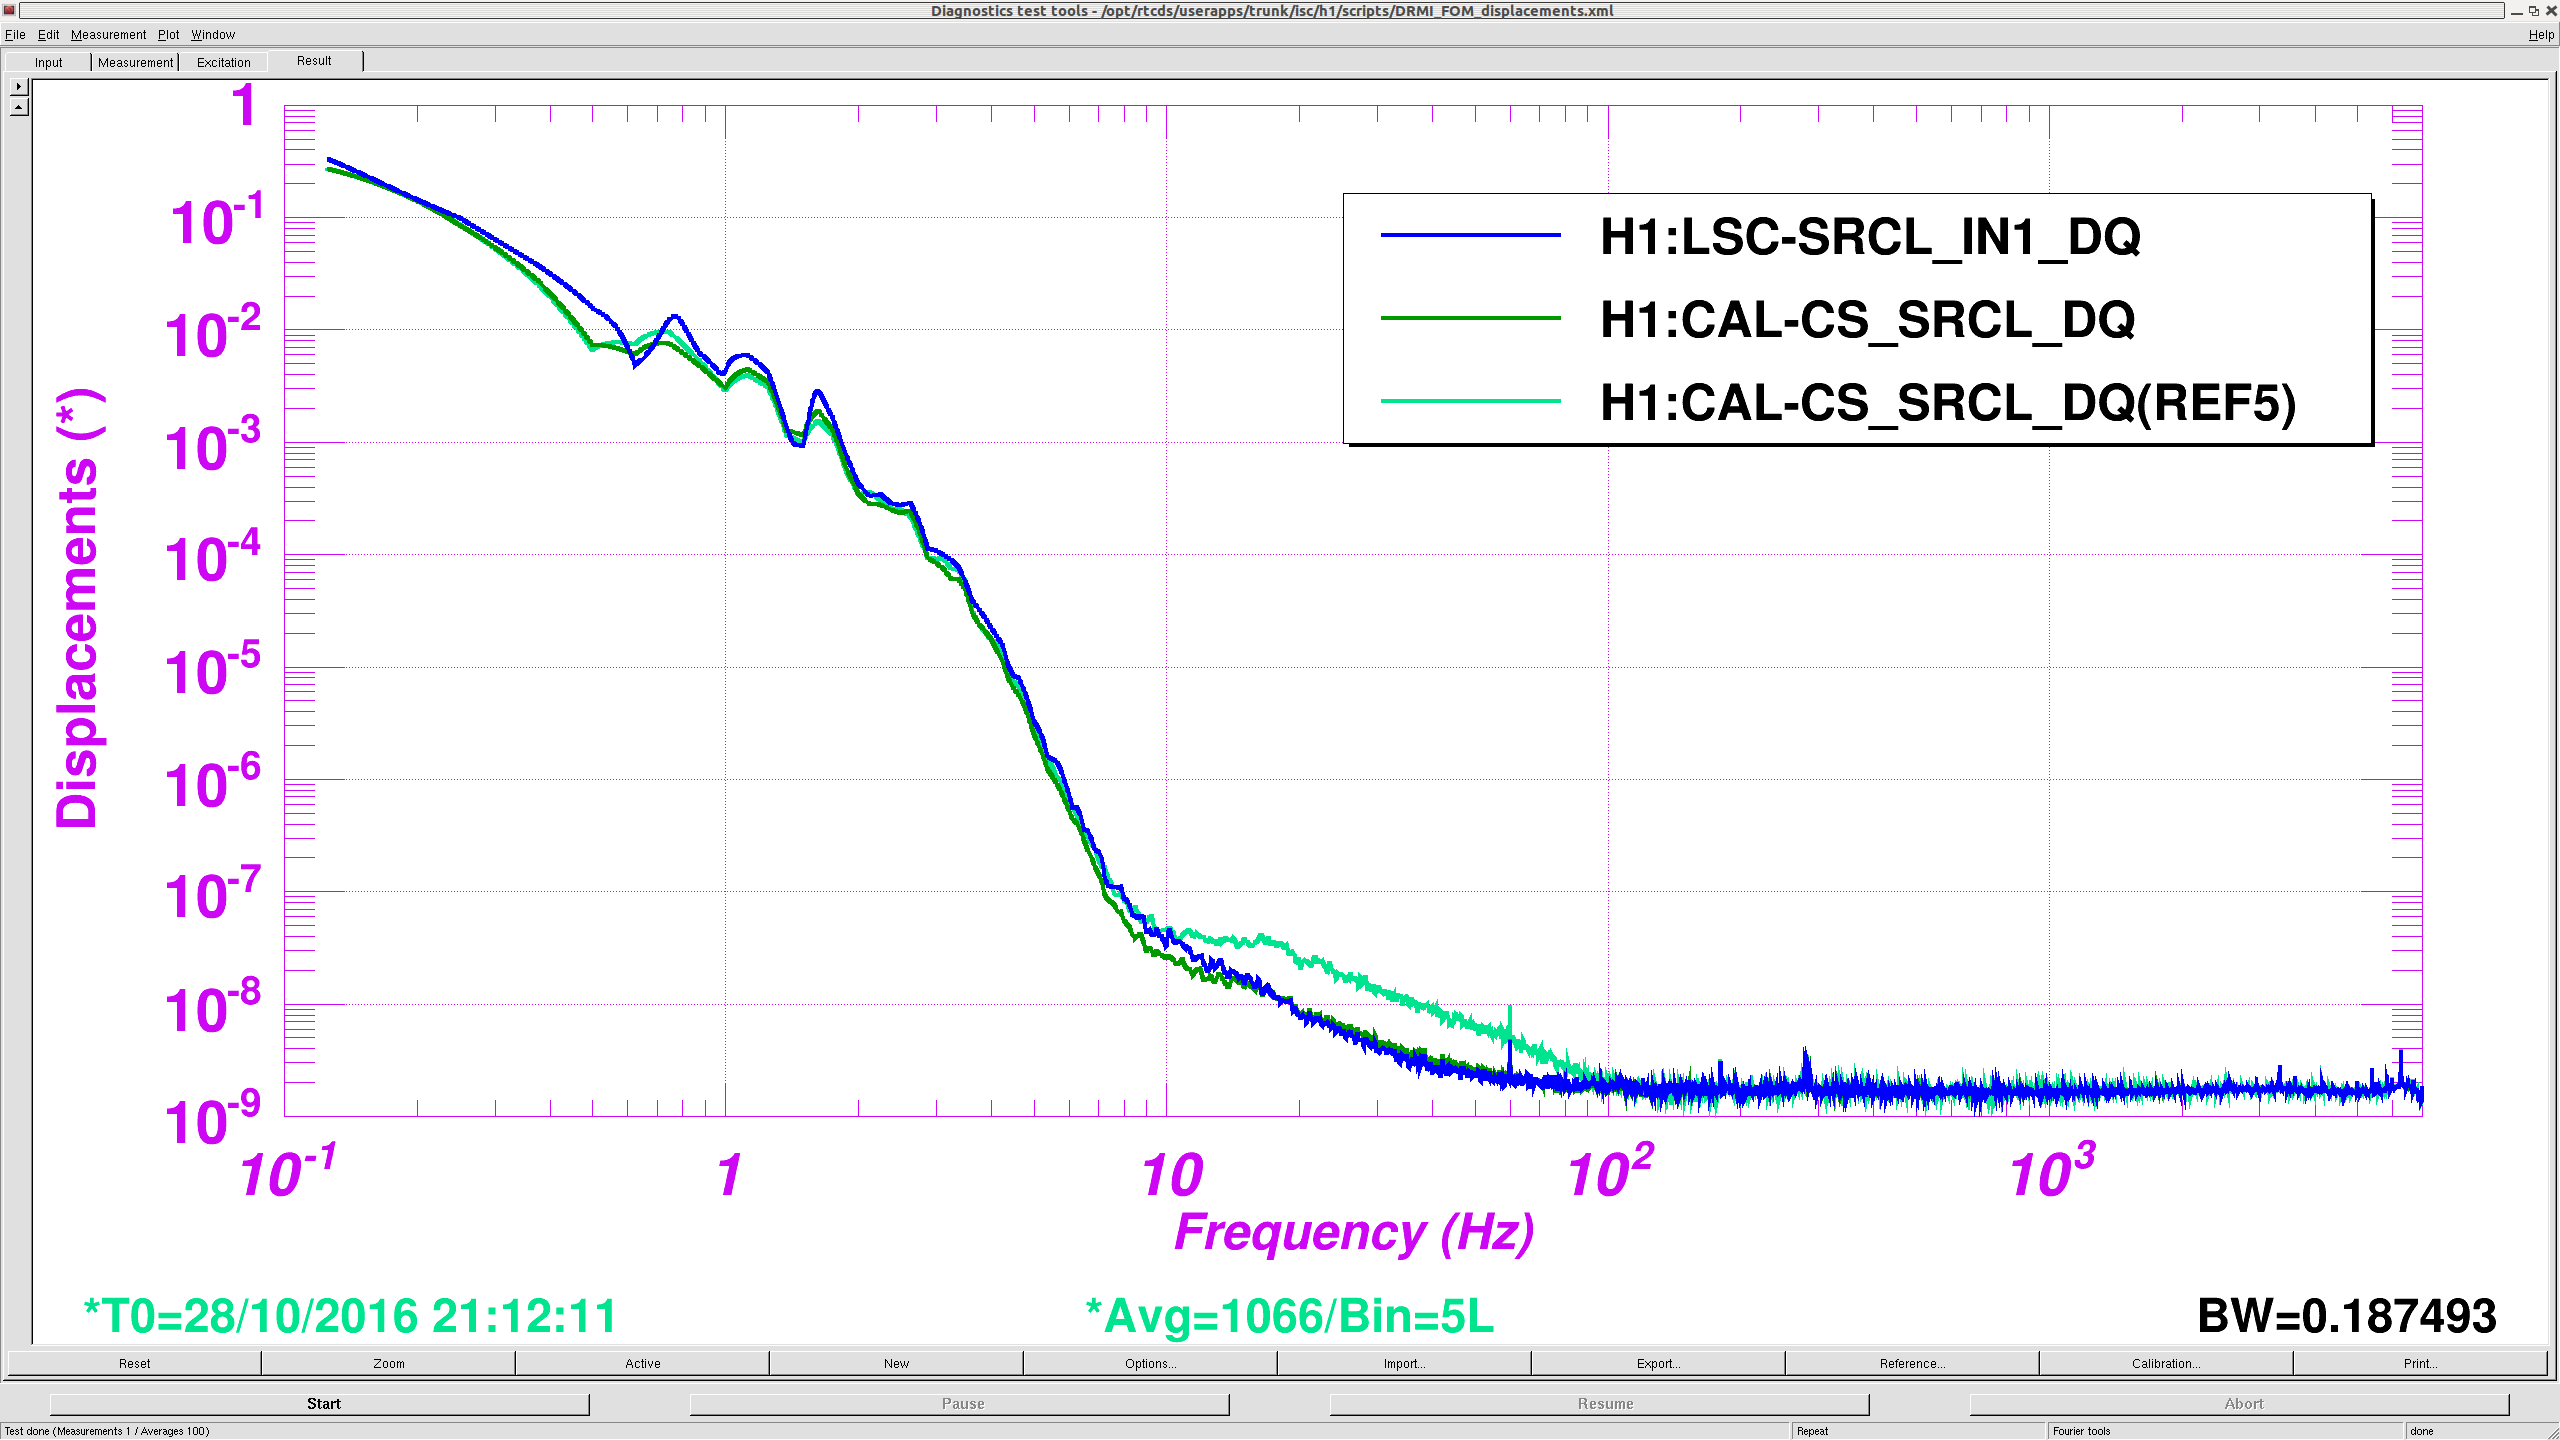
I was taking some measurements on the BSCs earlier today, and I noticed a feature at about .73 hz in the OAF CARM and DARM suspoint channels that didn't show up in the OAF MICH suspoint spectra. I then looked at the GS13s on ETMY and there is a pretty sharp feature that seemed to have appeared after recovery this morning. A quick cruise through the Summary pages, though, showed that there is some intermittent feature that has been there off and on since at least the end of June. I thought it might be the RX/RY loops on ST2 I've been trying, but turning those off had no effect. I then took the ISI St2 to damped, but the feature was still there. Jeff said that the TMS has a resonance about .73 hz, so I turned the damping off and that made the feature much worse, but it also rang up a bunch of other features. Whatever this is, it has to be very intermittent since I hadn't noticed it before today, and I look at ETMY pretty frequently, and I've never noticed it before.
Attached plot is the ST2 RX GS13, which showed this the strongest, though RY and Y also saw it. The CPS also saw this in all configurations, even damped. The TMS sees this, though not as big, and the quad sees even less and only in pitch. ST1 of the ISI does not see this.
For future reference, recall that H1's TMSY is the only "first article" TMTS, slightly different from every other "production" TMTS. The mode that is close to this frequency is modeled to be at 0.734 Hz. *If* this resonance is the source of the feature seen in the ISI, I suspect the coupling to ST2 rotational DOFs is because the TMS is mounted far from the center of the optical table. I've taken a damped and undamped transfer function this morning to confirm that this mode is "well" damped when damping loops are on. RED is current damped BLUE is current undamped and BLACK is some previous test in June of 2015. Indeed, the undamped resonance is at 0.73 Hz (and there's actually a cluster of three resonances from various other modes cross-coupling into the measurement), but as the damped measurement confirmed, the Q is a low ~15-30, as designed.
Title: 08/09/2016, Day Shift 15:00 – 23:00 (08:00 –16:00) All times in UTC (PT) State of H1: IFO is unlocked. HAM6 Vent, Tuesday maintenance day Commissioning: Outgoing Operator: N/A Activity Log: All Times in UTC (PT) 15:00 (08:00) Start of shift 15:00 (08:00) Vern – De-energized PSL rotational stage 15:24 (08:24) Carlos – Going to roof to clean sky camera lens cover 15:30 (08:30) Carlos – Back from roof 15:36 (08:36) Gerardo – Going to GV3 to work on Ion Pump replacement – Craning (WP #6064) 15:41 (08:41) Krishna – Going into LVEA to work on compact BRS 15:45 (08:45) Karen – Going to clean End and Mid Y 15:45 (08:45) Christina – Going to clean End and Mid X 15:59 (08:59) Kyle – Going to End-Y to turn down RGA bake 16:15 (09:15) Richard – Going into CER to pull binary I/O cards WP #6067 16:16 (09:16) Hugh & Marc – Replace ITMX Corn2 Coil Driver WP #6063 16:17 (09:17) Jim B. & Dave – Going to CER to pull binary I/O cards WP #6067 16:22 (09:22) Corey & Filiberto – Going to HAM6 for ground checks 16:25 (09:25) Norco N2 delivery to End-Y CP7 16:31 (09:31) Daniel – Going to End-Y to work on Timing change WP #6066 16:34 (09:34) Christina – Finished at End-X – Going to Mid-X then to the CS 16:36 (09:36) Karen - Finished at End-Y – Going to Mid-Y then to the CS 16:39 (09:39) Jim & Ian – Going to End-X 16:39 (09:39) Kyle – Back from End-Y 16:42 (09:42) Betsy & Steven – Going into Optics Lab 16:46 (09:46) Dave B. – Going to End-X, Mid-X, End-Y & Mid-Y for reboots WP #6066 16:48 (09:48) Beverage service on site to stock machines 16:58 (09:58) Daniel – Back from End-Y 17:02 (10:02) Jim & Ian – Back from End-X 17:08 (10:08) Norco N2 delivery to LVEA CP2 17:10 (10:10) Cleaning service on site to change out mats 17:25 (10:25) Hugh – Going to End-X and End-Y to check HEPI Pumps 17:35 (10:35) Richard – Going to HAM6 area for ground testing 17:43 (10:43) Richard – Out of the LVEA 17:56 (10:56) Dave & Jim – In the CER for PSL reboot 18:04 (11:04) Kyle – Going into LVEA HAM4 area RGA WP #6068 18:06 (11:06) Joe – Going into LVEA battery and wash station checks 18:07 (11:07) Dave B – Going to Mid-X 18:11 (11:11) Hugh – Going to HAM6 to re-payload ISI 18:18 (11:18) Calum, Peter, Betsy, Corey – Going into LVEA to work on shutter 18:23 (11:23) Joe – Out of the LVEA 18:30 (11:30) Richard – Transitioned LVEA to Laser safe 19:06 (12:06) Gerardo & Chandra – Out of LVEA – Crane is parked & AUX cart is running 19:22 (12:22) Corey – Out of the LVEA 20:15 (13:15) Corey & Filiberto – Going to HAM6 for grounding checks 20:42 (13:42) Betsy – Out of LVEA 20:45 (13:45) Koji – Going to HAM6 20:55 (14:55) Gerardo – Going into LVEA to check on Ion Pump at GV3 21:30 (14:30) Krishna – Taking student on tour of the LVEA 21:37 (14:37) Steven – Going into the Optics lab 22:01 (15:01) LVEA transitioned to Laser Hazard 22:02 (15:02) Betsy – Going to HAM6 22:21 (15:21) Cheryl – Going to HAM6 22:30 (15:30) Cheryl – Out of the LVEA 22:40 (15:40) Calum & Travis – Going to HAM6 22:54 (15:54) Gerardo – Going to shutdown AUX cart at GV3 Title: 08/09/2016, Day Shift 15:00 – 23:00 (08:00 – 16:00) All times in UTC (PT) Support: Incoming Operator: N/A Shift Detail Summary: IFO is unlocked due to HAM6 vent for OMC repairs. Tuesday maintenance day. Close out work continues at HAM6.
[Stefan, Jenne]
We have been looking at different PD signals to see if we can set up a guardian check that the fast shutter indeed closes upon lockloss. Right now we don't have a good way to code it in guardian yet, so Stefan has made a template for the lockloss script that we can run every lockloss.
Note that AS_C and ASAIR_B are both before the shutter, so should not see a change in light upon shutter close. AS_A, AS_B, and OMC_DCPD are all after the shutter, and should lose light if the shutter successfully closes.
For now, we have some DTT snapshots. NDS2 is under maintenence, so not all plots have the same traces, sorry.
Once NDS2 is back online, we'll post a few more plots of a few more locklosses, with both ASAIR and OMC DCPD included.
Also, we don't want to use signals such as the OMC input pointing QPDs that are whitened for this fast information.
NDS is back. Here are several plots, one where the shutter failed, and 5 where it worked. We see that this "bounce" is very repeatable.
The problem is that the big pulse of power can come before, during or after the bounce, so it is possible that we still send high power light to the AS WFS and the OMC unintentionally. As long as the PZT shutter has worked, the DCPDs will be protected, but the black glass dumps and AS WFS will not be. See in particular the 28July 20:19utc plot for an example when the big pulse comes just after the fast shutter originally closes.
Rich saw this bounce behavior when testing the fast shutters (see T1400335 starting at page 8), so this is a known issue, but we need to fix it.
Optical way of looking every acquisition whether the shutter is moving:
The fast shutter is kept closed through DRMI lock, and only opened when we're ready to start using the AS WFS in the DHARD_WFS state. So, we can look to see that there is some power at the ASAIR PDs, or also the AS_C diode. Initially, there should be no light on the AS WFS or going to the OMC. However, after the shutter is requested to be opened, we should suddenly see signal on those diodes.
Attached are 2 instances of this behavior, so it shouldn't be too hard to write a guardian check to ensure that the fast shutter is moving during every lock acquisition sequence. If instead we see light on the AS WFS as soon as DRMI is locked, and there isn't a sudden change when the shutter is requested open, then we should get warnings so that we know the shutter is perhaps stuck open.
Hopefully the new shutter installation will solve the problem that Jenne mentions where the shutter let light pass for about 20 msec after the original closing. We believe that the previous shutter was too low (9 mm between the beam and the top of the shutter mirror), so that the downward 'bounce' of the shutter was enough to let the beam by. The shutter is now 3 mm higher than it was, so hopefully it will continue blocking the beam even during the downward part of the shuttering cycle.
J. Kissel ECR E1500045 FRS 6014 WP 6051 I've completed the installation of the infrastructure for individual switch-ability for all QUAD's PUM / L2 actuation stage coil drivers. This stage should now have the same functionality as the BS M2, and all of the M3 stages of the HSTSs (the MCs, the PRs, and the SRs). I've created EUL2OSEM burt files for the walk through switching the state of each coil, so the only step that remains to take advantage of the new infrastructure is to modify the ISC_LOCK guardian's COIL_DRIVERS state to include the QUADs. Details: ------------- This update includes (this should double as an installation checklist for LLO) - Updates to the ITM and ETM QUAD library parts: (see screenshots in LHO aLOG 28906) /opt/rtcds/userapps/release/sus/common/models/ QUAD_MASTER.mdl << Modified the BIO block to use the new Individually Controlled PUM library block, arranged connections from BIO to L2 blocks accordingly QUAD_ITM_MASTER.mdl << (same as above) Modified the BIO block to use the new Individually Controlled PUM library block, arranged connections from BIO to L2 blocks accordingly STATE_BIO_MASTER.mdl << Created new library block for individual control of PUM driver FOUROSEM_DAMPED_STAGE_MASTER_WITH_DAMP_MODE.mdl << Modified COILOUTF bank to accept individual control and switched EUL2OSEM matrix from static to ramping - Corresponding updates to the impacted ITM and ETM QUAD MEDM screens, /opt/rtcds/userapps/trunk/sus/common/medm/quad/ SUS_CUST_QUAD_OVERVIEW.adl SUS_CUST_QUAD_ITM_OVERVIEW.adl SUS_CUST_QUAD_BIO.adl SUS_CUST_QUAD_ITM_BIO.adl SUS_CUST_QUAD_L2_EUL2OSEM.adl - Restored the nominal L2 EUL2OSEM matrix values, given the new channel names from the ramp matrix part - Installed a ramp time of 8.0 sec for the EUL2OSEM matrix, as is the case for the other Triples that have been modified previously - Restored the nominal coil driver state and test/coil enable for each coil individually (LHO likes these to be in State 2 (acq ON lp OFF) in the DOWN state, currently) - Creating new burt configuration files for the EUL2OSEM matrices as each coil is turned off. These now live and been committed here: /opt/rtcds/userapps/trunk/isc/h1/scripts/sus/ ?tm?_l2_out_ll.snap ?tm?_l2_out_lr.snap ?tm?_l2_out_normal.snap ?tm?_l2_out_ul.snap ?tm?_l2_out_ur.snap - Reconciling the SDF system such that - All new EUL2OSEM matrix channels are accepted and monitored - All new individual BIO channels are accepted and monitored - The EUL2OSEM ramp time has been accepted and monitored This closes out the above mentioned work permits and FRS for H1.
No resets needed, all saturation counts 0.
FAMIS# 7066
Took pet swipe in HAM6 on 08/02/2016 when doors were removed. Swipe was from -X side of OMC weldment to side of table, (see photo). At the same time, removed 4" witness wafer from HAM6. Sample has been prepared for analysis (DCC T1600336). See photo for location of wafer.
Krishna
I'm driving a piezo stack placed under the c-BRS platform with a function generator (drive frequency 5-200 mHz, 10V pk-pk) located on the floor in the CER. This setup is temporary and will be removed in a few hours.
There are no significant changes from last week. OSC DB3 still showing incorrect current measurement and AMP chiller flow rate showing very slkow steady decrease.
[Betsy TJ Koji]
We measured the optical powers in HAM6 before OM1-3 and OMC as well as at the transmission of OM1 and OM3.
Taking the ratio of these powers and AS_C QPD SUM, we get the calibration of the optical powers in HAM6.
This will be used for throughput calculation of the entire IFO output optics.
The ratio is
(Power into HAM6)/(AS_C QPD SUM) = 0.0162 +/- 0.0005 [mW/cnt]
Caveat: Our measurements were dominated by the systematic error of the power meter (as usual). Estimated size of the error is +/-3%.
Without having a better power meter, I don't expect I can improve this number.
As you can see in the spread sheet, each measurement has small statistical error like 0.1~0.5%. The numbers for AS_C QPD SUM was taken by the data downloaded from CDS.
However, two measurements of the optical power before OM1 (blue) showed 5% discrepancy. Also tracing the power along the main HAM6 path, the fluctuation of the power measurement (blue plot) exceeds the expected reduction of the power (orange plot) by measured transmissions. (Note that OM1 and OM3 has 800ppm and 1.6% transmission, that is consistent with the measurement in 2015.)
Therefore, this big fluctuation was concluded to be a systematic error of the measurement, particulary of the power meter (Ophir diode type sensor head), considering the stability of the AS_C QPD SUM.
From the two measurement of the optical power before OM1, and the plot, the systematic error was estimated to be +/-3%.
See LHO aLog 28649. The voltage regulator has been replaced and this original unit returned to service.
WP 6063 FRS 5948
J. Kissel There are several front end models with out-standing SDF diffs prior to the timing system upgrade boot fest. I attach screenshots because there's no chance we can reconcile these before all front ends go down. Models with the biggest collection of DIFFs: h1pslfss h1psliss h1pslpmc h1asc h1lsc h1sysecatc1plc1 h1sysecatc1plc2 h1sysecatc1plc3 Hope this helps us in the recovery!
Travis S, Darkhan T,
Overview
On August 4th PcalX maintenance measurements were taken at EX. During maintenance we adjusted AOM bias. The offset value for the OFS drive was also adjusted, but incorrectly (see details). Today we re-ajusted OFS offset value to +5.14V.
Details
During Pcal maintenance measurements of the Pcal laser power in the Transmitter module were taken to assess Pcal drive range. Analysis of the measurement will give us an efficiency of an AOM driver (max diffracted power), assessment of pick-off power levels for the transmitter PD, OFS PD, maximum available output power modulation range. At the moment the measurements have not been fully analyzed.
The AOM bias voltage was adjusted for it to give ~50% out of max available AOM drive when the OFS loop is open. The OFS offset was adjusted accordingly in the front-end. Originally this was not done correctly, cause the OFS offset was adjusted when the loop was not closed.
Later when Evan tried to close the loop, the error signal, i.e. sum of the OFS PD signal and the OFS offset (when excitations and injections are turned off), saturated the AOM driver.
This is now fixed by adjusting the OFS offset to +5.14V.
We turned back on the excitations (currently one line with 39322 ct amplitude at 3501.3 Hz) and hardware injections.
[Betsy, TJ, Fil, RichM, Peter, Koji, Calum, RichA (remote)]
Progress
- The OMCT path (Y+) was aligned. Using 10W input instead of 2W helped us to find the leakage cavity flash through the PZT mirrors with 50ppm transmission. In the end we confirmed that the beam is well close to the center of the viewport (simulator) using a sensor card+an IR viewer and a CDD setup.
- The other OMCT beam (Y- side) was found to be blocked by one of the panels of the black glass shroud. We needed to shift the Y- panel more than the allowed range by the design. In order to allow this shift, we flipped a PEEK bushing and removed some of the washers and viton O-rings on the captive compliant fixing screws. Two screws to hold the glass holder were also removed to widen the sliding range. (See attachment 1, 2)
- The light powers in HAM6 were measured at various positions. This will be analyzed in a different entry.
- The funtionarity of the picomotors were confirmed (cf. channel assignment ALOG LHO 16422). Also we confirmed that the two beam diverters are working.
- We found that failure of the fast mechanical. We could not close the shutter because the coil wire has an open connection. Close inspection revealed that the coil wire has a kink (attachment 3). By jiggling this kink we actually could fluctuate the coil resistance from 20Ohm to infinity. The replacement shutter was immediately sent from CIT. It is coming here tomorrow morning.
To Do (Tue afternoon)
- Install the replacement fast shutter.
- Ground loop check
- Other SUS/SEI exit procedure
9:50AM MON AUG 8th, 2016 - Chamber entrance Particle counts with hand held CC counter:
Particle size | Outside of chamber cover, in CR | In chamber above table |
0.3um | 0 | 0 |
0.5um | 0 | 0 |
1.0um | 0 | 0 |
Evan G., Jeff K.
We investigated the time delay of an injection made at H1:CAL-PCALY_SWEPT_SINE_EXC to H1:CAL-PCALY_TX_PD_VOLTS. The measured phase delay is 100.2 deg at 960 Hz (or equivalent delay of 290 usec).
Attempting to account for the phase from timing diagrams (see attached diagram, figure 1, DCC: G1501170), we find:
15.05 deg ("43.5 usec") 16-64k IOP upsampling 21 deg (61 usec) DAC "processing" delay 13.11 deg ("37.9 usec") AI (analog) --- PCAL --- (negligible) 13.11 deg ("37.9 usec") AI (analog) 21 deg (61 usec) ADC "averaging" delay 15.05 deg ("43.5 usec") 64-16k IOP downsampling Total = 98.3 deg ("284.8 usec") We wanted to repeat the measurements made by Shivaraj at LLO (aLOG 27207) and verify the measurements yield consistent timing results.
We injected a 960 Hz signal in H1:CAL-PCALY_SWEPT_SINE_EXC and recorded the following time series (see figure attached): H1:CAL-PCALY_TX_PD_VOLTS_OUT H1:CAL-PCALY_RX_PD_VOLTS_OUT (measured to be equivalent to the TX_PD channel) H1:IOP-ISC_EY_ADC_DT_OUT H1:CAL-PCALY_FPGA_DTONE_IN1 H1:CAL-PCALY_DAC_NONFILT_DTONE_IN1 H1:CAL-PCALY_DAC_FILT_DTONE_IN1 H1:CAL-PCALY_SWEPT_SINE_EXC
The phase of the H1:IOP-ISC_EY_ADC_DT_OUT signal (measured at 65k) is determined from the amplitude of the signal at time T=0 with respect to the overall peak amplitude. We measured -2551 cts amplitude at T=0, where the sine wave has a peak amplitude of 4090 cts. The arcsine of the ratio gives the phase of -38.6 degrees in the range of -90 deg. to +90 deg. Since the true phase is outside of this range (more negative) we wrap instead to 180+38.6 = 218.6 degrees. This is the reference phase of the DuoTone signal.
We repeated the measurements to find the phases of all of the channels: H1:IOP-ISC_EY_ADC_DT_OUT = 218.6 deg <---- marked as time T=0 H1:CAL-PCALY_FPGA_DTONE_IN1 = 203.8 deg <---- also T=0 but filtered by the digital AA H1:CAL-PCALY_SWEPT_SINE_EXC = 219.4 deg H1:CAL-PCALY_DAC_NONFILT_DTONE_IN1 = 182.7 deg H1:CAL-PCALY_DAC_FILT_DTONE_IN1 = 100.2 deg H1:CAL-PCALY_TX_PD_VOLTS_OUT = 96.5 deg H1:CAL-PCALY_RX_PD_VOLTS_OUT = 96.4 deg
The difference in phase of H1:CAL-PCALY_SWEPT_SINE_EXC to H1:CAL-PCALY_TX_PD_VOLTS_OUT is 122.9 degrees at 960 Hz (= 355.6 usec)
So now there is a weird discrepancy in our measurements. The H1:CAL-PCALY_SWEPT_SINE_EXC to H1:CAL-PCALY_TX_PD_VOLTS measurement says 290 usec. The timing diagram predicts 285 usec. The phase of the waves measured in a time series is 355.6 usec. The difference is about 61 usec.
Still open questions:
[Corey, TJ, Betsy, Koji]
RESOLVED ISSUES:
- The issue of the suspension TF was resolved by adjusting one of the OMC EQ stop holders [LHO ALOG 28900]
- The sign-flip issue of the DCPD signals has been explained by the accoustic noise of the OMC [LHO ALOG 28901]
PROGRESS:
- The lock nuts of the upper mass EQ stops were fastened (by fingers)
- The black glass panels of the OMC shroud were restored. We checked the input/reflection apertures to be well aligned against the beams.
- The OMCT steering mirror was restored to the optical mount.
- The alignment of the WFS path was reviewed. It was found that the path is still well aligned. Just the WFS QPDs were manually aligned by the mounts with picomotors.
- We attached the viewport simulator on the flange to check the alignment of the in-air paths. The AS AIR path was very well centered on the viewport without touching. The OMCR path is about 50% towards East (-Y) from the center of the viewport. We could not find the OMCT spot no matter how we flash the OMC. This could be just the beam was too dim, or was blocked by the shroud. We'll investigate this on Monday again.
TO DO:
- Continue to work on the OMCT path alignment. This requires ~10W IMC input. Try to find a dim flashes. Use a CCD camera on a tripod to find the spot around the viewport cover.
- We want to check the calibration between AS_C QPD SUM, the incident power on OM1, and the incident power on the OMC breadboard.
- Other ISC items function check (picos, beam diverters, fast shutter - see Rich's comment below, etc)
- Ground loop check
- Other SUS/SEI exit check
J. Kissel Now that the re-assembly of the OMC is complete including EQ stop spacing, EQ stop lock-nut securing, and OMC shroud replacement, I've reconfirmed that the dynamics of the OMC SUS are still free-and-clear as they were this afternoon. Nice work Koji and co.! There is no further planned installation work in and around the OMC SUS, so we suspect these will be the last full in-air transfer functions before chamber close-out next week. Templates live here: /ligo/svncommon/SusSVN/sus/trunk/OMCS/H1/OMC/SAGM1/Data/ 2016-08-06_0007_H1SUSOMC_M1_WhiteNoise_L_0p02to50Hz.xml 2016-08-06_0007_H1SUSOMC_M1_WhiteNoise_P_0p02to50Hz.xml 2016-08-06_0007_H1SUSOMC_M1_WhiteNoise_R_0p02to50Hz.xml 2016-08-06_0007_H1SUSOMC_M1_WhiteNoise_T_0p02to50Hz.xml 2016-08-06_0007_H1SUSOMC_M1_WhiteNoise_V_0p02to50Hz.xml 2016-08-06_0007_H1SUSOMC_M1_WhiteNoise_Y_0p02to50Hz.xml Note, I've finally listened to my own advise and made sure that these in-air transfer function templates all have the same frequency resolution and excitation amplitude and coloring.
While HAM6 is open, it would be good to do a close inspection of the fast shutter. Specifically the wires attaching the bobbin (toast) to the integral terminal block. These wires are tiny and are the most likely item to fail. Also good to check for any delamination of the mirror to the bobbin.
Photos from Friday's work is on Resource Space here:
https://ligoimages.mit.edu/?c=1703
9:30AM FRI AUG 5th, 2016 - Chamber entrance Particle counts with hand held CC counter:
Particle size | Outside of chamber cover, in CR | In chamber above table |
0.3um | 60 | 25 |
0.5um | 20 | 10 |
1.0um | 0 | 0 |
1:30PM FRI AUG 5th, 2016 - Chamber entrance Particle counts with hand held CC counter:
Particle size | Outside of chamber cover, in CR | In chamber above table |
0.3um | 60 | 0 |
0.5um | 0 | 10 |
1.0um | 0 | 0 |
[Betsy, Corey, TJ, Koji]
- Now the OMC cavity is flashing!
- The OM1~3 and OMC suspensions have been debiased, and the OSEMs were tweaked to have the flags at the center of them.
- The optical paths such as the OMC incident path, OM1 transmission path, OMC refl path ahve been aligned.
We still need to align the WFS and OMCT paths and confirm viewport paths if the beams are hitting the viewport.
- Currently the OMC PZT HV is ON.
Shutter mirror inspection
The surface of the shutter mirror was checked with the green lantern. We didn't observe any sign of degradation.
Mass balance
- We adjusted the weight of the new OMC to match with the old one as much as possible. Then the mass was moved to have reasonable flag positions in the OMC suspension.
OLD OMC OMC ASSY-D1201439-002 Balance mass arrangement (Topview)
OMC (6960g) + Mass (201g) = 7161g |
New OMC OMC ASSY-D1201439-3_2 Balance mass arrangement - final (Topview)
OMC (6978g) + Mass (189g) = 7167g |
- The lateral position of OMCS RT OSEM was adjusted to have the flag at the center in the OSEM.
- The centering of the OMCS OSEMs were checked to be within the tolerance range.
- Along with the mass balancing, the positions of the EQ stops for the OMC breadboard were checked. We found several EQ stops were too close or too far. The EQ stop holders were adjusted to have them reasonable gaps to the glass breadboard.
Electrical functionality check
- The DCPDs were illuminated by a white flash light to check which DCPD responds to which channel. DCPDA and DCPDB are related to the DCPD on the transmission anfd reflection sides of the BS prism, respectively. (DCPD(T) = DCPDA, DCPD(R) = DCPDB). This seemed opposite to the case with the previous OMC. It was found that the difference in the internal cabling on the OMC caused this difference. This will be noted in the OMC testing procedure document (T1500060) athough this does not affect the calibration.
- The OMC QPDs were illuminated by the flash light. QPD1 (short arm) and QPD2 (long arm) correspond to QPDA and QPDB, as nominal.
Incident beam alignment & suspension debiasing
- Prep: IMC was locked at 2W. The beam was aligned on to the center of AS_C QPD.
- At this point, we already could observe the beams were on the OMC QPDs. Very good reproducibility.
The signal ratios between OMC_QPD_A/B_SUM and AS_C_QPD_SUM (0.56 and 0.59 today) were confirmed with the ones with the numbers on Jul 28 (0.48 and 0.45).
These ratios were enough similar to convince ourselves that they are the real spots.
From this point, we could follow the procedure in T1400588 (sec 2.3.3 and later).
- OMCS and OM3 were debiased to have (0,0), and used OM1 and 2 to align the spots on the OMC QPDs.
- This made OM1 Yaw ~-2000, and the OMC2 Pitch ~1500.
- The OM1 suspension cage was twisted to remove the OM1 Yaw bias.
- The OM2 suspension pitch adjustment screw was adjusted to remove the OM2 Pitch bias.
- The resulting offsets were: OM1 (116.9, -229.0), OM2 (94.5, 113.0), OM3 (0,0), OMCS (0,0) => Requirement <250 = 1/10th of the full scale => OK!
- We quickly checked some suspension transfer functions for OM1/OM2 and OMCS. OM1 and OM2 showed consistent TFs as the previous measurements. OMCS had the same resonant structures as before except for the resonant frequency of the lowest frequency mode. JeffK is checking the TFs more carefully.
- We turned on the PZT HV and scanned the PZT2 voltage. We confirmed that the OMC DCPDA and DCPDB were observing the OMC flahses.
Optical path check
- Main path: The spot positions on OM1/2/3 were checked. They looked fine.
- Shutter path: The mechanical shutter path was checked. It is still nicely aligned.
- OM1 trans path: The beam alignment in the OM1 transmission was checked. They looked fine. We still need to check the AS AIR viewport path with the viewport emulator.
- OMCR path: The beam spots on the OMCR steering mirrors were checked. The beam was not on the center of the steering mirrors. The first steering mirror (so-called M8) in the OMCR path was moved. The reflection path for 90:10 BS and the beam diverter path was checked. They looked just fine. M10 and M11 were used to align the spots on the OMCR QPDs. We didn't use M9 this time. We'll check this path again once the viewport emulator is attached on the chamber tomorrow.
- WFS path / OMCT path: We will work on these paths tomorrow.
Next steps
- Restore OMC blackglass shroud if the OMCS TFs look OK.
- Restore OMCT steering mirror
- Place the viewport emulator
- Confirm spot locations on the viewport
- We want to check the calibration between AS_C QPD SUM, the incident power on OM1, and the incident power on the OMC breadboard.
- Ground loop check
- Other SUS/SEI exit check
More detailed assessment of the OMC and OM SUS can be found here: LHO aLOG 28883. The OMC is locked up in Transverse / Roll, otherwise all SUS look healthy.
Assuming this is the case, we need to check the upper mass EQ stops to make sure the upper mass gets completely free.
Also this action will change the position of the OMC glass breadboard. Therefore the beam alignment should be revisited again.
(Photos From Yesterday's Work)
Not many taken with alignment/optic work mainly on the plate. Photos can be found here:
https://ligoimages.mit.edu/?c=1702
9:30 AM THUR AUG 4th, 2016 - Chamber entrance Particle counts with hand held CC counter:
Particle size | Outside of chamber cover, in CR | In chamber above table |
0.3um | 10 | 10 |
0.5um | 0 | 10 |
1.0um | 10 | 10 |
(Betsy, Corey, Keita, Koji & also some photos by Richard M)
Following up on alogs from Keita & Koji, photos from yesterday's work has been uploaded to resourcespace and can be found here:
https://ligoimages.mit.edu/?c=1696
(There's 91 photos. I did not upload blurry photos.)
I'm attaching highlight photos to this alog & they are roughly numbered in the order taken:
> 4. Burn hole at entrance aperature on the shroud glass for OMC
Today, we took out the black glass panel with a burn hole from the OMC shroud.
The attached close-up photo shows the burn hole above the entrance aperture to the OMC. Also, you can observe many more craters.
As we are going to install the replacement panel, we wonder what was the cause of these misaligned craters and what was the difference between the small craters and the biggest burn hole.
~10:00AM WED AUG 4th, 2016 - Chamber entrance Particle counts with hand held CC counter:
Particle size | Outside of chamber cover, in CR | In chamber above table |
0.3um | 70 | 0 |
0.5um | 20 | 0 |
1.0um | 10 | 0 |
~1PM WED AUG 4th, 2016 - Chamber entrance Particle counts with hand held CC counter:
Particle size | Outside of chamber cover, in CR | In chamber above table |
0.3um | 0 | |
0.5um | 0 | |
1.0um | 10 |