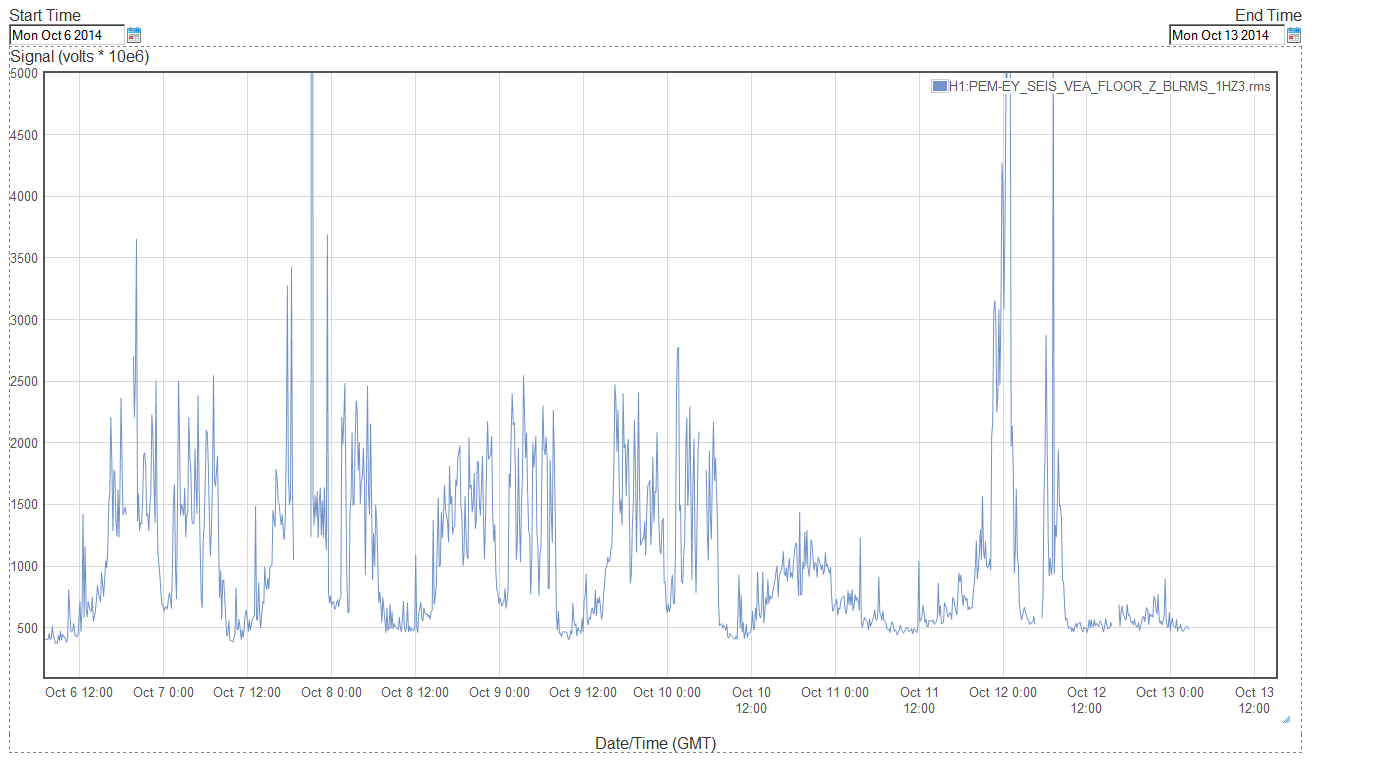
Displaying reports 74141-74160 of 76956.Go to page Start 3704 3705 3706 3707 3708 3709 3710 3711 3712 End
Reports until 16:37, Friday 18 May 2012
LHO General
patrick.thomas@LIGO.ORG - posted 16:37, Friday 18 May 2012 (2899)
ops summary
Dave restarted all the models of h2seib6.
Gerardo moved dust monitor 2 in the end Y LVEA into the clean room over BSC 6.
The IOP watchdogs for SUS BSC6 were tripped (in chamber work)
H2 SUS
betsy.weaver@LIGO.ORG - posted 15:37, Friday 18 May 2012 (2898)
ETMy ready for TFs

Today, we finished fixing the PUM (L2) LR magnet/flag.  We then verified that the suspension was free of any mechanical rubbing (many head to toe inspections) and adjusted all OSEMs to nominal settings, accounting for buoyancy.  So, we are ready for TFs on this guy.

H1 CDS
robert.schofield@LIGO.ORG - posted 14:50, Friday 18 May 2012 (2895)
More on I/O chassis fans, power supplies, and magnetic field coupling sites

Summary:

The power supply and fan issues with the i/o chasses could be solved with a new power supply producing smaller magnetic fields (being planned by CDS), routing cables away from power supplies, and a separate supply for the fans.  The strongest magnetic field coupling sites to the OSEM read back channels were the cable connectors to the chasses that the signal passes through and not boards such as the a to d board. However, since the cables pass close to the power supply, the dominant coupling for the power supply fields was to the cables instead of the connectors at their ends. The separate issue of the fan frequencies showing up in channels can be solved by using an external power supply: the remaining coupling (from magnetic fields) when using a separate supply was measured here to be down by at least ten. 


Power supplies in the I/O chasses:

In  a previous log I reported that magnetic fields from the I/O switching power supply were strong enough to couple into channels at an unacceptable level (here).  Since then, I have investigated the magnetic field coupling sites to see if there were any coupling sites that could be mitigated.

I looked for magnetic field coupling sites to one of the UIM OSEM readback channels for ITMY. I used a centimeter scale coil and slowly scanned circuit boards etc., while monitoring the coupling on a screen. The strongest coupling that I found was to the cable connectors to the UIM coil driver, the anti-aliasing module and the I/O chasis. The coupling to the connectors was stronger than the coupling to the a to d board, or any other location inside the coil driver or I/O chassis or along the cables. Note that this is only a test of coupling to the read back channel: I have not fully tested coupling of rack magnetic fields to the coil actuators.

Notwithstanding that the strongest coupling site was to the cable connectors, the dominant coupling site for the fields from the I/O chassis power supply was to the cables themselves because they pass so close to the power supply. Figure 1 demonstrates cable coupling, showing that when the cable into the UIM coil driver was about 10 cm from a field generator set on the I/O chassis power supply, the injected comb showed up strongly on the channel, but much less so when the cables were moved about 40 cm away from the field source, with no other changes.

Fans in the I/O chasses:

I noted in a recent ilog (here) that i/o chasis fan frequencies showed up in the channels passing through the chasis. When the fans were run on a separate power supply, the coherence was lower, but because of time constraints and dtt crashes, I was not able to run long coherence measurements to make sure that the coupling was much lower. Figure 2 shows the results of a recent 79,000-average coherence measurement, and the fan peaks appear to be showing with a low level of coherence. The plot suggests that the coupling of the fans to the i/o chassis channels is down by a factor of about 10 when the fans are run on a separate power supply. 

For this reason, I think that running the fans on a separate power supply will be sufficient. So, to solve the issues I have raised recently, the i/o chasis power supplies should be replaced and the fans should run on independent supplies.  There is a chance that power supply ripple from the fans would not be a problem with the new power supplies. I have not tested this.

Non-image files attached to this report
LHO General
gerardo.moreno@LIGO.ORG - posted 10:50, Friday 18 May 2012 - last comment - 15:17, Friday 18 May 2012(2894)
Y-End Dust Monitors
Relocated the Y-End station dust monitor #2, it is set inside the BSC06 clean room, it is next to the SE pier.  However it needs to move closer to where the action is, but we need a longer cable to accomplish that, yes we are looking for a longer cable.

Dust monitor #1 remains located West of the iLIGO racks inside one of the cleanrooms.
Comments related to this report
gerardo.moreno@LIGO.ORG - 14:42, Friday 18 May 2012 (2896)
We found a cable, thanks Richard, so we re-relocated the dust monitor (#2), now the location is by the NW pier of BSC06.
patrick.thomas@LIGO.ORG - 15:17, Friday 18 May 2012 (2897)
The dust monitor labeled 'L' is at location 1. The dust monitor labeled 'M' is at location 2.
LHO General
patrick.thomas@LIGO.ORG - posted 18:49, Thursday 17 May 2012 (2893)
plots of dust counts
Attached are plots of dust counts > .5 microns.
Non-image files attached to this report
H2 SUS
travis.sadecki@LIGO.ORG - posted 16:04, Thursday 17 May 2012 (2890)
Summary of SUS work at BSC6 today

See Betsy's closeout checklist  for the latest updates.  https://alog.ligo-wa.caltech.edu/aLOG/index.php?callRep=2848

Since Betsy was working with Derek on Triples gluing stuff, I was on my own for much of the day.  I rediscovered that working on a monolithic Quad is rarely a one-person job, especially in chamber with TMS as its neighbor.  I began by attempting to remove the TFE caps that were on many of the spherical tip and silica tip EQ stops.  After cautiously removing as many as I could confidently do by myself, I was left with 4 caps on the underside of the top masses that were inaccessible by me solo due to limited access from the reaction side of the Quad.  These 4 caps require that someone with skinnier arms than mine reach through the Quad between the top and UI masses to grip the TFE cap from the inside while simultaneously working the screw from the outside to thread the cap off.  With a few spare minutes, Betsy helped me remove these last 4 caps.  Even with 2 people, we found this activity less than relaxing.  Note for future builds: Remove these caps before the monolithic is installed (since the majority of the clamping/unclamping is done by that point, the particulate issues these hoped to resolve is less of a concern). 

After the caps were removed, we noticed that one of the flags on the penultimate mass was dislodged from its steel disc baseplate, and that the magnet on the end of it was not seated correctly.  Betsy returned to her work with Derek, so I was on my own again.  To remedy this required the removal of the AOSEM opposite the flag in question in order to grasp the flag.  However, grasping the flag to remove/realign it is not trivial either.  This requires the use of a set of 10" long tweezers which must be inserted through the AOSEM hole (~1" diameter) in the PenRe to gingerly grab the assembly so as not to drop either of the 2mm x 6mm magnets of either end.  Again, due to access issues to the reaction side, I could not see the flag from this side.  To complete this simple task, 2 people will also be required: one to manipulate the tweezers and one to view/guide from the main chain side by looking through the penultimate mass, which luckily is transparent glass.  After bumping my head for the third time attempting the solo version of this task, I decided to move on (Note to TMS designers: much much larger chamfers on parts would be greatly appreciated).  I then installed the last of the sleeve screws that had been in use at BSC8 until recently.   Currently, the Quad is not fully suspended due to the PenRe being locked until the flag repair is complete. 

H2 General
jeffrey.garcia@LIGO.ORG - posted 16:00, Thursday 17 May 2012 (2891)
Ops log
Work in and around BSC6 throughout the day.  There were a few dust level alarms for "DST1_3" which is one of the two located in the End-Y VEA (the exact location of this dust monitor is not clear from the medms).

H1 PSL work in the LVEA.  

No machine reboots to report.


H1 AOS
jodi.fauver@LIGO.ORG - posted 14:31, Thursday 17 May 2012 (2888)
BSC2-HAM4 ICC
Condition of chambers was documented. HAM4 Support Tubes and bellows were inspected then bellows were vacuumed and the support tubes "picked". Support tubes will be wrapped and bellows protection installed.
H1 FMP
jodi.fauver@LIGO.ORG - posted 14:29, Thursday 17 May 2012 (2887)
BSC6 Close-out
Joe D. and Jodi re-cleaned the two high quality viewports from the south door. Cheryl inspected them and they are ready for re-installation.

The crew finished pulling the iLIGO flooring and installed the aLIGO flooring that is electropolished and qualified for UHV service. In removing the remainder of the iLIGO flooring this morning, Mark L. came upon a mystery: two unexpected holes in the longest plank of the flooring. Attached please see some pix. As you can see from the size discrepancy, these are not the normal holes for BSC flooring. All LIGO-ites questioned deny drilling/tapping the holes. For now, we will chalk it up to the "little green men from outer space" but it is not comforting to have holes appear in structures without any notice or agreement. >-( 
Non-image files attached to this report
H2 PEM
jeffrey.garcia@LIGO.ORG - posted 12:01, Thursday 17 May 2012 (2886)
EY dust alarms coherent with increased wind speeds
There were some dust monitor alarms triggered during the night in the End-Y VEA. The attached plot shows there were elevated levels of dust counts that are coherent with increased wind speeds.  This suggests spurious wind currents leaking into the VEA could cause dust particles to swirl around, increasing the dust count levels. 
Images attached to this report
LHO General
keita.kawabe@LIGO.ORG - posted 11:40, Thursday 17 May 2012 (2885)
eLIGO L1 OMC moved to H2 PSL table

I, Alberto and MichaelL unmounted the eLIGO L1 OMC (that was used for H1 squeezing experiment) from the optics cart in the H2 PSL ante-room and moved it to the H2 PSL table. The OMC was dogged down and wrapped by foils.

The cart was moved to the outside and put in a clean room near by.

FYI another eLIGO OMC (original H1 OMC) is in a protective cage in a shipment box in the optics lab.

LHO VE
gerardo.moreno@LIGO.ORG - posted 10:18, Thursday 17 May 2012 - last comment - 17:08, Thursday 17 May 2012(2884)
8:39 AM local -> Start of pumping YBM


Comments related to this report
gerardo.moreno@LIGO.ORG - 17:08, Thursday 17 May 2012 (2892)
Pumping was stopped overnight, system is not designed to run unattended, will restart early tomorrow.  Pressure at 1.74 torr.
X1 DTS
david.barker@LIGO.ORG - posted 08:16, Thursday 17 May 2012 (2883)
LHO DAQ Test Stand Construction Begins
Rolf, Dave, Richard, Jim,

we started construction of the new LHO DAQ Test Stand (DTS). It is denoted as a X1 system. It is being installed in the H2 EE building on the AC power side (repurposing two DC power supply racks). Currently we are installing the boot machine, network, NAT router, timing fanout, IRIG-B, DAQ data concentrator and one front end.
H1 PSL
david.barker@LIGO.ORG - posted 08:12, Thursday 17 May 2012 (2882)
psl frontend able to close shutter
We tested that the H1 PSL PMC model is able to remotely close the shutter by sending an EPICS command to the Beckhoff IOP/OPC. This feature did not work for the H2 PSL when it was running an earlier version of RCG. We (LHO CDS) would prefer that this communication be via a dedicated cable rather than relying on the ethernet network.
X1 SEI
hugo.paris@LIGO.ORG - posted 16:52, Wednesday 16 May 2012 (2881)
HAM-ISI GS13 shippment #3759 - Huddle Test

Jim, Corey, Hugo

The shipment #3759 from LLO contained:

They were all huddle tested, and validated. Spectra are attached.

3 of these 5 hortizontal GS13s were installed on HAM-ISI Unit #5, to replace the non-validated testing pods (aLog #2843)

The vertical GS13s will be installed on HAM-ISI Unit #6 which is currently being assembled.

Non-image files attached to this report
LHO General
cheryl.vorvick@LIGO.ORG - posted 16:05, Wednesday 16 May 2012 (2880)
OPS Summary:
- door went on BSC8 - dust counts spiked during the activity, but no more than would be expected
- lots of activity at BSC6: viewports removed for cleaning, aLigo flooring installed, other work inside the chamber
- during the safety meeting, the dust monitor at EY, that's in the clean room with BSC6, had numerous spikes in the dust counts, but it's not clear what activity is going on at the time

- end of the day:
Filiberto at EY
Gerardo put in a work permit for pumping on H2 ITMY tomorrow
H2 SUS
betsy.weaver@LIGO.ORG - posted 16:31, Monday 14 May 2012 - last comment - 11:41, Friday 25 May 2012(2848)
BSC6 To-Do list before closing up
Following is the list of items that need to be completed (in roughly the order below) before we can close this chamber.  Some of the items have been finished and are still on the list as markers for redlining the installation procedure.  Please add a comment if I have missed any steps

1) Electrical grounding checks - DONE
2) IAS SEI alignment complete, ISI & HEPI floating - DONE
3) IAS ETMy alignment Round 1 - DONE
4) TMS alignment - DONE
5) ESD continuity check
6) Clamp ETMy EQ stops
7) Reapply FirstContact to ETMy-HR and ERM-AR
8) Swap Flooring - Waiting for FTIR on new set, can slip down list but not beyond 14a.
9) Viewport in-situ cleaning (or swap if deemed necessary)
10) TMS OSEM alignment
11) Close the ring heater and set fiber guard to "nominal" position
12) Unlock ETMy, remove all TFE except TM line stops, and physically check for rubbing as per T1200213 (still drafting)
13) ETMy BOSEM alignment, factoring in buoyancy as per T1100616
14a) ETMy testing (See Phase 3a G1100693)
14b) IAS ETMy alignment again (if testing showed interference and suspension was adjusted to fix)
15) Repeat step 14 until all Phase 3a testing is complete - usually done in 3 rounds in order to clear all issues.  Note, IAS requires removal of ETMy-HR FC completely. 
16) TMS alignment check if needed
17) Lock down flooring nuts if loose
18) Set all EQ stops as per M1100256
19) Final FirstContact cleaning if needed
20) Remove TM line stops
21) Take pictures and count number of PEEK clamps
22) Set witness plates
23) Remove all tools
Shut the doors.
Comments related to this report
betsy.weaver@LIGO.ORG - 13:07, Wednesday 16 May 2012 (2873)

The good news is we're working down the list.  The bad news is, I added a few more items to the list.  Edited to reflect actual order:


1) Electrical grounding checks (moved down the list since it was DONE on the test stand, not on the chamber)

2) IAS SEI alignment complete, ISI & HEPI floating - DONE

3) IAS ETMy alignment Round 1 - DONE

4) TMS alignment - DONE

5) TMS OSEM alignment - moved up list since DONE

6) ESD continuity check

7) Clamp ETMy EQ stops - DONE

8) Reapply FirstContact to ETMy-HR and ERM-AR - (did not so ETM-HR since sheet was still somewhat intact) DONE

9) Swap Flooring - Waiting for FTIR on new set, can slip down list but not beyond 14a.

10) Viewport in-situ cleaning (or swap if deemed necessary)

11) SEI Electrical grounding checks

12) SUS Electrical grounding checks

13) Close the ring heater and set fiber guard to "nominal" position

14) Unlock ETMy, remove all TFE except TM line stops, and physically check for rubbing as per T1200213 (still drafting)

15) ETMy BOSEM alignment, factoring in buoyancy as per T1100616

16a) ETMy testing (See Phase 3a G1100693)

16b) IAS ETMy alignment again (if testing showed interference and suspension was adjusted to fix)

17) Repeat step 16 until all Phase 3a testing is complete - usually done in 3 rounds in order to clear all issues. Note, IAS requires removal of ETMy-HR FC completely.

18) TMS alignment check if needed

19) Lock down flooring nuts if loose

20) Set all EQ stops as per M1100256

21) Final FirstContact cleaning if needed

22) Remove TM line stops

23) Take pictures and count number of PEEK clamps

24) Set witness plates

25) Remove all tools

Shut the doors.

travis.sadecki@LIGO.ORG - 15:21, Thursday 17 May 2012 (2889)

Update to closeout checklist:

1) Electrical grounding checks (moved down the list since it was DONE on the test stand, not on the chamber)

2) IAS SEI alignment complete, ISI & HEPI floating - DONE

3) IAS ETMy alignment Round 1 - DONE

4) TMS alignment - DONE

5) TMS OSEM alignment - moved up list since DONE

6) ESD continuity check

7) Clamp ETMy EQ stops - DONE

8) Reapply FirstContact to ETMy-HR and ERM-AR - (did not so ETM-HR since sheet was still somewhat intact) DONE

9) Swap Flooring - Waiting for FTIR on new set, can slip down list but not beyond 14a.  DONE

10) Viewport in-situ cleaning (or swap if deemed necessary)  IN PROCESS

11) SEI Electrical grounding checks

12) SUS Electrical grounding checks

13) Close the ring heater and set fiber guard to "nominal" position

14) Unlock ETMy, remove all TFE except TM line stops, and physically check for rubbing as per T1200213 (still drafting)  DONE (PenRe has be relocked due to flag repair) Also, 1/4-20 x 3/4" vented screws installed for sleeve (these were overlooked in the making of this list).

15) ETMy BOSEM alignment, factoring in buoyancy as per T1100616

16a) ETMy testing (See Phase 3a G1100693)

16b) IAS ETMy alignment again (if testing showed interference and suspension was adjusted to fix)

17) Repeat step 16 until all Phase 3a testing is complete - usually done in 3 rounds in order to clear all issues. Note, IAS requires removal of ETMy-HR FC completely.

18) TMS alignment check if needed

19) Lock down flooring nuts if loose

20) Set all EQ stops as per M1100256

21) Final FirstContact cleaning if needed

22) Remove TM line stops

23) Take pictures and count number of PEEK clamps

24) Set witness plates

25) Remove all tools

Shut the doors.

travis.sadecki@LIGO.ORG - 11:41, Friday 25 May 2012 (2952)

Update to closeout checklist:

1) Electrical grounding checks (moved down the list since it was DONE on the test stand, not on the chamber)

2) IAS SEI alignment complete, ISI & HEPI floating - DONE

3) IAS ETMy alignment Round 1 - DONE

4) TMS alignment - DONE

5) TMS OSEM alignment - moved up list since DONE

6) ESD continuity check

7) Clamp ETMy EQ stops - DONE

8) Reapply FirstContact to ETMy-HR and ERM-AR - (did not so ETM-HR since sheet was still somewhat intact) DONE

9) Swap Flooring - Waiting for FTIR on new set, can slip down list but not beyond 14a.  DONE

10) Viewport in-situ cleaning (or swap if deemed necessary)  DONE

11) SEI Electrical grounding checks

12) SUS Electrical grounding checks

13) Close the ring heater and set fiber guard to "nominal" position DONE, AS MUCH AS IT CAN BE

14) Unlock ETMy, remove all TFE except TM line stops, and physically check for rubbing as per T1200213 (still drafting)  DONE (PenRe has be relocked due to flag repair) Also, 1/4-20 x 3/4" vented screws installed for sleeve (these were overlooked in the making of this list).  DONE

15) ETMy BOSEM alignment, factoring in buoyancy as per T1100616  DONE

16a) ETMy testing (See Phase 3a G1100693)  DONE

16b) IAS ETMy alignment again (if testing showed interference and suspension was adjusted to fix)  DONE

17) Repeat step 16 until all Phase 3a testing is complete - usually done in 3 rounds in order to clear all issues. Note, IAS requires removal of ETMy-HR FC completely.  DONE (PENDING FINAL SET OF TFS TODAY)

18) TMS alignment check if needed  IN PROCESS

19) Lock down flooring nuts if loose

20) Set all EQ stops as per M1100256  DONE

21) Final FirstContact cleaning if needed

22) Remove TM line stops

23) Take pictures and count number of PEEK clamps

24) Set witness plates

25) Remove all tools

Shut the doors.

Displaying reports 74141-74160 of 76956.Go to page Start 3704 3705 3706 3707 3708 3709 3710 3711 3712 End