Here we study the effect of thermal deformation on the SRCL detuning as we increase the input power. This work shows a more signifcant impact of the spherical aberrations and HOM thermal distortions on the SRCL detuning than the mode mismatch, or misalignment.
Building on the previous study of how mode mismatch affects SRCL detuning, I now turn to exploring the thermal effects on SRCL detuning. When laser light passes through optics, a small portion of it is absorbed, leading to some heating. This thermal absorption causes the optic to either physically deform or develop a refractive index gradient both of which can distort the wavefront. More background on this process is available.
A thermally distorted thin lens can be thought of as a combination of a quadratic lens term and a residual distortion that includes spherical aberrations and other higher-order modes. In FINESSE, we simulate this by generating an optical path difference (OPD) map based on the absorbed power. We then fit and subtract the quadratic component, which corresponds to the ideal thin lens (the effect explored in the earlier study). The remaining residuals represent the non-quadratic distortions we’re now interested in analyzing for their impact on SRCL detuning.
It’s important to note that in this model, the cavity geometry like, the radius of curvature remains unchanged. As a result, mode mismatch is not a factor in this part of the analysis.
These residual distortions have a stronger effect on detuning than the lensing term alone, as shown in the plots below. This model assumes 0.13 ppm absorption in the ITM coatings. The model fails to lock with higher absorption values. No thermal effects are applied to the ETMs in this analysis.
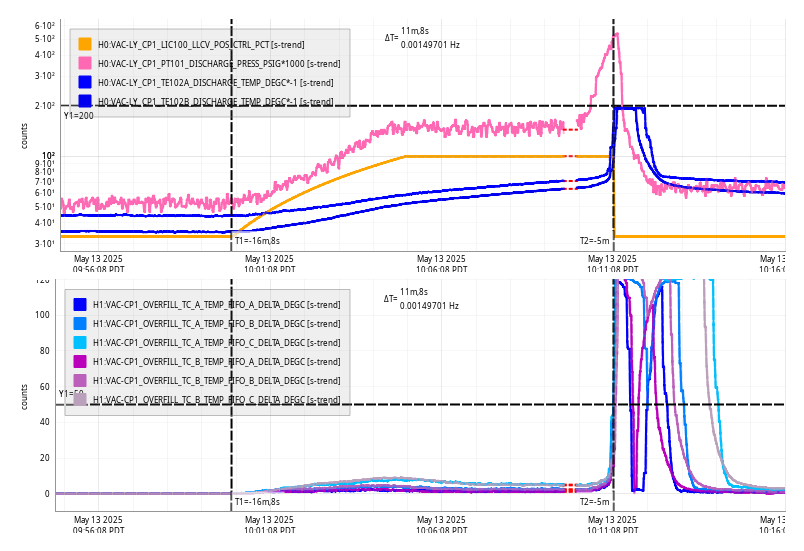
- The first plot shows how SRCL detuning changes as the input power—and thus the circulating power—increases from 10 W to 60 W. The right-hand y-axis shows the percentage change for reference.
- The second plot illustrates how the sensing functions shift with increasing power. These are normalized to their value at 100 Hz for easier comparison. When compared with earlier results, the impact of thermal distortion on the sensing function becomes clearly visible at low frequencies.


