Not sure how I did it, but I accidentally hit the back button on my browser while making an entry, and went back to see that the entry I was just about to post had vanished. :(
Here is the list of commissioning task for the next 7-14 days:
Green team:
Red team:
Blue team (ALS WFS):
Blue team (ISCTEY):
SEI/SUS team:
The ITMy lower ring heater had a busted edge as well as busted macor element connector. These pieces had broken during an adjustment earlier, but I suspect it was because the glass former is oversized compared to the macor element. The glass former and nichrome measured out at 0.281" while nominally the macor element that it seats in is 0.256". Trying to fit the pieces together caused the macor to start chipping and was going to obviously require a lot of force. It seemed like it would just cause the same problem all over again.
Jax, Stefan We verified that the whitening stage 1 of REFLAIR_A_RF45_I is indeed not switching on the analog side. We checked that the command bit (pin 25 / GND=pin 20) makes it to the board. Thus Jax will pull the board tomorrow and debug it.. Details: Rack: ISC R2 slot 32 S/N: S1101590 Assembly: D1002559 (board2)
Turns out we confused I and Q: in the electronics the Q channel comes before the I channel. Bottom line: the whitening board works fine. The Beckoff system does not switch line 33 on cable H1:ISC 56. I left a scope in the electronics room hooked up to that line.
On Friday I replaced the glass former that had broken on ITMx. After the glass former was replaced the ring heater was flushed and run in the airbake oven. The lower ring heater attached to the quad structure without incident. Cables were re-routed and tied down with stainless steel strips. Attached are the install photos.
The ITM03 test mass and it's PUM-ETM01 have been installed in the lower structure and the lower structure has been parked in the fiber weld cleanroom. Equipment setup is almost complete. We anticipate firing up the CO2 welder tomorrow.
Laser Status: Output Power : 28.2w FRONTEND Watchdog green HPO WATCH is red (High Power Oscillator Offline) PMC: Locked for : 0d 23h 16m Reflected power : 1.3w Power Sum : 11.7w FSS: Locked for : 0d 0h 1m ISS: Diffracted power : 5.8% (recovering from sat event) Last Saturation Event : 0d 0h 8m
Mitchell and I added 200lbs to the HAM now holding 800 lbs. The 50lbs in the middle is sitting on the 600lb leg element on four 1/16" thick viton pads. The three other 50s are on the ISI Optical Table but we couldn't get them to be non-rocking, two imperfect planes... So we turned the masses over and set them on just three pads.
Next step, unlocking, torquing, cabling, TFs.
On friday, I had a chance to test the Y2Y UIM filter, by taking an open loop transfer function driving in yaw from uim and looking at the test mass optical lever. The open loop looks as expected, falling at 1/f^2 after a resonnance at 0.6Hz. The attachement shows the open loop without vs with the filter.
[Stuart A, Jeff B] Templates have been committed to the sussvn for the H1 TMSY (TMTS) suspension, derived from L1 TMSX, as follows:- 2014-03-24_0900_H1SUSTMSY_M1_WhiteNoise_L_0p01to500Hz.xml 2014-03-24_0900_H1SUSTMSY_M1_WhiteNoise_T_0p01to500Hz.xml 2014-03-24_0900_H1SUSTMSY_M1_WhiteNoise_V_0p01to500Hz.xml 2014-03-24_0900_H1SUSTMSY_M1_WhiteNoise_R_0p01to500Hz.xml 2014-03-24_0900_H1SUSTMSY_M1_WhiteNoise_P_0p01to500Hz.xml 2014-03-24_0900_H1SUSTMSY_M1_WhiteNoise_Y_0p01to500Hz.xml These can be made available by svn'ing up the /ligo/svncommon/SusSVN/sus/trunk/TMTS/H1/TMSY/SAGM1/Data/ directory. Let me know if there are any issues with their use. n.b. the reference included in these templates is for L1 TMSX at Phase 3b (in-vacuum) of testing.
Thanks for adding those Stuart !
We have accumulated for ~5 days on Y1. Plot attached. Kyle will start to analyze the RGA data this week.
model restarts logged for Sun 23/Mar/2014
2014_03_23 10:44 h1broadcast0
2014_03_23 10:44 h1fw0
2014_03_23 10:44 h1fw1
2014_03_23 10:51 h1broadcast0
2014_03_23 11:19 h1dc0
2014_03_23 11:21 h1broadcast0
2014_03_23 11:21 h1fw0
2014_03_23 11:21 h1fw1
2014_03_23 11:21 h1nds0
2014_03_23 11:21 h1nds1
2014_03_23 11:36 h1broadcast0
2014_03_23 11:41 h1broadcast0
2014_03_23 11:43 h1broadcast0
2014_03_23 14:29 h1lsc
2014_03_23 14:32 h1lsc
All restarts were expected. h1lsc due to DAQ issues, h1broadcast0 has memory swapping issues.
The COMM guardian now has states to lock the IR to the arm using the refl bias path, I will leave this running overnight.
Measuring the COMM noise with the refl DC bias path engaged gives repeatable results, while we did not repeatable results without it. However, something seems to be wrong with our calibration. Today, when the refl bias path is not engaged we wander over the peak in about 10 seconds, and all th way off resonance, so we know that the COMM noise is at least a fwhm of the IR resonance in the arm, 164Hz.
When we lock the refl bias path, measure a spectrum and correct for the gain of the refl DC bias path, the rms should be the noise of the refl bias path. However, we are consistently measuring a noise around 35 Hz (with cavity pole corrected for) or around 9 Hz without taking out the cavity pole. However, we know this is wrong.
At least with a repeatable measurement we can evaluate what make the noise worse and better, even if we don't yet trust the calibration. Attached is a plot of the COMM noise measured with refl DC bias engage, the gain of that path corrected for but not the cavity pole. In the blue trace the OpLev damping was on for both pitch and Yaw, in the green trace the pitch damping was off on both the ETM and ITM. The coherence are shown in the bottom panel, the solid lines were measured with no damping, the dashed lines with damping.
With the damping on, the noise at 0.45Hz is reduced by a factor of 5.5, although it doesn't seem to change the rms much in this plot.
The green trace was measured with lower bandwidth because the lock was not lasting more than a few minutes today, especially with the damping off.
Correction:
The arm cavity pole is 42 Hz, not 82 (that was the HIFOY number)! This noise measurement seems more reasonable with that in mind.
Thank you Ryan.
Dave O, Stefan While attempting to lock the PRC we noticed that POB_Air_B_RF_I_Err was low on signal. We traced this back to a low de-mod signal (see attached plot). We traced this down to a tripped fused in the ISC_R2_Rack. This tripped on the 17th March. We tried to reset it but it simply re-tripped again. When we locked PRX and PRY, we were also surprised that we needed to flip the feed-back sign in PRCL to lock on the carrier (compared to the settings the LSC guardian uses).
I assume by fuse you guys mean breaker right? I can't tell if this unit is now functional (as might be implied by successful locking mentioned in this post) or still problematic. I would like to understand this better in case it points to a potential flaw somewhere.
The negative regulator had the kapton insulation material under it not the gray that works. The -15 was shorting to the case. We replaced both +-15 insulating material. Unit was restored and is functional.
Unit D0902796 Serial Number S1000977 had insulation for both positive and negative regulators replaced.
(Sheila, Daniel)
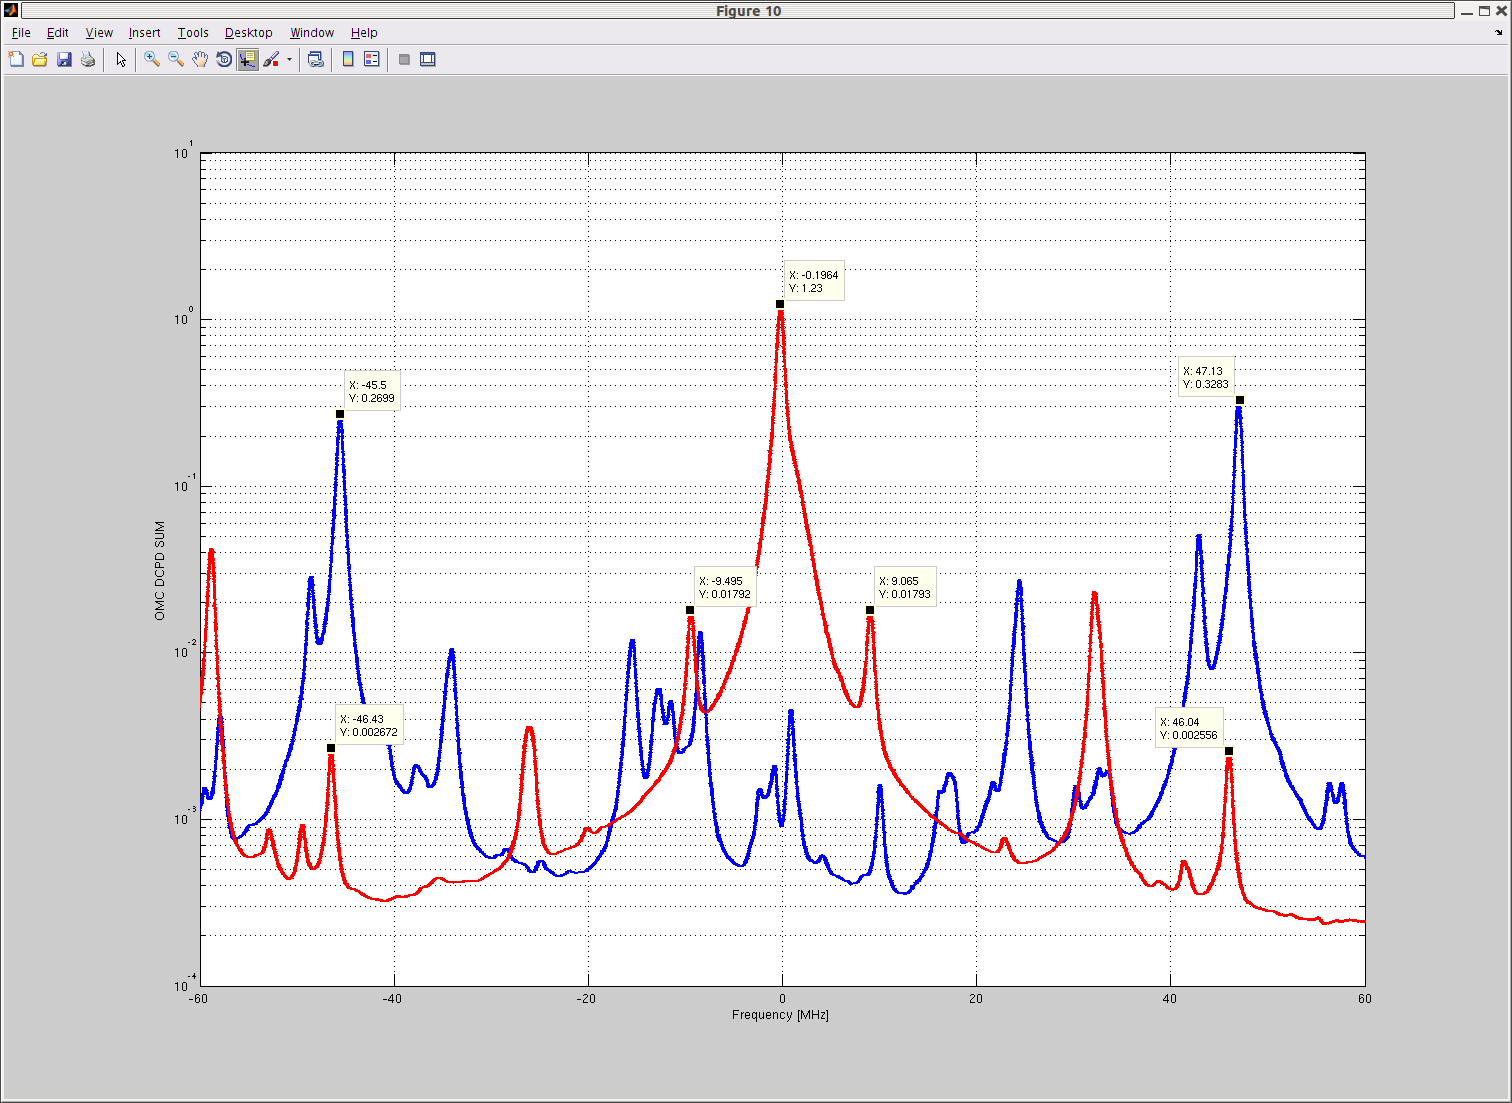
We used the normalized PDH signal to feed back to the additive offset of the common mode servo which in turn moves the mode cleaner and the laser frequency. The loop bandwidth was 20Hz with a 1/f shape. This kept the red laser light on resonance in the arm cavity for good. We then swept the offset of the normalized PDH error signal to scan the cavity resonance. The attached plot shows the sweep. It took about 20 seconds. The FWHM as measured by the red transmitted light corresponds to 49.7 units. However, it should be 165Hz. The calibration factor was set to 0.208 (from 0.063).
This measurement was made with 2 stages of whitening on REFL_9 and 36dB of whitening gain.
In the refl DC bias path we used a gain of 50, 6dB input gain on the common mode board input 2, with negative polarity. We has the boost on the COMM PLL off, and used common compensation on the common mode board.
Attached is the measurement of the gain in the DC bias path.
The cavity pole is really 42 Hz, so the calibration should be set to 0.106.
We mounted the second green Faraday on a 4-axes mount and reworked the Green injection path to make the beam shape less clipped. We needed to go close to the edge of the EOM and Faraday aperture to get the best beam quality.
As for the EOM, the best beam shape was achieved when the beam is very close to the top edge of the output aperture, maybe it was already touching the hole. We backed off the height adjustment screw (closer to the output) of the EOM mount by half turns so there's no apparent clipping but it's still very close. With this backed off position the beam shape was not as good but we called it good anyway as we couldn't do anything about it.
Anyway, since the center of the aperture for Faraday as well as EOM is NOT the best position as far as the beam quality is concerned, Faraday and EOM should be on adjustable mount. The first Faraday is still fixed, and this means that the beam is not horizontal along the beam path through the first Faraday, which is OK but not ideal (e.g. the beam is not completely centered on the first lens).
We still don't know if this new beam path arrangement is any better or worse than before.
We took some beam profile measurements, which Sheila will post later. Quality of the injected beam is better, the beam coming back to WFSA looked better than before, WFSB was worse.
Our measurements from this afternoon are attached...
apperature 1 was horizontal for hese measurements, apperature 2 vertical