The past two weeks Camilla has run multiple tests on the ring heaters (73093, 73272, 73289 , 73308), so I updated mag_phase_plotter.py and used it to compare these tests.
It is now easier to add/compare different tests+times with mag_phase_plotter_v1.1.py and the txt file it references, mag_phase_plotter_inputs.txt. Both are currently found in /ligo/gitcommon/labutils/mag_phase_plotter.
Note: We had to replace the LSC-POPAIR channels so we replaced them with LSC-POP_A_RF{9,45} channels for now, and it looks like RF45 is not useful for us when looking at the ring heaters. This will be changed out as soon as we find a better channel.
Comparisons(pdf):
| Name of Test |
Date |
Description |
| Normal power up control case |
10/02/23 |
Normal power-up & thermalization at our nominal ring heater setpoints |
| ETMs difference test |
09/29/23 |
ETMX upped by 0.1, ETMY lowered by 0.1 (73093) |
| ITMs vs ETMs Test |
10/04/23 |
ITMs upped by 0.1W each, ETMs lowered by 0.1W each (73272) |
| Back to nominal from ITMs vs ETMs Test |
10/04/23 |
ITMs lowered to nominal, ETMs upped to nominal (73272) |
| ETMs Increase Test |
10/05/23 |
ETMs both increased by 0.1W(73289) |
| ITMs Increase Test |
10/06/23 |
ITMs both increased by 0.05W (73308) |
| Back to nominal from ITMs Increase Test |
10/06/23 |
ITMs both decreased back to nominal (73308) |
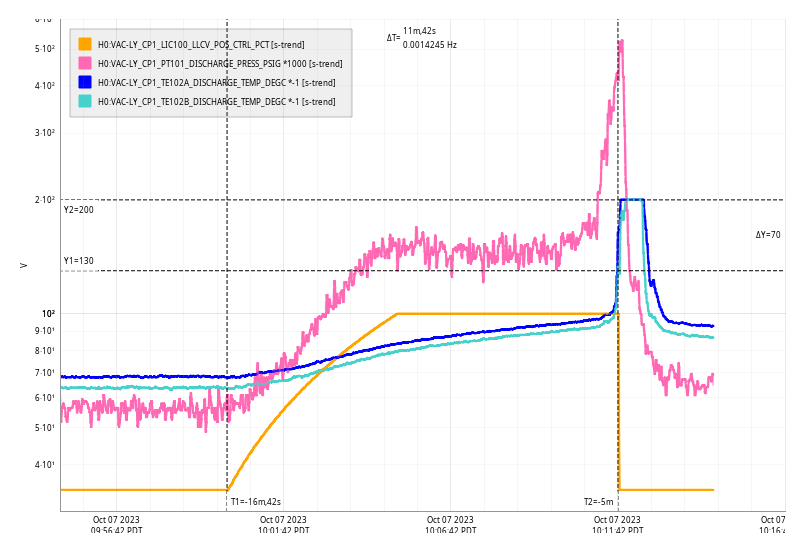


Unfortunately, had a lockloss at TRANSITION FROM ETMX (0334utc). Currently on our way back up at ENGAGE ASC.